USB connectivity that is so very very small

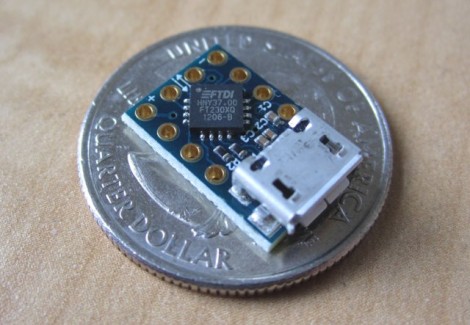
Using FTDI chips as a USB to Serial solution is nothing new, but this MicroFTX board takes the footprint to a new low. If you’re space limited this should have no problem fitting into your project. But if you plan to use it for prototyping we predict it’ll be lost in the parts bin forever as soon as you take your eyes off of it.

The USB Mini-B connector is becoming quite popular with hobby electronics these days. But here [Jim Paris] chose to use its little brother, the USB micro connector. Want to put this together by hand? How are you with 0402 footprints and QFN chips? In fact, there’s a ground pad on the bottom of that IC which means you really need to use a reflow oven to do the job right.

Aside from the diy-unfriendly fabrication size, we do like the design. There are four output pins (voltage, ground, TX, and RX) with a set of four solder jumpers to configure them. It can be powered from the USB port or an external connection, with the option for 5V or 3.3V output.

[Thanks John]

16FUSB — it's like V-USB for the PIC 16F628

If you have an idea for a fairly simple USB device but don’t want to invest in the more expensive microcontrollers, this library will be of interest to you. It’s a software implementation of the low-speed USB protocol for PIC 16F628. You can pick these up for around $2, and it just takes a few other components to complete the circuit. And hey, you don’t even need a proper PIC programmer to flash the code. This is the same chip for which we just saw an Arduino act as the programmer.

The circuit design looks exactly the same as the V-USB stack, which provides USB functionality to lower-end AVR microcontrollers. In addition to the chip you need a crystal oscillator, a couple of 3.6V zener diodes, and a handful of passive components. There are a couple of LEDs in the design, but we assume these are for feedback and are not crucial to the functionality of the circuit.

There’s no shortage of data included in the project post so you may want to bookmark this one for later reference.

GPIB connectivity twofer

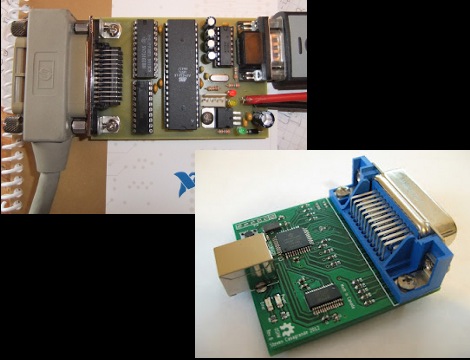
Dust off that old GPIB hardware and hook it up to your modern computing platform using either of these two solutions. If you haven’t a clue what we’re talking about you probably don’t own any fifty-year-old test equipment. But the General Purpose Interface Bus (aka IEEE-488) was fairly common on 1960’s era test equipment like multimeters and logic analyzers.

[Sven Pauli] is responsible for the RS232 GPIB interface board (translated) in the upper left. It uses an ATmega16 and a couple of classic bus driver chips to get the job done.

To the lower right is a USB to GPIB converter board that [Steven Casagrande] developed. This one is PIC based, using the 18F4520 and an FTDI chip to handle the USB side of the equation.

Check out the connector that is used for this protocol. We’d bet that’s not the easiest part to source. But at least now you’ll know what you’re looking at when pawing through the flea market offerings.

Those USB TV tuners used for SDR can also grab GPS data

Talk about versatile hardware. These inexpensive TV tuner dongles can also grab GPS data. You may remember seeing this same hardware used as a $20 option for software defined radio. But [Michele Bavaro] decided to see what other tricks they could pull off.

Would it surprise you that he can get location data accurate to about 20 centimeters? That figure doesn’t tell the whole story, as readings were taken while the dongle was stationary for three hours, then averaged to achieve that type of accuracy. But depending on what you need the data for this might not be a problem. And [Michele] does plan to implement real-time GPS data in his next iteration of the project. He plans to use an SDR acquisition algorithm to measure doppler shift in accounting for the slow clock speed of the dongles compared to standard GPS receivers. We can understand how that would work, but we’re glad he has the skills to actually make it happen because we’re at a loss on how the concept could be implemented.

[via Reddit]

Automated turntable photography

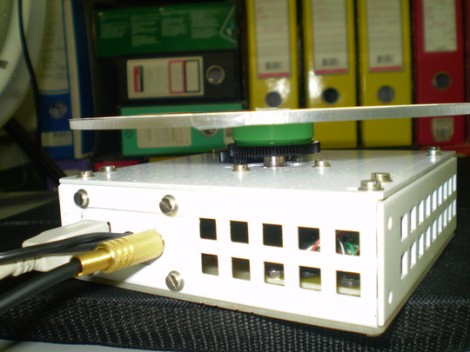
[Muris] has a friend who is selling items on the internet. This friend wanted a simple way to make rotating images of the products and asked him to help. The result of his labors is this base unit that drives the turn table and controls the camera.

The first iteration of the turntable was powered by the stepper motor from a floppy drive. A disc was mounted directly on the motor spindle, but the results were a bit poor. This is because the motor had a fairly low resolution of 200 steps per rotation. That doesn’t allow for smooth animation, and there was a lot of vibration in the system. An upgrade to the geared system you see above included swapping out that motor for one from an old scanner. Now it achieves 1200 steps per rotation and the vibration is gone.

The connectors seen in the base are USB, incoming power, and shutter control. [Muris] wrote a program to control the PIC 16F628A inside the base. The program sends commands via USB and has parameters for number of frames per rotation, direction of rotation, and the like. Set it up as desired, place the product on the turntable, and hit start. Unfortunately there’s no video of this in action because [Muris] gave it to his friend as soon as it was finished. We guess the fact that he didn’t get it back means it’s working great.

If you don’t mind some rough edges and exposed wiring you can throw a system of your own together pretty quickly.

PS3 IR dongle tamed for use with a Linux box

So a man walks into a Radio Shack and the clerk says “Why the long face?”. No, that’s not it. [Ms3fgx] walks into a Radio Shack and says “holy crap, that PS3 IR dongle is only two bucks”. He’s been looking for an IR remote receiver to use with a Linux machine and decided to bend this PS3 dongle to his will. It’s a lot less expensive that the parts to build the simplest IR receivers like this FTDI cable version, or a microcontroller based receiver.

He plugged it in and was delighted to find that it enumerates. The kernel has PlayStation 3 controller support built-in and has no problem picking up this device. When he uses ‘cat’ to display the incoming data all he gets is repetitive garbage. This is because the dongle only supports Sony remote control codes. But after a bit of universal remote setup, he’s got unique commands for each button. The last piece of the puzzle is to map the controller commands to keyboard keys. This is done with the QJoyPad package, but there are a myriad of ways to remap these buttons so go with what you know.