Metal detection using an inductor instead of a clock crystal.

This project from a few years back is an interesting take on a metal detector. Instead of building a detection circuit, [Bruno Gavand] replaced the external clock crystal with an inductor. Here you can see the inductor coil next to the PIC 12F683. You can see two components jumping from one breadboard to the other. These are smoothing capacitors on the inductor lines.

The watchdog timer for the chip is run by the internal RC oscillator. When the external crystal receives a pulse due to metal inducing a current in the coil, the value of the watchdog timer is compared to it. This data is filtered and if the proper parameters are present the green LED blinks. This is bicolor LED. If the inductor circuit is functioning properly it will blink red at power up. [Bruno] says that results will vary based on that inductor so you may need to try a few to get the calibration light to blink.

We’re thinking this would make a simple stud finder (by detecting where the nails/screws are in the wall). Check out the demo after the break, then let us know what you would use this for by leaving a comment.

[Read more…]

16FUSB — it's like V-USB for the PIC 16F628

If you have an idea for a fairly simple USB device but don’t want to invest in the more expensive microcontrollers, this library will be of interest to you. It’s a software implementation of the low-speed USB protocol for PIC 16F628. You can pick these up for around $2, and it just takes a few other components to complete the circuit. And hey, you don’t even need a proper PIC programmer to flash the code. This is the same chip for which we just saw an Arduino act as the programmer.

The circuit design looks exactly the same as the V-USB stack, which provides USB functionality to lower-end AVR microcontrollers. In addition to the chip you need a crystal oscillator, a couple of 3.6V zener diodes, and a handful of passive components. There are a couple of LEDs in the design, but we assume these are for feedback and are not crucial to the functionality of the circuit.

There’s no shortage of data included in the project post so you may want to bookmark this one for later reference.

Arduino PIC programmer writes to 18F family

[Kirill] wrote in to share his Arduino-based PIC programmer. It is capable of writing to the 18F family of chips, including 18F2XXX and 18F4XXX. We think that’s pretty exciting because this line of chips has USB functionality and there are bootloaders out there that let you program them via USB. So if you wanted to build your own PIC dev-board (like this one) you can use your Arduino to flash the bootloader.

This post comes hot on the heels of the Arduino being used as a PIC 16F programmer. That hack has a rudimentary programming GUI, something that [Kirill] admits his lacks but has no plans to implement himself. Perhaps someone will do a little porting work to merge the projects, adding to the range of chips supported by this programming technique.

Arduino can program PIC too!

This is a wiring diagram that [Soranne] put together when developing a method of programming PIC microcontrollers using an Arduino board. You can see that he takes care of the 12V issue by connecting the Master Clear (MCLR) pin to an external source. This comes with one warning that the Arduino should always be reset just before making that connection.

He’s tested this with a 16F628 and is happy to report that he can successfully flash the program memory, but hasn’t implemented a way to write to the EEPROM as of yet. This should work for any of the 16F family of chips, but we’d bet this will be extended if some knowledgeable folks decide to lend a hand.

On the PC side of things [Soraane] has been working on a program to push code to the Arduino via the USB connection. He’s developing it in C# and even has a GUI worked up for the project. You can get your hands on the software in the second post of the thread linked above but you’ll have to be logged into the Arduino forum to see the download link.

We think the 12V issue is why we don’t see more roll-your-own programmers for PIC. But there are a few solutions out there like this ATmega8 version.

Receiving asynchronous data bursts

[Johan’s] been working on a chunk of code for about seven years and he thinks it’s ready to help you with your next project. He calls it D1 (The One) and it lets you receive asynchronous data without the need for a hardware USART. It’s capable of working with signals from an IR or RF remote, as well as tangentially related transmissions like RFID and magstripe readers.

It uses timer and port interrupts to sample the incoming data. Once it’s captured a transmission, the code sets a flag so that you can pull what it got into your own application. If you’re expecting to receive a protocol that sends packets several times in a row a verification module is also included which runs as a precondition of setting the received flag. The package is written in PIC assembly, but with all the information that [Johan] included in his post this shouldn’t be hard to port over to other chip architecture.

Tiny N64 controller comes with hand-cramp guarantee

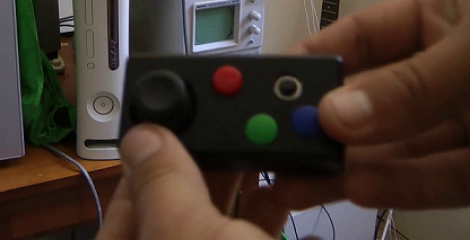
Just looking at this little thing makes our hands ache. But [Kirren] did do a great job of building an N64 controller inside a tiny project box. It’s not a mod, but a ground-up build based on a PIC 16F628 microcontroller.

It has most of the buttons found on a standard controller, and he assures us that you can play most games without missing the ones that didn’t make it into the design. You can just make out the analog stick to the left, but that silver ring on the right is actually a 4-direction tactile switch which stands in for the C buttons. He’s also included Start, A, B, R, and Z.

The link above goes to his Wiki, and there are more than enough details if you’re interested in doing this yourself or just understanding how everything works. Check out his writeup on the protocol, and  you can even get a copy of his code. There’s also a video demo after the break which shows [Kirren] playing some Bond with the controller. [Read more…]