Your mug on an Etch a Sketch — automatically

[Jim’s] pretty serious about his Etch a Sketch. He’s gone to the trouble of building a rig that will automatically render a photograph as Etch a Sketch art. Do you recognize the US political figure being plotted in this image? He actually cracks these open and removes all of the internals to preserve the artwork when the reassembled body is ready to be hung on a wall. But we like it for the hacker-friendly interface techniques he used.

He moves the knobs using a pair of stepper motors. They attach thanks to a pair of 3D printed gears he modeled which go over the stock knobs and secure with four set screws. He says he can be up and printing in five minutes using these along with the MDF jig that holds the body and the motors.

He converts photos to 1-bit images, then runs them through ImageMagick to convert them into a text file. A Python script parses that text, sending appropriate commands to an Arduino which drives the motors. The image is drawn much like a scanning CRT monitor. The stylus tracks one horizontal line at a time, drawing a squiggle if the pixel should be black, or skipping it if it should be white.

We wish there was a video of the printing process. Since we didn’t find one, there’s a bonus project unrelated to this one after the break. It’s an Etch a Sketch clock.

[Read more…]

Arduino compatible home automation for smart phone or voice control

[Joseph] wrote in to share this home automation system he’s working on as a college project. He calls it the Room Engine and the house-side of the hardware is built on top of the circuit you see here. This is the most basic part of the REBoard, which is meant to connect to a computer uses RS232 or USB, and in turn use a set of relays to switch mains voltage devices.

You can follow the bread crumb on his webpage to get a broader video of the system. The interface is designed to use two parts. One is a voice recognition system that is supported by the computer. The other is an iOS interface that includes login credentials and a button-based control system. The video after the break shows off the smart phone portion of the controller. We think he’s done a good job of integrating a few appliances without the need for commercial products such as X10 modules.

If you’re just interested in switching a few things without cord’s reach of each other this can get it done, and offers scheduling functionality. It would also be pretty easy to set this up with a WiFi module and do away with the PC.

[Read more…]

More pins and more power with a DIY Sanguino

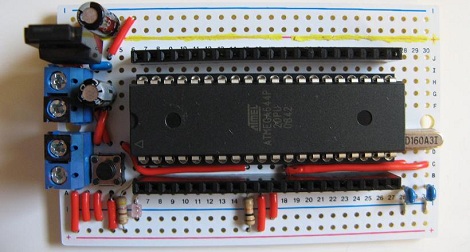
Not long after [CulinarilySpeaking] got into the Arduino game, he began to want more IO pins and a larger program space for more ambitious projects. This, of course, led him down the path towards the Sanguino, the ATMega644-based dev board with many more IO pins than Arduino boards based on the ATMega328. Instead of buying new, [CulinarilySpeaking] decided to make his own Sanguino, and the results look fantastic.

After coming across an ATMega644 while browsing for parts on line, [CulinarilySpeaking] found the micro that had enough power and pins to do some fairly complex stuff. A bunch of other people though about using this chip in the Arduino environment before, so all [CulinarilySpeaking] had to do was copy the circuit with the parts he had on hand.

After soldering all the components to the neat breadboard-style PCB, [CulinarilySpeaking] fired up the Arduino IDE and put the Blink example on the 644. Everything worked, so now there’s a board with much more power than a standard Arduino built with only $8 USD in parts.

via reddit

A much easier take on an Android garage door opener

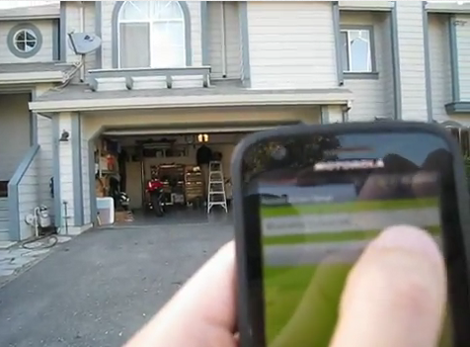
[Andy] is taking the complexity of a smartphone-controlled garage door down a notch with this project. He’s not interested in checking on the state of the door (open or closed) using a video feed, or in controlling the thing from anywhere in the world. He just wants to use his Android as the remote control and we say amen to that.

The circuitry in the garage is pretty simple. A relay is used to simulate a button press on the in-garage wired opener. This relay is driven by an Arduino which uses a Bluetooth shield for connectivity. Since his Android phone has a Bluetooth modem the rest of the project is just app development. As you can see in the video, the app automatically connects to the Arduino when it is launched, then waits for the button press to send the electronic equivalent of ‘Open Sesame”.

The project covers a series of posts so if you want to see how he got the app up and running make sure to browse through his archives. The next iteration for this app needs to be a background widget that enables Bluetooth, connects to the Arduino, and send s the open command all with one press.

[Read more…]

One wire reads the keypad from the APRS radio mic

[Shane Burrell] decided to spend some time learning how the keypad on the his Kenwood TM-710A APRS radio mic works. It uses a different technique than you might think. Normally a grid of buttons is scanned as a matrix to detect keypresses, but this hardware actually counts pulses on a serial wire to take each reading.

The stock radio sends a steady digital pulse to the handset and with each pulse the mic pulls the line low. It then uses a 4017 decade counter to see what comes back. If the edge count matches it means nothing is pressed, but a change in the number of pulses returning to the base unit can be used to extrapolate which button has been pressed.

[Shane] went on to implement this control technique using an AVR chip in place of the  radio base unit. He used the data gained from measuring the pulse behavior using an oscilloscope to write the firmware for the project. He filmed a bit of a demo after the break which shows his findings.

We’re not quite sure how this would translate into your own home-brew projects, but the thought of scanning a keypad with two pins of a uC is quite desirable. Sure there is the 555-timer frequency technique, but we’re always down with new ideas.

[Read more…]

RC car controller and receiver replacement

This radio controlled car controller replacement is a great project to try some new things with that fancy hardware you’ve got sitting around. The hack comes in two parts, the receiver and the transmitter. They’re communicating via Bluetooth so if you only want to build one side of the hardware you should be able to make most Bluetooth devices work as the other. For instance, build the receiver for the car and control it with a Wii remote. Or use the controller to play emulator games on an Android phone.

Both pieces are Arduino based. The controller makes use of a Freeduino with a Bluetooth shield as well as a pair of analog stick breakout boards. The car side of things uses a Bluetooth Bee (a Bluetooth module that is pin compatible with an Xbee socket) and an Arduino pro. Once the hardware bits are assembled, it takes very little code to get the system up and running. Join us after the break for a quick clip of the car in action.

[Read more…]