Your mug on an Etch a Sketch — automatically

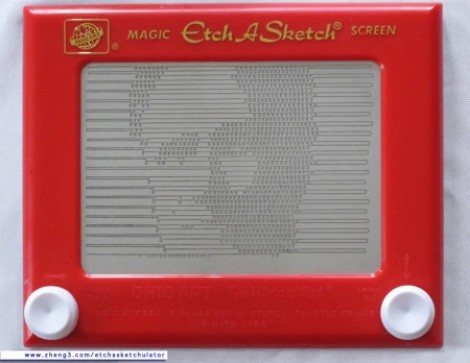
[Jim’s] pretty serious about his Etch a Sketch. He’s gone to the trouble of building a rig that will automatically render a photograph as Etch a Sketch art. Do you recognize the US political figure being plotted in this image? He actually cracks these open and removes all of the internals to preserve the artwork when the reassembled body is ready to be hung on a wall. But we like it for the hacker-friendly interface techniques he used.

He moves the knobs using a pair of stepper motors. They attach thanks to a pair of 3D printed gears he modeled which go over the stock knobs and secure with four set screws. He says he can be up and printing in five minutes using these along with the MDF jig that holds the body and the motors.

He converts photos to 1-bit images, then runs them through ImageMagick to convert them into a text file. A Python script parses that text, sending appropriate commands to an Arduino which drives the motors. The image is drawn much like a scanning CRT monitor. The stylus tracks one horizontal line at a time, drawing a squiggle if the pixel should be black, or skipping it if it should be white.

We wish there was a video of the printing process. Since we didn’t find one, there’s a bonus project unrelated to this one after the break. It’s an Etch a Sketch clock.
[Read more…]

Printing PCBs on a junked Epson printer

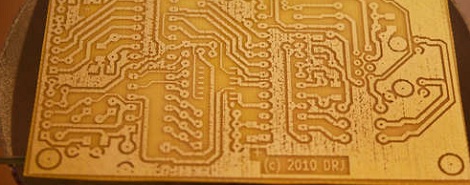
When it comes to making PCBs at home really quickly, there’s not much to improve upon with [Ryan]’s bodged up Epson printer that prints an etch mask directly on a piece of copper clad board.

Like most of the direct to copper PCB printer conversions we’ve covered ( 1, 2, 3 ), [Ryan]’s build relied on an Epson printer and Mis Pro yellow ink. The Mis Pro ink is one of the most etch-resistive substances that can be shot out of an inkjet printer, and Epson printer cartridges use a piezo pump that is perfect for squirting ink out on command.

After tearing the printer apart and lifting the print head a bit, [Ryan] needed a proper feed system to control where on the copper he was printing. He managed to make a board carrier out of a sheet of aluminum. By taping down the copper clad board, everything seems to work phenomenally.

After the break you can check out how fast [Ryan] can print out a fully etch-resisted PCB. It’s not improbable that he could produce a few dozen boards an hour; something our toner transfer PCB production method would kill for.

via makezine

[Read more…]

Separating a working scanner from its broken printer

The laser printer portion of this all-in-one machine gave up the ghost and [Entropia] couldn’t get it working again. But the scanner was still functioning so he decided to separate the scanner from its dead printer module.

The model in question is a Samsung SCX-4200. The design is actually perfect for separation because the scanner sits on top of the out feed tray of the printer. It can even be lifted to allow more room for printed pages to pile up. All he has to do is separate the hinged connector and reroute the flat cables. But the real question in [Entropia’s] mind was whether or not the control board would work without the laser printer components connected to it.

He carefully disassembled the unit, spilling toner here and there which is left over from a catastrophic knock-off toner cartridge incident. A quick test showed him that although the drivers complain that the paper tray is open, the scanner does still work. He glued the controller board seen on the left to the bottom of the scanner enclosure, and added some felt feet. Now his scanner is closer to the size you’d expect. And on the plus side he gained a geared stepper motor, laser scanning unit, exhaust fan, and a couple of solenoids to use in future projects.

Resetting the page count on a laser printer

[Brian] really liked his Samsung color laser printer right up until it was time to replace the toner cartridges. A full set of toner cartridges sell for about the same price as the printer itself, so [Brian] figured he could simply refill the toner in the cartridges he already has. The printer sends out the ‘low toner’ warning  based on page count and won’t print if the page count is too high, negating the economy of a toner refill kit. Luckily, [Brian] figured out a dead simple way to reset the page count so he can use those third-party refill kits.

All the configuration settings and page counts for the printer are stored on an I2C EEPROM. After dumping the data held on this EEPROM with an Arduino and sniffing everything going into the EEPROM with a Bus Pirate, [Brian] was nearly at his wit’s end. Thankfully, serendipity intervened. When [Brian] restarted the printer with the Bus Pirate attached, he noticed it took much longer to initialize. Printing a configuration report, he was trilled to see that all page counts have been zeroed.

The final hack that allows [Brian] to reset the page count and used refilled toner cartridges is a simple wire that ties the SDA line of the EEPROM to ground on boot. [Brian] used a momentary switch, but given this is a once-every-few-months operation, a simple wire would suffice. Check out [Brian]’s page reset demo after the break.

[Read more…]