Metal detection using an inductor instead of a clock crystal.

This project from a few years back is an interesting take on a metal detector. Instead of building a detection circuit, [Bruno Gavand] replaced the external clock crystal with an inductor. Here you can see the inductor coil next to the PIC 12F683. You can see two components jumping from one breadboard to the other. These are smoothing capacitors on the inductor lines.

The watchdog timer for the chip is run by the internal RC oscillator. When the external crystal receives a pulse due to metal inducing a current in the coil, the value of the watchdog timer is compared to it. This data is filtered and if the proper parameters are present the green LED blinks. This is bicolor LED. If the inductor circuit is functioning properly it will blink red at power up. [Bruno] says that results will vary based on that inductor so you may need to try a few to get the calibration light to blink.

We’re thinking this would make a simple stud finder (by detecting where the nails/screws are in the wall). Check out the demo after the break, then let us know what you would use this for by leaving a comment.

[Read more…]

DIY intervalometer uses a great looking enclosure

That finished look for your project is all about the enclosure you find to host it. We think [Punge] really did a great job with the case for this DIY intervalometer. The build section of the project page links to the company that makes the enclosures. They’re meant to host round PCBs with several options for button configuration. Combine this with enough space for a coin cell and you’ve got a great looking custom device.

The intervalometer itself is much like others we’ve seen. It uses an audio-jack connector to control the camera. You have the option of using a three or four contact version depending on what your camera supports. The PIC 12F683 uses an optocoupler with a built-in transistor to do the switching. A single button seen at nine o’clock on the board above is all it takes to start the device off. Press and hold once to wake it up, then wait for your desired interval and press the button again to start the timed shots.

You’ll notice that there is no programming head in this design. A separate board was etched to attach the PicKit, with the surface mount chip just held in place during programming.

Electronic candle protects sleeping infant

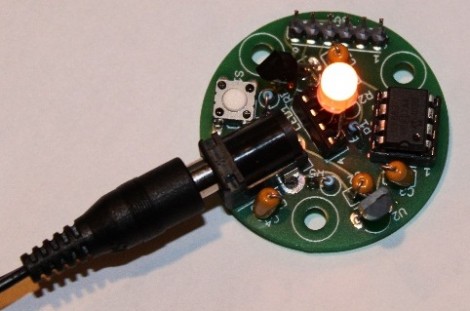
[William] developed this temperature candle as a tool to help keep babies safe as they sleep. It seems that ambient temperature has an effect on Sudden Infant Death Syndrome (SIDS). This device is meant to alert you when room temperature is outside of the recommended envelope.

The board hosts an eight-pin PIC microcontroller (12F683P), a temperature sensor, RGB LED, and a push button. The round PCB is the same size as a votive candle, which is nice except that you’re going to have to drill a hole in your candle holder to accommodate that barrel jack.

The temperature sensor is read by the microcontroller and used to determine the color of the LED. Red is hot, blue is cold, and just right is somewhere in between. But if you’d rather know the exact current temperature you can press the button and it’ll blink out the Celsius reading using blue for 10 degree increments (three blinks is 30 degrees, etc.) and red for single degrees. Don’t miss the demo of the candle in the video after the break.

[Read more…]