Measuring the capacities of different battery brands

Being the smart consumer he is, [Denis] usually looks at the price per pound when comparing similar products at the grocery store. When it came time to buy a few AA batteries, he didn’t have any data to go on. To solve his little conundrum, [Denis] decided he would test several brands of batteries and see which one gives him the most bang for the buck.

After bringing home a haul of a dozen different brands of AA cells, [Denis] broke out the Arduino and starting designing a circuit. To test how much energy each brand provides, the Arduino measures the voltage across a load every second until the battery reaches 0.2V. The elapsed time, as well as the voltage, Watt hours, Joules, and ambient temperature are logged on an attached LCD screen and sent over a USB serial link to automate the data collection process.

What’s the verdict? Unsurprisingly, words like ‘super,’ ‘max,’ and ‘ultra’ didn’t connotate a better battery. The best bang for the buck came from an off-brand called RS Power Ultra. The worst battery was the Panasonic Evolta cells that came in at about $1.50 USD per watt-hour.

If you’d like to verify [Denis]’ work, all the code is up on Github along with the schematic.

A simple project to get you started with the Android ADK

simple-adk-exercise

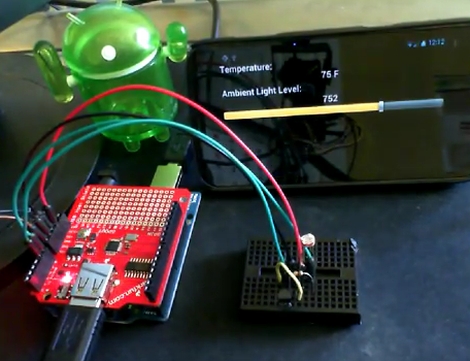
If you just got your hands on a shiny new Android phone and are looking for a fun project to try out, you might want to check out this simple Arduino exercise that [Mike Mitchel] put together. Everyone needs a starting off point for hacking, and [Mike] thought that combining and Arduino and Android handset together for the purpose of temperature sensing and light metering would be a great place to begin.

The prerequisites for this project are a bit beyond a simple breadboard and a few ICs, requiring an $80 Android ADK board to go along with your phone and Arduino. If your focus is going to be on interfacing your phone with microcontrollers however, it’s purchase you’ll make sooner than later anyhow.

The setup is pretty simple as you might expect. A photocell and TMP36 temperature sensor are connected to the Arduino, then with a bit of code and USB host magic, the Android app shows the temp and amount ambient light present in the room.

[Mike] has made all of his easy to read and well commented code available online, so be sure to check it out if you have been thinking about (but putting off) playing around with the Android ADK.

Quick and easy Arduino-powered theremin

[Martin] sent in a great guide to a simple Arduino based theremin. It’s a very small build – just a single common IC and some passive components – and easy enough to build in an afternoon.

The theremin is based on a simple LC oscillator built around a 7400 quad NAND gate IC, a wire antenna, and a few caps and resistors. When a hand moves closer to the antenna, the frequency of the oscillator increases; when a hand moves away, the frequency decreases. On the software side, the oscillator is connected to the internal hardware counter of the Arduino. Every time there’s a change in the voltage output by the oscillator (all the time, varying slightly with the distance from a hand to the antenna), the counter increases by one. This counter is tallied up over 1/10th of a second, and the distance from the instrumentalist to the theremin can be determined. From there, it’s just outputting a frequency to a speaker.

All the code, schematics, and board layouts are available on [Martin]’s guide, and most of our readers probably have the parts to build this lying around their workbench. You can check out a video of [Martin]’s theremin in action on his guide.

Make your RC car drive itself with this simple brain swap

arduino-rc-conversion

If the kids have lost interest in that RC car or truck you bought them over the holidays, [Randy Sarafan] from Instructables has a few ideas that might help make the toys fun again, while teaching your kids a bit about electronics in the process. In his writeup, he shows how to swap out the brains of your run of the mill RC truck, enabling it to do far more than was originally intended. The procedure is pretty simple, and something that you can easily involve your kids in, if you’d like.

He uses an Arduino and a motor shield to keep the conversion simple, but this can be done with just about any capable microcontroller you might have on hand. [Randy] added a Parallax Ping sensor to the front of the truck enabling it to avoid objects as it drives itself, but since he cut out the truck’s original control board we’re assuming that there’s no way to override the truck’s actions at present.

[Randy] calls the conversion a “robot” though it seems like more of a semi-autonomous rover if you ask us. Regardless, revamping an old RC car is certainly far better than letting it collect dust on a shelf, or worse, tossing it out during spring cleaning.

Continue reading to see a short video of [Randy’s] RC truck in action.

[via HackedGadgets]

[Read more…]

Auto-locking pet door ensures that your outdoor kitty obeys its curfew

auto-locking-pet-door

If you’ve got a pet that roams freely in and out of your house, you may find yourself wanting to more closely regulate how they come and go. [tareker] was looking to keep his cat indoors at night when dangerous animals might be lurking in the neighborhood, but he didn’t want it to become a hassle.

He already had locking pet door on hand, which he hacked to regulate the egress and ingress of his cat automatically. He installed a pair of reed switches to determine if the door had been opened outwards (cat leaving) or inwards (cat returning), keeping track of the state using an Arduino Nano. A servo motor attached to the door’s frame locks the door whenever it detects the cat is safely inside after nightfall.

While he also added an RGB LED to reflect the status of the door, he’s considering connecting it to the Internet so that he can control and check the door from wherever he might be at the moment.

DrummerBot joins the jam session when your bandmates are busy

drummerbot

It seems that more often than not, [Steffest] finds himself inspired to rock out on his guitar without a percussion section to back him up. Like any enterprising hacker/musician would be wont to do, he built a robotic drummer to join in when he got the urge to play.

His DrummerBot is driven using an Arduino, which is tasked with controlling the 8 servo motors that the bot has at its disposal. The bot’s drum set is composed of a variety of items from fan motors to pot lids and more. [Steffest] wanted the ability to produce the maximum variety of sounds possible, so most of the servo motors are driven in two directions allowing the bot to strike more than one item with each “arm”.

[Steffest] is a big fan of interfacing physical objects with a web interface, so he built a simple HTML based sequencer that allows him to program the robot from his phone. Once the sequencer is programmed, the DrummerBot can be launched into action with the simple press of a button.

[Steffest] says that the bot works pretty well, but the sound is a bit raw if you hear it live. A little Ableton Live post-processing goes a long way to smooth things out however, as you can see in the video below.

[Thanks, Wesley]

[Read more…]