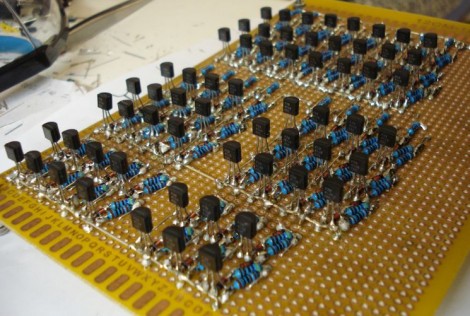
Building a computer with discrete transistors

You’re going to want to do some stretching before undertaking a soldering project like this one. We’re betting that the physical toll of assembling this 4-bit discrete processor project is starting to drive [SV3ORA] just a bit crazy. This small piece of electronic real estate is playing host to 62 transistors so far, and he’s not done yet.

It’s one thing to build some logic gates in Minecraft (and then turn then into a huge 16-bit ALU). But it’s another thing to actually commit to a physical build. [SV3ORA] does a great job of showing the scope of the project by posting a tight shot of one inverter, then three in a row, then the entire 8-bit address and display system. These gates are built on the copper side of the board, with the power feed, LEDs for displays, and jumpers for control on the opposite side. We’re excited to see where he goes with this project!

But hey, if you don’t want to do that much soldering there’s a lot you can do on a few breadboards.

Using diodes and transistors as solar cells

When you get down to it, solar cells aren’t much different from the diodes and transistors in your parts drawers or inside your beloved electronics. They’re both made of silicon or some other semiconductor, and surprisingly can produce electricity in the presence of light. Here’s two semiconductors-as-solar panel projects that rolled into the tip line over the past few days.

[Steven Dufresne] cut open a 2N3055 power transistor to expose the semiconductor material to light. In full sunlight, he was able to produce 500 millivolts and 5.5 milliamps. In other words, he’d need around 5000 of these transistors wired up to turn on a compact fluorescent light bulb. A small calculator has a much lower power requirement, so after opening up five transistors he was able to make a solar-powered calculator with a handful of transistors.

[Sarang] was studying solar cells and realized a standard silicon diode is very similar; both are p-n junctions and the only real difference is the surface area. He connected a 1N4148 to a multimeter and to his surprise it worked. [Sarang] is able to get about 150 millivolts out of his diode with the help of a magnifying glass. While he doubts his diode is more efficient than a normal solar cell, he thinks it could be useful in low-cost, low power applications. We’re thinking this might be useful as a high-intensity light detector for a solar cooker or similar.

After the break, you can check out the videos [Steven] and [Sarang] put up demonstrating their solar cells.

[Read more…]

LED tutorial demystifies several control techniques

Controlling LEDs is really quite simple. As you know, they need to be current limited which is as easy as applying Ohm’s law to your given set of values. To make things even more even there’s a slew of constant current LED driver chips out there that can be had for a song. But do you have any idea how those constant current circuits work? If not, then [Giorgos Lazaridis’] guide on LED driving and controlling methods will bring you up to speed in no time.

He starts out with the most basic concept, how to light an LED using proper current limiting resistors. But from there he moves on to the juicy bits. He builds a transistor-based constant current driver, then adds voltage regulation for the circuit as seen in the schematic on the left. He moves on to the more robust and efficient method on the right which pairs a MOSFET with that transistor circuit. This is the technique found on each pin of many of those constant current drivers and functions well regardless of the voltage input level.

He’s been producing videos to go along with these articles. After the break you can watch the episode that accompanies the schematic on the left. [Read more…]

Preheat alarm added to a basic kitchen oven

[Justin] didn’t want to keep checking if the ‘oven heating’ indicator light had gone off before popping his unbaked edibles into the oven. Many models offer a buzzer to let you know when the chosen temp is reached, but for folks who own a basic oven model there’s just a light that tells when the heating element is getting juice. Not to worry, he plied his circuit design skills and built a buzzer to alert him when the oven’s ready.

It only took a few components to accomplish the task. [Justin] uses a pair of NPN transistors triggered by a photoresistor. One transistor is responsible for switching on the buzzer, the other transistor is driven by the photoresistor and controls the base of its companion transistor (see the schematic for a better understanding).

He designed and etched a small PCB to host all the parts. As you can see above, it mounts over the indicator light and is powered by a 9V battery. There’s an on/off switch to the right so the buzzer doesn’t keep triggering while cooking, and a potentiometer allows him to fine-tune the photoresistor sensitivity.