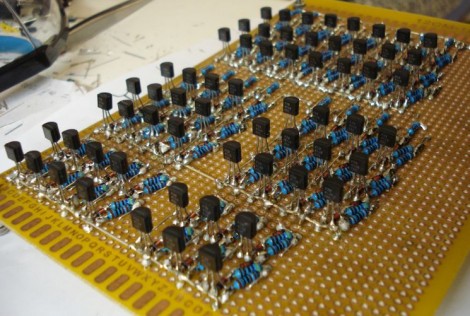
You’re going to want to do some stretching before undertaking a soldering project like this one. We’re betting that the physical toll of assembling this 4-bit discrete processor project is starting to drive [SV3ORA] just a bit crazy. This small piece of electronic real estate is playing host to 62 transistors so far, and he’s not done yet.
It’s one thing to build some logic gates in Minecraft (and then turn then into a huge 16-bit ALU). But it’s another thing to actually commit to a physical build. [SV3ORA] does a great job of showing the scope of the project by posting a tight shot of one inverter, then three in a row, then the entire 8-bit address and display system. These gates are built on the copper side of the board, with the power feed, LEDs for displays, and jumpers for control on the opposite side. We’re excited to see where he goes with this project!
But hey, if you don’t want to do that much soldering there’s a lot you can do on a few breadboards.


Inb4 “What is the point” and “Waa, waste of time, waa”
This is ace and everyone should think so.
Wow. I was actually working on this exact project a few months ago. And I figured out my logic in Minecraft even… Unfortunately I made some soldering mistakes and never finished.
People who say this is a waste of time are just afraid of the complexity of using discrete components. Try building a dig-clock with 1200 parts. You learn a lot more then using arduino with 5.
I cut my teeth with this sort of stuff in the early 60’s – 2N404A’s and 1N34A diodoes. The JK flip flops were fun to get working.
Oh, I forgot – if he had two diodes from the pullup resistor to the transistors emitters, it would give a bit more margin when he drives the input diode low to turn the transistor off.
opps – wish you could edit there comments – I ment transistors bases, not emitters.
Compared to redstone in Minecraft, that is. Looks like I messed up to quote tag.
And I thought, building a NE555 out of transistors is pointless..
Wow, just wow
Bonus points: Put LEDs on all gates and run it in single-step mode or at a low speed. A visual tool for instructors! Visual simulators on a PC is possible too but… just isn’t quite as good as an in-your-face circuit board that you can pick up and play with.
It would be awesome to see. Hell i would hang it on my way as art. 1 Hz clock and have it run a simple program.
I tried to do this back in high school but my breadboard wasn’t big enough. I only have enough space for a few logic gates and didn’t have a solid understanding discrete logic.
Nice!
I’ve thought about doing a discrete 4-bit CPU but I’m sticking with TTL for now. Once I have the bugs worked out in TTL, we’ll see about taking on a discrete version. That is a huge undertaking!
F’n awesome!!!
But careful there Mike, you’ll get excommunicated 😀
I’ve had a project like this in the back of my mind for a while but I’ve been putting it off because every time I think about it I realise how complex it’s going to be.
I’m glad there’s someone giving it a go.
Me want 🙂 I wanted to do exactly the same thing. Hope it will get to workable unit.
Hello there!
It all started by finding the Galactic electronics 4-bit CPU. It was so easy to understand how it worked, that I could not resist to build one. I am already building one with TTL like the author, BUT I am building the RAM as well as the EPROM using TTL as well. Now, that is a huge project already, if you realize that just the decoder for the ram takes 17 74ls154 to be made. I have not seen any homebrewer do it this way, they all seem to stick with out of the box RAM chips, because these are complex indeed.
Now imagine how this can be done transistorized, really this is huge! I do not think I will have the patience to make a 256 positions RAM, I think I will go for something like 32 or 64, but I will see how it goes.
But the resto of the computer is not really too tough. Some circuits, for example the clock, could be replaced by simpler ones (like a simple transistor multivibrator). Also for the EPROM, a diode matrix aproach could possibly be done.
I am glad you have fun seeing this project eventhough it is less than 1/20 finished 🙂