Sandbox topographical play gets a big resolution boost

Here’s another virtual sandbox meets real sandbox project. A team at UC Davis is behind this depth-mapped and digitally projected sandbox environment. The physical sandbox uses fine-grained sand which serves nicely as a projection surface as well as a building medium. It includes a Kinect depth camera over head, and an offset digital projector to add the virtual layer. As you dig or build elevation in parts of the box, the depth camera changes the projected view to match in real-time. As you can see after the break, this starts with topographical data, but can also include enhancements like the water feature seen above.

It’s a big step forward in resolution compared to the project from which the team took inspiration. We have already seen this concept used as an interactive game. But we wonder about the potential of using this to quickly generate natural environments for digital gameplay. Just build up your topography in sand, jump into the video game and make sure it’s got the attributes you want, then start adding in trees and structures.

Don’t miss the video demo embedded after the break.
[Read more…]

Digital gaming table made with no smoke, just a mirror

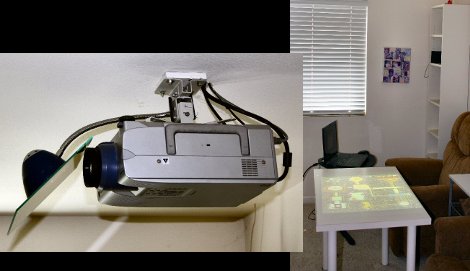
The concept of having a digital gaming table got stuck in [RobotGuy’s] mind over the weekend and he managed to whip this up in no time using materials on hand. He already had a ceiling-mounted projector which just happens to reside immediately above the space occupied by his coffee table. By swapping that piece of furniture out for a white Ikea table, and adding a mirror to the projector he now has the virtual gaming surface he was looking for. The mirror mount is nothing more than a desk lamp that includes a spring clamp and flexible neck. He hot glued the piece of mirror to this, and attached it to the projector’s ceiling anchor. Since rear-projection screens are common, all digital projectors have the ability to mirror and rotate the image being displayed so that it appears on the table in the correct orientation.

We love the look, but this is really only one portion of a digital gaming project. We think the table needs some interactivity. We often see this done using infrared light processed by a webcam. That multi-touch option is not going to work with a standard table since the camera needs to be on the opposite side of a translucent surface. But if you don’t mind using a stylus this IR whiteboard technique would work.

DIY film projector fits in the palm of your hand

altoids-pocket-projector

DSLRs aside, the price of digital cameras these days can make it easy to consider just tossing your old one out when it breaks. [Leonidas Tolias] had another idea, and with a few broken cameras he had on hand he constructed a slick little pocket-sized projector.

The project started out as a pair of lenses from busted cameras and an Altoids tin in which he mounted them. The larger lens from a video camera was installed on the exterior of the tin, while the smaller of the two was mounted inside. Bits from disposable cameras were used to create a set of film reels, which he supports with some hand cut scrap aluminum. He made some test photo slides by printing some images on transparency paper, which he can cycle through using a film advancement rig he built out of string and a couple of gears.

While you won’t be using this projector for your next boring PowerPoint presentation, it does work pretty well as you can see in pictures on [Leonidas’] site.

[Thanks, Taylor]

Snake-the-Planet makes a game board out of your surroundings

It’s Friday night and these guys are driving around town looking for a good spot to play a head-to-head game of Snake. It’s not that they need somewhere to sit (they travel with a couch and floor lamp for that purpose) it’s that they’re using a projector and camera to make a game out of their surroundings.

A white Mystery-Machine-style van has room for everything they need to make the traveling arcade happen. A mobile power supply provides juice to the camera and projector. To get started, the system takes a high-contrast black and white photo of the surface in front of it. Everything that appears below the white threshold becomes a wall on the game board, everything else is a playable area. Obstacles are formed by windows, doorways, pipes, signs, pieces of foam board the guys hang on a wall, and even your body if you stand in the way during scanning. From there the guys each grab a joystick and play the hacker-favorite game of snake.

After the break you can watch a description of how the system works. [Read more…]

Projector calibration on uneven surfaces made easy

projector-calibrator

If you are thinking of building your own flight/racing sim setup at home, you might want to check this out. [Alex] from the Garoa Hackerspace in Säo Paulo, Brazil put together a slick setup that makes projector image calibration a breeze.

When building a wraparound screen for such a simulator, you are likely to run into problems with both overlapping images and distortion from the curved projection. There are projectors that can easily adjust themselves to work in this sort of setup, but they are often very expensive, so [Alex] thought he would build a solution himself.

After studying a paper written by [Johnny Chung Lee] in 2004, he built a prototype display calibrator last year that used similar, though slightly tweaked methods to get the job done. This time around, [Alex] has improved his calibrator, making the process more precise and a bit quicker.

Light sensors and an Arduino are attached to the back of the projection medium, and a large broad scan of the screen is performed by the projector. His code then triggers an additional sweep of each corner to better estimate the exact edges of his projection surface. Since the video is tweaked in software rather than relying on the projector hardware to handle the task, the result is cheap and very accurate.

Don’t take our word for it though, check out [Alex’s] video demonstration below to see his calibrator in action.

[Read more…]

Projection screen using latex paint and sand blasting beads

This method of building your own projection screen is new to us. [Sean Michael Ragan] ran across some sand blasting material made up of minuscule glass beads at Harbor Freight and inspiration struck. He purchased a fifty-pound bag and set out to see if it could be used with regular latex paint to create a projection screen. The answer is an absolute yes, but results are dependent on how you apply it.

Now there is paint you can buy which will turn your wall into a projector screen, but it’s expensive. [Sean’s] hack isn’t a direct replacement as he found the results of just mixing the beads with paint and applying them to a vertical surface weren’t up to the standards he’s looking for. But if you build a screen to hang on the wall you can let gravity work for you. He laid the screen flat and applied a heavy coat of paint to the surface. He then sprinkled a heavy coat of the glass bead over the wet paint and let it dry. Finally he cleaned off the material which didn’t stick and hung it on the wall.

Don’t have a projector to use with this hack? No problem, just build your own.

[Thanks Skuhl]