HTML based AVR compiler aims to make Arduino development on iOS possible

It’s surprising what lengths people will go to in order to bring functionality to their smart phones. In this case, [Tadpol] wanted a way to develop for his Arduino on an iOS device like an iPad or iPhone. He figures it’s possible to rewrite the IDE as HTML5, but since that’s a pretty large mountain to climb, he started by building a browser-based AVR compiler. It’s an interesting concept, and he’s got a working prototype up on Github for you to test. Perhaps you can throw your hat in the ring and help him with development?

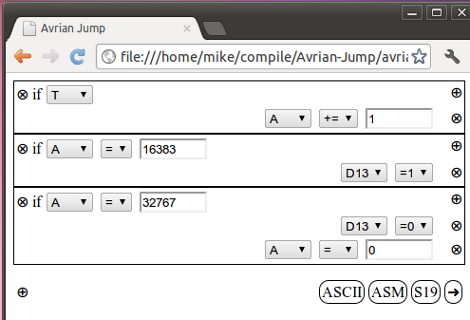
The web interface uses boxes to add to the code. What you see above is three sets of commands which will blink an LED. The project, named Avrian Jump, uses a simple ladder language to feed the compiler, with several different options for output. The most interesting in our mind is a WAV file which can be used to program an AVR from the audio out of your device. That would make programming as simple as connecting the specially modified AVR to your headphone jack. There’s also an ASCII output which allows you to save your programs for later alteration, S19 output for AVRdude programming, and an assembler output for debugging purposes. It’s hard to see where this project might go, but we have to admit that the concept is intriguing.

Playing chiptunes with a YM2149 and optimizing an Arduino

[Oryx] grew up with the bleeps and bloops of an Atari ST, so it comes as no surprise he would want to relish in his nostalgia by playing with the YM2149 sound generator he recently picked up on eBay. Like most of us, [Oryx] went to his old standby, the Arduino, when it came to connect this bare chip to his computer. The first circuit didn’t work, so after a lot of poking around the firmware, [Oryx] discovered the benefits of hand-optimizing software.

There are a lot of sound files available for the YM2149 floating around on the Internet. These files are just dumps of the 16 registers at 50Hz, so it’s very easy to send these from a computer to an Arduino over a serial connection. Unfortunately, when [Oryx] got his breadboard set up nothing happened. After breaking out the ‘scope, he discovered the Arduino was switching pins 100 times slower than the YM2149 data sheet called for.

[Oryx] remembered seeing a great blog post going over the speed at which the digitalWrite() function changes pin states. We’ve seen this before, and the fastest way to change pin states on the Arduino is with the ugly bitwise manipulation. After changing a few lines of code, [Oryx] was switching two pins nearly simultaneously.

Now that the YM2149 chip is working correctly, [Oryx] is planning to make a MIDI synth out of his project. You can get an idea of how that will sound with the demo video he put up after the break.

[Read more…]

Measuring the capacities of different battery brands

Being the smart consumer he is, [Denis] usually looks at the price per pound when comparing similar products at the grocery store. When it came time to buy a few AA batteries, he didn’t have any data to go on. To solve his little conundrum, [Denis] decided he would test several brands of batteries and see which one gives him the most bang for the buck.

After bringing home a haul of a dozen different brands of AA cells, [Denis] broke out the Arduino and starting designing a circuit. To test how much energy each brand provides, the Arduino measures the voltage across a load every second until the battery reaches 0.2V. The elapsed time, as well as the voltage, Watt hours, Joules, and ambient temperature are logged on an attached LCD screen and sent over a USB serial link to automate the data collection process.

What’s the verdict? Unsurprisingly, words like ‘super,’ ‘max,’ and ‘ultra’ didn’t connotate a better battery. The best bang for the buck came from an off-brand called RS Power Ultra. The worst battery was the Panasonic Evolta cells that came in at about $1.50 USD per watt-hour.

If you’d like to verify [Denis]’ work, all the code is up on Github along with the schematic.

Displaying bubbles in mineral oil

After he saw a ‘falling water display,’ [Matt] figured he could turn that idea on its head. He built a display that uses bubbles for pixels. Even though the build isn’t complete, we love the results so far.

[Matt] began his build constructing a tall, thin water tank out of acrylic. Eight solenoids were mounted in the base of the tank, attached to an aquarium air supply, plastic tubing, and one way valves. The first run of the bubble display didn’t go too well, but after adding dividers between each column the display started working.

With the dividers, [Matt] no longer had to worry about bubbles colliding or moving any direction but up. The bubbles weren’t moving consistently, so he replaced the water with mineral oil. Oil made a huge improvement, but the bubbles still float up at different speeds. [Matt] ascribes this to the unregulated air supply, but we’re thinking this problem could be mitigated with glycerine like the previous bubble display we saw.

It may still have some problems, but we love the result. Check out the video of bubbles in mineral oil after the break.

[Read more…]

A simple project to get you started with the Android ADK

simple-adk-exercise

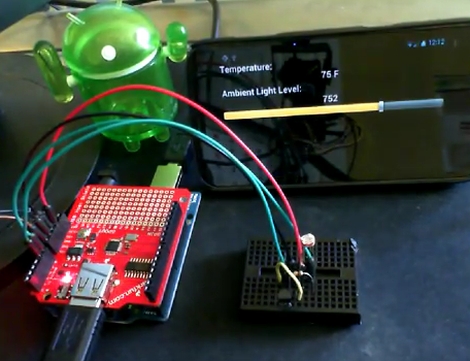
If you just got your hands on a shiny new Android phone and are looking for a fun project to try out, you might want to check out this simple Arduino exercise that [Mike Mitchel] put together. Everyone needs a starting off point for hacking, and [Mike] thought that combining and Arduino and Android handset together for the purpose of temperature sensing and light metering would be a great place to begin.

The prerequisites for this project are a bit beyond a simple breadboard and a few ICs, requiring an $80 Android ADK board to go along with your phone and Arduino. If your focus is going to be on interfacing your phone with microcontrollers however, it’s purchase you’ll make sooner than later anyhow.

The setup is pretty simple as you might expect. A photocell and TMP36 temperature sensor are connected to the Arduino, then with a bit of code and USB host magic, the Android app shows the temp and amount ambient light present in the room.

[Mike] has made all of his easy to read and well commented code available online, so be sure to check it out if you have been thinking about (but putting off) playing around with the Android ADK.

Digital speedometer with an arduino

[Martyn] is restoring a 32-year-old Honda motorcycle, so when the ancient speedometer broke last year he thought it was prime time to start of a digital speedometer project. We’re loving the results so far, and would love seeing it on a nicely restored bike.

Instead of the relative horror of driving 40 LEDs with a single Arduino, [Martyn] bit the bullet and got a Maxim 7221 LED driver. Controlling 64 LEDs  over a three-wire interface simplified the board design somewhat, allowing [Martyn] to etch his own PCB with the toner transfer & HCl/H2O2 method. To actually power and control the entire circuit, [Martyn] used an Arduino loaded up with a program based  LedControl library makes programming the spedometer a snap.

Although the speedo works, [Martyn] says he isn’t proud of how it looks. We don’t mind – the candy colored jumpers add a nice flair to the project, and they’re hidden behind the face plate of the speedometer. We’re sure once he gets the neutral, high-beam, and warning indicators working with the LED bar array / tachometer, everything will look awesome.

via reddit