UPS with dead batteries reborn as a whole-house power backup

[Woodporterhouse] must deal with regular power black outs in his area. He recently converted a rack-mount uninterruptible power supply to feed a portion of his mains wiring. This one is not to be missed, since he did such a great job on the project, and  an equally remarkable job of documenting it. It’s one of the best examples we’ve seen of how to use Imgur as a project log.

The UPS still needs to have a case, but it doesn’t need room for batteries as he’s going to use a series of high-end sealed lead-acid batteries. So he cut down the enclosure to about half of the original size. That’s it mounted just above the new batteries. For this to work you need some type of transfer switch which can automatically patch between incoming line voltage, and the battery backup. He already had one of these switches in place for use with a generator, that’s it in the upper left. The entire system powers a sub-panel responsible for his essential circuits — the electronics in the home and a few lighting circuits (we’d assume this includes utilities like the refrigerator).

One really great feature that the reused UPS brings to the project is a monitoring card with a NIC. This way he can check the server to see if the UPS is being used, and how much of the 14 battery life remains.

[Thanks Ross via Reddit]

Resizable ARM dev board; just take some off the top

[Bob Alexander’s] most recent project is a hack saw resizable ARM breakout board. He wanted to start using more ARM microcontrollers in his projects and went for a breadboard friendly design. It uses a 40-pin dip package, but if you need the horsepower but not the I/O you can literally cut it down to size. We might recommend grabbing some tin snips, which can cut through a PCB like butter, but to each his own.

The board is based around an STM32 chip. You’ll find a crystal oscillator for the system clock, and a clock crystal if you need it. On the other side of the chip he included a footprint for a voltage regulator. This setup provides a remarkable range of input voltages, accepting from 2 to 3.6 volts without the regulator, and up to 16 volts if the regulator is present. He designed a package footprint that can be easily bridged if there’s no SMD part there. Just make sure you insulate that pad if you are using one with a conductor on the bottom. He explains this in detail in his writeup.

You’ll need a programmer to work with the board. He uses an STM32 Discovery Board for this but there are quite a few other options out there too.

Apartment entry morse-code lock

[Bozar88] lives in an apartment building that has a buzzer at the front security door. Guests find your name on the panel next to that door, and press a button to ring the phone just inside the entry of each apartment unit. He decided to extend the built-in capabilities by adding a morse-code entry password which unlocks the security entrance automatically (translated).

He designed a circuit and etched his own board which fits nicely inside of the wall-mounted phone. It uses an ATtiny2313 to implement the coding functions. The device attaches to the intercom line in order to detect incoming button presses from the entry panel. There’s some protection here to keep the signal at or below 5V. The output is two-fold. The microcontroller can drive the microphone line using a transistor, which gives the user audio feedback when the code is entered. To unlock the door an opt-isolated triac (all in one package) makes the connection to actuate the electronic strike on the entry door.

The video after the break is not in English, but it’s still quite easy to understand what is being demonstrated.

[Read more…]

Harvesting and graphing wireless household utility meter info

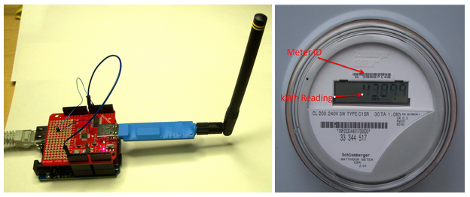
Both our electrical meter and our gas meter are located in the basement of our house (we recently had the gas meter moved outside though). When people see this they always ask if the meter readers have to come inside once a month. The answer is no, these meters broadcast usage data which is picked up once a month when a utility company vehicle drives down the street. If you have wireless meters in your house, here’s a way to harvest and graph the wireless data so that you can analyze your usage patterns.

The hardware used here is a special USB dongle. This has a 900 MHz radio which picks out the packets from a reasonably large list of meter types, and pushes them through the USB interface. In the image above you can see that an Arduino with a USB host shield is used, but there are also drivers if you want to connect this directly to your computer.

We looked around and didn’t find any specifics on the hardware used on that board. But it can’t be all that hard to make one of these at home… the populated board seems to have just two ICs and a few passive components. Anyone up to the challenge of hacking together their own packet sniffer? We wonder if the Next HOPE badge could pull down the data?

[Thanks Chris]

Measuring the capacities of different battery brands

Being the smart consumer he is, [Denis] usually looks at the price per pound when comparing similar products at the grocery store. When it came time to buy a few AA batteries, he didn’t have any data to go on. To solve his little conundrum, [Denis] decided he would test several brands of batteries and see which one gives him the most bang for the buck.

After bringing home a haul of a dozen different brands of AA cells, [Denis] broke out the Arduino and starting designing a circuit. To test how much energy each brand provides, the Arduino measures the voltage across a load every second until the battery reaches 0.2V. The elapsed time, as well as the voltage, Watt hours, Joules, and ambient temperature are logged on an attached LCD screen and sent over a USB serial link to automate the data collection process.

What’s the verdict? Unsurprisingly, words like ‘super,’ ‘max,’ and ‘ultra’ didn’t connotate a better battery. The best bang for the buck came from an off-brand called RS Power Ultra. The worst battery was the Panasonic Evolta cells that came in at about $1.50 USD per watt-hour.

If you’d like to verify [Denis]’ work, all the code is up on Github along with the schematic.

Projecting video directly onto the retina

With the head-mountable, augmented reality Google Glass capturing tons of attention in the press, it was only a matter of time before we saw a DIY retina projector. This isn’t a new build; [Nirav] has been working on it for a few months, but it might just be time for this information to be useful to someone.

A retina projector focuses laser light though beam splitters and concave mirrors to create a raster display on the back of your eye. There’s an incredible amount of research into this field, but not many DIY projects. To make this project a reality, [Nirav] picked up a SHOWWX laser video projector and mounted it in a 3D printed frame along with a few pieces of optical equipment.

[Nirav]’s build isn’t without its drawbacks, though. The exit pupil, or the apparent size of the image, is only about 1.5 mm wide and much too small to be of any real use. Also, commercial retina projectors have an output of a puny 2 microwatts, where [Nirav]’s laser projector puts out 200 millwatts. This is more than enough to permanently damage your eye.