HTML based AVR compiler aims to make Arduino development on iOS possible

It’s surprising what lengths people will go to in order to bring functionality to their smart phones. In this case, [Tadpol] wanted a way to develop for his Arduino on an iOS device like an iPad or iPhone. He figures it’s possible to rewrite the IDE as HTML5, but since that’s a pretty large mountain to climb, he started by building a browser-based AVR compiler. It’s an interesting concept, and he’s got a working prototype up on Github for you to test. Perhaps you can throw your hat in the ring and help him with development?

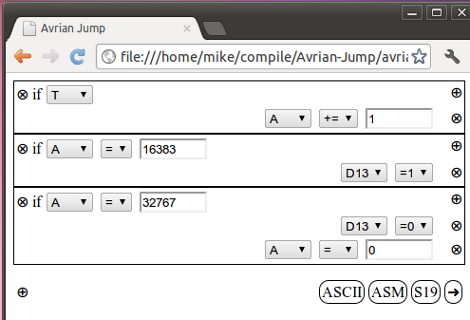
The web interface uses boxes to add to the code. What you see above is three sets of commands which will blink an LED. The project, named Avrian Jump, uses a simple ladder language to feed the compiler, with several different options for output. The most interesting in our mind is a WAV file which can be used to program an AVR from the audio out of your device. That would make programming as simple as connecting the specially modified AVR to your headphone jack. There’s also an ASCII output which allows you to save your programs for later alteration, S19 output for AVRdude programming, and an assembler output for debugging purposes. It’s hard to see where this project might go, but we have to admit that the concept is intriguing.

Wooden CNC touch probe

diy-touch-probe

[Gary] sent a few pictures of his latest project our way via Flickr, which we thought a few of you CNC owners might be interested in. He has been working with his CNC machine a lot lately and decided it was about time he built a touch probe for his rig.

His initial goal was to use the touch probe to ensure his CNC table was perfectly level, but we’re thinking it will be helpful for a lot of different projects in the future. [Gary] says he was really looking to put together a proof of concept device, but that things worked out so well he had to share.

His probe seems to work very well, even without the fit and finish of others we’ve seen in the past. The body of the probe itself was built using several layers of quarter inch plywood, housing three sets of two screws. The screws are wired together in order to form a closed circuit when the brass probe is inserted. When the probe makes contact with a solid object, the circuit is broken, and the coordinates of the probe’s head are recorded.

Though [Gary] admits that he was not super careful when it came to building the probe, we think the results speak for themselves. For a first iteration its scanning abilities are pretty impressive – we can’t wait to see version 2.

Wireless door alarms protect your stuff from afar

wireless-shed-alarm

[Webby] had a friend named [Steve], and as the story goes [Steve] had a few storage sheds on his property that were prone to break-ins.

While the doors were all fitted with a lock, wooden doors are only so strong, and are easy fodder for intruders bearing crowbars and the like. [Steve] was looking for a good way to know when people were poking their heads where they don’t belong, so he rigged up a set of simple alarms that let him know when it’s time to break out the shotgun.

On each of the shed doors, he installed a small IR proximity sensor wired up to a PIC12F675 microcontroller. The PIC is is connected to the “call” button a medium range wireless radio, so that whenever the IR sensor detects that the door is ajar, the PIC triggers an alert on the base unit.

The solution is simple, which we figure also makes it pretty reliable – nice job!

A "Jukebox" In a Bell Jar

jukebox in bell jar

[Tim] wrote in to tell us about his Mark III hard drive in a bell jar, and we were quite impressed! The principle of using a bell jar to protect the hard drive inside so the world can see it spinning is really a cool idea, but his execution of this project is excellent. It was reportedly so good that an unnamed college actually asked him to build one of his drive displays for them.

The Mark III is an excellent build, and the little hard drive has been swapped to the front of it for better visualisation. The disadvantage of the iPod Mini used for the Mark III build is that it actually buffers enough so that the read head doesn’t have to spin during the entire song.  Because of this, we thought that his first build, nicknamed [pink], was even more interesting, if ever so slightly less refined. By many of our hacking standards though, both are incredibly finished works of art!

Both these builds feature a plethora of LEDs to keep you entertained, and can be seen demonstrated after the break! [Read more…]

Print in chocolate, sugar, and clay with a universal paste extruder

With a glut of Easter candy acquired over the last week, you might be thinking what to do with mountains of chocolate and other sugary delights. How about sending them through a 3D printer with [RichRap]’s universal paste extruder?

[RichRap]’s extruder uses a common 10cc syringes slowly squeezed by an off-the-shelf stepper motor. Chocolate wasn’t the only goal for this build;  [RichRap] also tested out cake icing, corn chip dough, muffin and sponge cake batter with his new toy. The most interesting paste in our humble opinion is porcelain ceramic clay. [RichRap] was able to make some very nice 3D printed greenware, but we’ll withhold our judgement until the ceramic parts are fired later this week.

After the break you can check out the introduction video for the Universal Paste Extruder, as well as a quick glimpse of [RichRap]’s very cool porcelain clay prints. We’re very interested in the ceramics printed with this extruder, if only for printing reprap parts that will be exposed to plastic-melting temperatures.  Of course, all the files to build your own paste extruder are up on Thingiverse.

Tip ‘o the hat to [Josef Prusa] for sending this one in.

[Read more…]

Playing chiptunes with a YM2149 and optimizing an Arduino

[Oryx] grew up with the bleeps and bloops of an Atari ST, so it comes as no surprise he would want to relish in his nostalgia by playing with the YM2149 sound generator he recently picked up on eBay. Like most of us, [Oryx] went to his old standby, the Arduino, when it came to connect this bare chip to his computer. The first circuit didn’t work, so after a lot of poking around the firmware, [Oryx] discovered the benefits of hand-optimizing software.

There are a lot of sound files available for the YM2149 floating around on the Internet. These files are just dumps of the 16 registers at 50Hz, so it’s very easy to send these from a computer to an Arduino over a serial connection. Unfortunately, when [Oryx] got his breadboard set up nothing happened. After breaking out the ‘scope, he discovered the Arduino was switching pins 100 times slower than the YM2149 data sheet called for.

[Oryx] remembered seeing a great blog post going over the speed at which the digitalWrite() function changes pin states. We’ve seen this before, and the fastest way to change pin states on the Arduino is with the ugly bitwise manipulation. After changing a few lines of code, [Oryx] was switching two pins nearly simultaneously.

Now that the YM2149 chip is working correctly, [Oryx] is planning to make a MIDI synth out of his project. You can get an idea of how that will sound with the demo video he put up after the break.

[Read more…]