Arduino MIDI sequencer displays a lot of data

This Arduino MIDI sequencer has no shortage of ways to display loop info. The screen above is a touch-sensitive interface that acts as the user input. But if this screen is not visible, you can still see which tracks have activated samples for each beat and what effects are being used. That’s thanks to the collection of display boards which are shown in the video after the break.

The setup acts as the MIDI front end, relying on other hardware to generate the samples. It presents all of the options through several pages on the 320×240 touch screen display. The Ardunio Mega is responsible for monitoring the UI data, crafting and sending the MIDI commands, as well as updating the LED-based display boards. These include bar graphs for the various effects, a four row by sixteen pixel beat pattern display, and 7-segment displays to track the current location within the loop. All in that’s 368 LEDs driven by 18 shift registers.

Update: Link to a gallery can be found after the break as well.

[Read more…]

Using GPS to stay aware of red light cameras

red-light-camera-alerter

Depending on how you view them, red light cameras are a great way to get people to drive carefully, or an utter nuisance. We agree with the latter opinion, as does [Dave], so he built a handy little device that alerts him when he’s about to approach one of these intersections.

His Red Light Camera Alerter is based around an Atmega 328P sporting the Arduino bootloader. The micro obtains GPS coordinates while [Dave] is driving, comparing his current location with a table of all known red light intersections in the area. As he nears a red light camera, the status LED changes colors from blue to yellow to red as he gets closer, making it easy to keep aware of his situation. He also included an Adafruit OLED display in his device, which relays his speed, GPS coordinates, heading, and actual distance from the red light in real time.

While [Dave] admits that he doesn’t really have a need for the alerter as there are only a couple located in his immediate vicinity, he says it was a fun and easy way to get some experience with using GPS sensors in his projects. He doesn’t have any video of it in action, but you can find the code he uses to drive the alerter on his blog.

Adding an electronic lock to a DIY book safe

electronic-book-safe

DIY book safes are well and good, but if you give someone enough time to peruse your book collection, the 3-inch thick “Case study on Animal Husbandry Techniques during the 14th Century” is likely to stand out among your collection of hand-bound “Twilight” fan fiction. In an attempt to teach his friend a bit about microcontrollers and circuits, [Jonathan] spent some time adding a bit more security to your run of the mill book safe.

The pair started out with the time-consuming process of gluing the book’s pages together and creating enough hollow space for both storage and the electronics. With that out of the way, they installed a latch and servo motor inside the cavity, the latter of which is controlled using an Atmega328p with the Arduino bootloader. To gain access to the goodies stashed away inside, Jonathan hooks up a small PS/2 keypad and enters a passcode. This triggers the servo motor, opening the latch.

While the latch likely only adds a nominal bit of security to the book safe, it’s a fun enough learning exercise to justify the time spent putting it together.

Continue reading to see a short video of [Jonathan’s] electronic latching book safe in action.

[Read more…]

Advanced compass/accelerometer library for Arduino

We don’t have much personal experience with DOF hardware, but this Arduino library which reads and compensates for three-axis magnetometer and accelerometer data looks very impressive. It should work for existing hardware, but there’s also a demo design using a Honeywell HMC5883L compass and a Freescale MMA8453Q accelerometer which you can build yourself. Unfortunately these come in QFN packages (like most cheap accelerometers these days) so you may need to be creative when soldering.

What’s so special about this library? Watch the video after the break (use 720p in fullscreen to get the full effect) and you’ll see three different scatter plots of the output data. The image above is a capture of the third example, which is using the hard iron offset and accelerometer compensation. That is to say, metal on and around the board is accounted for, as well as the physical orientation of the device. Even if you have no prior experience with this type of hardware it’s easy to see the usefulness of this kind of software compensation.

[Read more…]

HTML based AVR compiler aims to make Arduino development on iOS possible

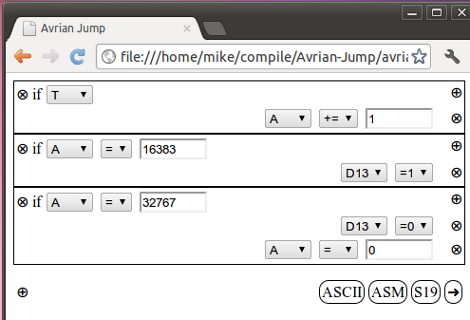
It’s surprising what lengths people will go to in order to bring functionality to their smart phones. In this case, [Tadpol] wanted a way to develop for his Arduino on an iOS device like an iPad or iPhone. He figures it’s possible to rewrite the IDE as HTML5, but since that’s a pretty large mountain to climb, he started by building a browser-based AVR compiler. It’s an interesting concept, and he’s got a working prototype up on Github for you to test. Perhaps you can throw your hat in the ring and help him with development?

The web interface uses boxes to add to the code. What you see above is three sets of commands which will blink an LED. The project, named Avrian Jump, uses a simple ladder language to feed the compiler, with several different options for output. The most interesting in our mind is a WAV file which can be used to program an AVR from the audio out of your device. That would make programming as simple as connecting the specially modified AVR to your headphone jack. There’s also an ASCII output which allows you to save your programs for later alteration, S19 output for AVRdude programming, and an assembler output for debugging purposes. It’s hard to see where this project might go, but we have to admit that the concept is intriguing.

Playing chiptunes with a YM2149 and optimizing an Arduino

[Oryx] grew up with the bleeps and bloops of an Atari ST, so it comes as no surprise he would want to relish in his nostalgia by playing with the YM2149 sound generator he recently picked up on eBay. Like most of us, [Oryx] went to his old standby, the Arduino, when it came to connect this bare chip to his computer. The first circuit didn’t work, so after a lot of poking around the firmware, [Oryx] discovered the benefits of hand-optimizing software.

There are a lot of sound files available for the YM2149 floating around on the Internet. These files are just dumps of the 16 registers at 50Hz, so it’s very easy to send these from a computer to an Arduino over a serial connection. Unfortunately, when [Oryx] got his breadboard set up nothing happened. After breaking out the ‘scope, he discovered the Arduino was switching pins 100 times slower than the YM2149 data sheet called for.

[Oryx] remembered seeing a great blog post going over the speed at which the digitalWrite() function changes pin states. We’ve seen this before, and the fastest way to change pin states on the Arduino is with the ugly bitwise manipulation. After changing a few lines of code, [Oryx] was switching two pins nearly simultaneously.

Now that the YM2149 chip is working correctly, [Oryx] is planning to make a MIDI synth out of his project. You can get an idea of how that will sound with the demo video he put up after the break.

[Read more…]