Print your own Supercaps

[Gil] recently wrote in to tell us about some awesome research going on at UCLA. Apparently by layering some oxidized graphite onto a DVD and tossing it into a lightscribe burner, it’s possible to print your own super capacitors; some pretty high capacity ones at that.

For those that are unaware, supercapcaitors are typically made using two electrolyte soaked, activated carbon plates separated by an ion permeable film. Since activated carbon has an incredible surface area huge energy densities can be reached, in some cases 1kJ/lb.

Laser-formed graphite sponge replaces the activated carbon in the researchers’ printed capacitors. A video after the break discusses  the whole process in moderate detail, meanwhile greater detail can be found in their two papers on the subject.

First one to print a transistor gets a bag of mosfets!

[Read more…]

Chocolate as rocket fuel

[Adric Menning] has an unfortunate allergy. He’s allergic to chocolate. Instead of eating the stuff, he’s using it to build model rocket engines. The project stems from the Quelab Hackerspace’s chocolate hacking challenge which spawned a number of interesting hacks. [Adric’s] doesn’t use pure chocolate (an experiment with a Hershey’s bar was a bust) but manages to ignite using a Milky Way bar.

This is not as unorthodox as you might think. Sugar and potassium nitrate have long been used to create solid rocket propellant. The chocolate version is swapping out plain old sugar for the candy bar. It was chopped into 10 gram chunks to make proportion calculations easier later on. The chunks go into the freezer to make them easier to grind using a mortar and pestle. Once it’s a somewhat chunk-free powder he mixes it with the potassium nitrate which previously had its own trip through the grinder. After being packed into a chunk of PVC pipe and fitted with an exhaust nozzle the engine is ready to go.

You can check out the test-fire video after the break. There’s a burn restriction in his area due to drought so this is just an engine test and not an actual rocket launch.

[Read more…]

Brewing up gunpowder with household products

When the zombiepocalypse comes you’re not going to want to run out to the store for more ammo. But you can always reload great grandpa’s musket with some homemade gunpowder. All kidding aside, the invention and proliferation of gunpowder had a profound effect on the world. Here you can see just how easy it is to make with chemicals that are common in our modern world.

The two compounds that go into this experiment are ammonium nitrate and potassium chloride. Where can you get your hands on these materials? Instant cold packs use ammonium nitrate and water to start an endothermic reaction. The potassium chloride can be found in the grocery store as a table salt alternative.

The chemicals need to be measured by weight. [William Finucane] didn’t have a digital scale on hand so he made a balance using a wooden ruler, two plastic component drawers, and a Bic lighter as a fulcrum. With approximately equal parts of the two materials he sets about dissolving in water, filtering, and heating of the concoction to produce saltpeter. Combine this with powdered sugar and you’ve got gun powder. Don’t believe that it works? You can see the fiery goodness in the clip after the break.

Flammable and explosive materials are dangerous to work with, so you probably shouldn’t do this yourself. But then again, it can’t be as dangerous as working with thermite. [Read more…]

Anodize titanium at home

We don’t really have any titanium lying around, it’s not exactly a cheap material. But this hack that shows you how to anodize titanium in your home laboratory (or kitchen for that matter) and it might help the metal make its way into a future project. It seems the process is not overly difficult or dangerous and it’s possible to achieve a lot of different colors in the finish.

In the image above [PinkFlute] is using Coke Zero, a sugar-free soda, as the chemical agent in the process. The alligator clip attached to the utensil is providing the positive voltage and the yellow wire dipped in the drink is negative. Finish color is determined by the voltage supplied. You can choose various shades of green, purple, yellow, and blue based on a voltage range of about 100V to 20V.

This is one of two anodizing methods shown. the other uses a foam brush dipped in soda with the negative lead clamped onto it. You just brush in the electrified substance to alter the camping spork’s finish.

[via Reddit]

DIY Conductive ink lets you freehand circuits on the cheap

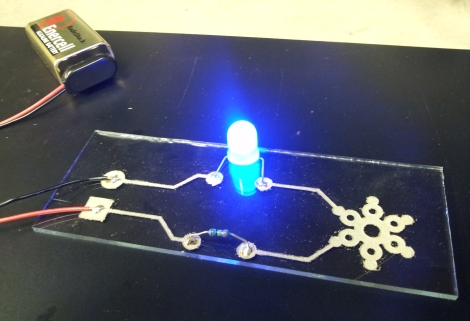
silver-ink-on-glass

[Jordan] likes the flexibility that conductive inks offer when putting together electronic circuits, but says that they are often too expensive to purchase in decent quantities, and that they usually require substrate-damaging temperatures to cure. After reading a UIUC Materials Research Lab article about making conductive ink that anneals at relatively low temperatures, he decided to give it a shot.

[Jordan] started out by picking up various chemicals and lab supplies online, setting up shop at Pumping Station: One. The process is pretty straightforward, and seems like something just about anyone who took high school chemistry can manage. That said, he does note that some of the chemicals, such as Formic Acid, can be quite painful if mishandled.

After just a few minutes of work and about 12 hours waiting time, [Jordan] had himself a decently-sized vial of conductive ink. He tried it out on a few different substrates with varying results, and in the end found that etched glass made the best circuits. He says that there are plenty of experiments to try, so expect even more helpful info from him in the near future.

[via Pumping Station: One]

Etching PCBs with vinegar

When we hear about etching PCBs at home we assume that either Ferric Chloride or Cupric Chloride were used to eat away unmasked copper from the boards. But [Quinn Dunki] just wrote up her PCB etching guide and she doesn’t use either of those. Instead, she combines vinegar, hydrogen peroxide, and salt. It’s easier to find vinegar than muriatic acid (Cupric Chloride is made using this, peroxide, and adding the copper) so this is something to keep in mind if you’re in a pinch (or a Macgyver situation).

The rest of the process is what we’re used to. She’s using photoresistant boards which can be masked with a sheet of transparency instead of using the toner-transfer method. Once they take a bath in the developer solution she puts them in a shallow dish of vinegar and hydrogen peroxide along with a teaspoon of salt. She wipes the surface with a foam brush every minute or so, and inspects them every ten minutes to see if they’re done.

She does discuss disposal. Seems that she throws the solution in the garbage after each use. The liquid will contain copper salts which are bad for wildlife. We’ve heard that you should neutralize the acid and make a block of concrete using the liquid, then throw it in the garbage. Does anyone have a well-researched, ethical, and environmentally friendly way of getting rid of this stuff?