Creating a multimedia elevator ride

[Ben Peoples] works in theatrical electronics. Sounds like fun, and here’s an example of the kind of stuff he does. We’re not sure what event this installation was used for, but if the elevator ride needed something flashy just think of what the party room must have looked like. These HDTV screens on the ceiling of the elevator play different clips when the elevator is moving up or down. The challenge for [Ben] was to find a way to make it work without tapping into the elevator electronics or requiring any button presses.

The first attempt at sensing the elevator’s travel was done with an accelerometer. The problem with this approach is that an accelerometer only senses change in acceleration and this method proved to be fairly error prone. [Ben] switched over to a reflective sensor which performed quite well. Since most of these sensors will only work within about an eighth of an inch he ended up building his own with a LDR and a couple of amber LEDs.

[via Reddit]
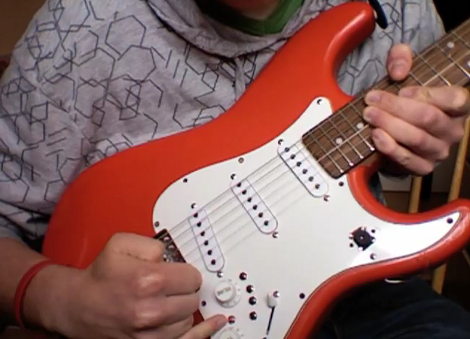
Inconspicuous guitar hack adds a lot of control to Max/MSP

[Sam] is working on his Interactive Technology Degree and he made some alterations to this guitar as a class project. It doesn’t look much different, but closer inspection will reveal a handful of extra buttons, and a camera module. He actually added a Wii remote to the guitar which is used to control Max/MSP.

His pinky is pointing at one of the buttons. That one is red and triggers the Bluetooth sync function for the Wii remote. The other four buttons are wired to the up, down, A, and B buttons. In the video after the break [Sam] talks about the Max/MSP front-end which is used to connect the remote to the computer. Once communications are established the accelerometer sensor data is continuously streamed to the software, and the other four buttons are used for controlling the patches.

The camera module that is mounted in the guitar can be used to stream video but it appears to have no effect on the sound. In fact, the live video feed can be mixed with a waveform generation. Sound characteristics like volume affect the cross-fade between the two video signals. [Sam] talks about this feature, but when the playing demo starts about 6:10 into the clip we don’t seen any of the live video on the projection screen.

[Read more…]

Modeling an object with internal IMUs

[Joseph Malloch] sent in a really cool video of him modeling a piece of foam twisting and turning in 3D space.

To translate the twists, bends, and turns of his piece of foam, [Joseph] used several inertial measurement units (IMUs) to track the shape of a deformable object. These IMUs consist of a 3-axis accelerometer, 3-axis gyroscope, and a 3-axis magnetometer to track their movement in 3D space. When these IMUs are placed along a deformable object, the data can be downloaded from a computer and the object can be reconstructed in virtual space.

This project comes from the fruitful minds at the Input Devices and Music Interaction Lab at McGill University in Montreal. While we’re not quite sure how modeled deformable objects could be used in a user interface, what use is a newborn baby? If you’ve got an idea of what this could be used for, drop a note in the comments. Maybe the Power Glove needs an update – an IMU-enabled jumpsuit that would put the Kinect to shame.

[Read more…]

Advanced compass/accelerometer library for Arduino

We don’t have much personal experience with DOF hardware, but this Arduino library which reads and compensates for three-axis magnetometer and accelerometer data looks very impressive. It should work for existing hardware, but there’s also a demo design using a Honeywell HMC5883L compass and a Freescale MMA8453Q accelerometer which you can build yourself. Unfortunately these come in QFN packages (like most cheap accelerometers these days) so you may need to be creative when soldering.

What’s so special about this library? Watch the video after the break (use 720p in fullscreen to get the full effect) and you’ll see three different scatter plots of the output data. The image above is a capture of the third example, which is using the hard iron offset and accelerometer compensation. That is to say, metal on and around the board is accounted for, as well as the physical orientation of the device. Even if you have no prior experience with this type of hardware it’s easy to see the usefulness of this kind of software compensation.

[Read more…]

Accelerometer-based game control using an iOS device courtesy of HTML5

This game of Space Invaders is played by tilting your iPhone to the left or right. It’s a demonstration of HTML5 used to link devices in-browser. The only setup that’s required is for the base device to load up a webpage, then the control device scans a QR code (or just types in a link) to connect with the game. You can give it a try right now if you want.

It only works with iOS devices but we believe that’s because mobile Safari has the ability to poll accelerometer data and other browsers do not. If this was using on-screen buttons rather than the tilt controls it would work on any device that implements HTML5. The connection is facilitated by Node.js and Socket.IO. The QR code that is generated by the host machine’s page includes a unique ID which allows the control device to link with it. Once loaded, commands from the controller are sent via Socket.IO to the node on the host machine.

As with this HTML5-based sensor data application, we think this method is important because it allows control without the need for a standalone application. We’re hoping to see a lot of this in embedded projects in the future. By serving data to a smart phone or other device you remove to need for a physical user interface in your projects, which means you can make great things while spending less.

[via Reddit]