You’ll throw your back out playing this analog TV synth

de-rastra

While CRT televisions fall to the wayside as more people adopt flat-panel TVs, the abundance of unused sets gives hacker/artist [Kyle Evans] an unlimited number of analog canvases on which to project his vision. He recently wrote in to share his latest creation which he dubs “de/Rastra”.

The “CRT Performance Interface” as he calls it, is an old analog television which he hacked to display signals created by moving the TV around. Fitted with an array of force sensors, accelerometers, and switches, the display is dynamically generated by the movements of whomever happens to be holding the set.

Signals are sent wirelessly from his sensor array to an Atmel 328 microcontroller with the help of a pair of XBee radios, where they are analyzed and used to generate a series of audio streams. The signals are fed into a 400W amplifier before being inserted into the CRT’s yoke, and subsequently displayed on the screen.

We’re sure [Kyle] is probably trying to express a complex metaphor about man’s futile attempts to impose his control over technology with his project, but we think it simply looks cool.

Check out [Kyle’s] work for yourself in the video below and give us your take in the comments.

[Read more…]

Directly interfacing a joystick with an Xbee

We see a pretty steady stream of projects that use Xbee modules. They’re one of the more reliable and popular ways to add a wireless aspect to your project. But we don’t often see them used to their full potential. Since there’s a microcontroller onboard, many simple tasks can be accomplished without the need for an addition microcontroller. [Stephen’s] showing how this can be done, by reading the stick and button data from a game controller using only an Xbee module.

His test setup uses an Arduino to drive servo motors on the receiving end of the hardware. You can’t do everything with Xbee, but the sender is where this concept comes into play. [Stephen] grabbed an older gamepad which is meant for use with a PC game port. The joystick uses potentiometers to measure position data, and the buttons simply complete a circuit. He altered the joystick by adding voltage dividers to the pots, and pull-up resistors to the buttons. From there he just wired it up to the Xbee and set up the module’s firmware to package and transmit the data. It’s a nice way to do more with less.

We had a little discussion here at Hackaday about Xbee modules which seem to be in short supply. Some of us think it’s due to the flooding in Thailand. If you’ve got some info on the situation, or just want to share your own conspiracy theory, let us know in the comments.

Monitoring the status of a unisex bathroom

Years ago, someone at [Chuck]’s job came up with the brilliant solution of an indicator to display if the unisex bathroom is currently vacant, a men’s bathroom, or a women’s bathroom. The old system worked well, but [Chuck] thought it would be a great idea to display the current status of the bathroom on the large TV in the office, saving his coworkers from getting up only to wait in line until the bathroom became vacant.

Like the previous paper sign, [Chuck]’s build has three statuses: a men’s room, a women’s room, and vacant with a manual dial that is turned whenever someone is entering or leaving. The new build vastly improves on the paper-based indicator by using a laser cut indicator on a rotary switch.

The electronics are dead simple; just an XBee and a Explorer USB board. Whenever the switch state is changed, the XBee sends a bit of data off to a mac mini and displays the status on the office TV. It may be funny to our immature sense of humor, but it’s still a very nice project.

Wireless camera mount offers pan and tilt functions

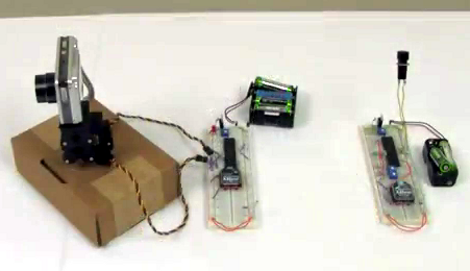
[Chris] put together a bunch of common components to create this wireless pan and tilt system for a security camera or a robot.

The motorized base is simple enough, using two servos to make up a mount for the digital camera. In this case he used a parts package which is designed to mount the servos perpendicular to each other. You could also 3D print, our build your own brackets quite easily. The control circuitry consists of a pair of PIC 18LF4520 microcontrollers and a set of Xbee modules. This is where the wireless connectivity comes in.

On the transmitter side, a pair of potentiometers are read by the microcontroller’s ADC and translated into position values. The receiver takes those values and drives the servo motors accordingly. In the clip after the break [Chris] is using micro trimpots which require a screw driver to adjust. You might want to hit the parts bin and see if you can get some that have a more user-friendly shaft or knob.

Unfortunately this system doesn’t transmit video. But WiFi webcams are getting quite affordable so that might be a good option in this case. [Read more…]

Monitoring home electricity usage via a tidy wall display

power-meter-display

[Janne Mäntyharju] wanted to get an idea as to how much electricity he consumed in his new home, mainly to see if using his fireplace for additional heat had any effect on his bill. Luckily his power meter was mounted in the utility room of his house, making it easy to keep tabs on his usage.

His meter features a small LED that blinks a fixed number of times per consumed Kilowatt hour, so he mounted a photoresistor and ATtiny2313 above it to detect the light pulses. [Janne’s] server polls the microcontroller every 5 minutes over an XBee connection, recording the power usage in an SQL database for further analysis. From this database, he generates graphs showing both the temperature in his home as well as the average electricity usage for the specified time period.

[Janne] also wanted to make the data easily accessible, so he constructed a wall-mounted display using a Beagleboard and digital picture frame. The display not only shows his electricity usage, but it toggles between the weather, calendar events, IRC logs, and pictures from his security camera.

We’ve certainly seen this sort of electric meter monitoring before, but it serves as a quick reminder that given the right tools, watching your power usage (among other things) can be as easy as taking a quick glance over at the wall.

DIY quadcopter for around $200

We think [FlorianH] did a bang-up job of prototyping his Minima Quadcopter on the cheap. The total bill comes in right around $200 and we’re very happy with the quality of parts as well as the results.

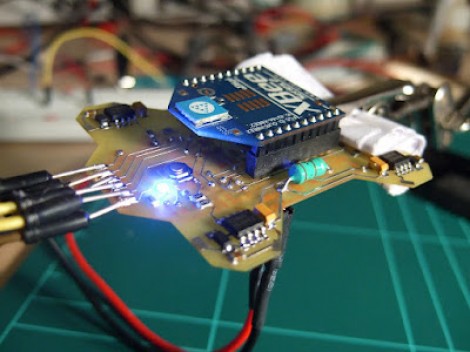
Here you can see the top of the double-sided board which he etched to host all of the components. At each corner there is a power MOSFET which drives the motor. At first glance we thought that the Xbee module was acting as the radio control and processer as well. But on the underside you’ll find an ATmega32 which is responsible for reading the Gyroscope sensor and Accelerometer, processing these signals and driving each MOSFET via PWM lines to provide stability.

You can see some flight tests after the break. [FlorianH] mentions that there is some oscillation in the feedback loop when both the gyro and accelerometer are used. But cut the accelerometer out of the equation and the platform is rock-solid.

This build uses carbon tubes to mount the motors, which we think will be a little more robust than the all-PCB designs are.

[Read more…]