Kicad symbol generating script shows promise

Kicad is a fantastic PCB layout tool. We think creating a part for use with Kicad is in many ways easier than in Eagle, but it never hurts to have a few shortcuts. Here’s a new way to quickly get your parts into the schematic editor. It’s a Python script that generates symbols from an XML input file. You create the XML file with a list of all the pins on your part and the function they will serve. The Python script will then format that as a library file which can be imported by Kicad.

It’s a little bit clunky due to the number of steps in the process. But it is possible to use a CSV file generated in a spreadsheet program to create the XML needed by the script. We’ve used the online component builder ourselves, and appreciate the possibility of mass pin assignments instead of the drop-box for every pin as used by the web interface. One time we were 20 pins into the naming process and accidentally refreshed the page… ugh!

The code is available in their git repository, with a description of the XML format, and a wiki tutorial outlining the component building process. After you give it a try we’d love to hear what you think in the comments.

Let there be light inside your Epilog laser cutter

[Bradley Gawthrop’s] biggest gripe about his laser cutter is the lack of Mac support. We don’t think we’d have any gripes if we owned one of these (yeah, that’s a lie…) but we can understand his second biggest issue which is the inability to see the work piece once it’s inside the machine. He figured out a very easy way to light the area as the cutter gets to work.

It occured to him that the optical head is always directly above the part of the work piece he was interested in seeing. He had been using a flashlight to shed some light, but what if he just added lighting to that head? The circuit is certainly nothing hard; some LEDs, resistors and a power source will do the trick. But routing the power is where things get more difficult. You need flexible wiring strung just right so as not to restrict motion on the X/Y axes. Most of his time was spent routing some 14 gauge stranded speaker wire for this task. He added his own 5V DC supply to power the adhesive LED strip which enjoys a resting place on the bottom rail of the head unit. Boom, problem solved.

Take a picture of a bang with a camera sound trigger

We’ve featured dozens of digital camera triggers over the years. Very rarely do we come across one as well designed as [Viktor]’s ‘lil bang sound trigger that snaps a picture whenever a microphone picks up a loud noise.

[Viktor]’s build is based around a PIC16F microcontroller with an LM386 amp connected to a microphone. On the front of the device, the right knob controls the sensitivity of the microphone and the left knob sets the delay between detection and the trigger.

The ‘lil bang trigger connects to the camera through an opto-isolated 3.5 mm jack that is compatible with all the fancy Canon and Nikon DSLRs. The delay between sound detection can be changed from 0 to 255 ms, allowing for precise control over a high-speed photography rig.

All this work comes after the  light-activated trigger [Viktor] built for taking pictures of lightning. The sound-activated version wouldn’t work for lightning pics, but he thinks it could be useful for collision or explosion photographic studies. Check out the video of [Viktor]’s ‘lil Bang in action after the break.

[Read more…]

Puncher tracks your freelancing hours, time spent in TSA patdowns

freelance-puncher

[Raphael Abrams] does a lot of freelance work, but he has trouble accurately keeping track of the hours he has put in for his clients. After trying various applications and methods of logging his time, he finally decided to build a device that worked just the way he liked.

He calls his device the “Freelance Puncher”, though it already has been nicknamed the detonator, as it looks like something you would find in the hands of a [James Bond] villain. The device uses a PIC16LF1827 to track the time, saving his logged hours to the built-in EEPROM when powered off. A pair of 7-segment displays are used to display the accumulated hours upon power-on, and a set of seven SMT LEDs separated into two banks keep track of quarter and hundreds of hours worked.

[Raphael] has made his code and schematics available on Github, so you can easily replicate his work if you are looking for a better way to track your time. We think it looks great, though it could be the sort of thing that traveling freelancers might want to keep in their checked luggage, unless they want to spend some quality time with the TSA! Be sure to stick around to see a short video where [Raphael] shows off and explains how his Freelance Puncher works.

[Read more…]

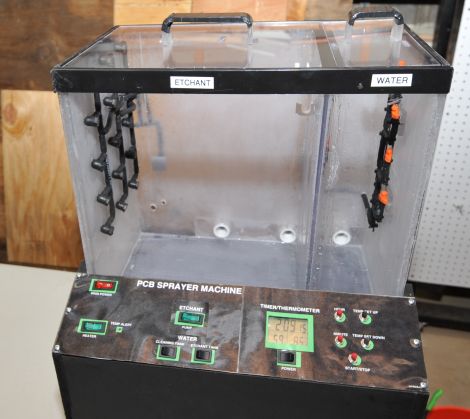
Create PCBs in just minutes with this awesome spray etching machine

pcb-sprayer

If you have ever produced your own PCBs at home, you know that it can be somewhat of a time consuming process. Spending 20 or so minutes manually agitating a board is a drag, and while aquarium bubbler setups improve the process, they are far from ideal. [Christian Reed] knew that if he really wanted to streamline his PCB production he had to emulate the big boys and build a PCB sprayer of his own.

His spray etcher is contained in a custom acrylic case built mostly of scraps from previous projects. It contains two compartments – one for spraying etchant on the PCBs, and another for rinsing the finished work. The system is impressive to say the least, featuring a maze of tubes and piping which allow him to etch boards and manage his chemicals with ease.

[Christian] says that although the parts list might seem daunting at first, it really is pretty easy to assemble the device. Seeing as he can etch and wash a board in about two minutes flat, we think that any amount of effort would be worth the results.

[Christian] points out that he was unable to find a guide for building this type of PCB sprayer anywhere online, so he documented the process in painstaking detail in order to make it as easy as possible to replicate his work. Be sure to check out the video below to see his etch tank in action – we’re pretty sure it will have you itching to build one this weekend.

[Read more…]

ElectroDroid – your Android electronic reference app

Earlier this week, fellow Hack a Day-er [Mike Nathan] reviewed Adafruit’s new iPhone/iPad app Circuit Playground. The comments on [Mike]’s review turned to suggesting ElectroDroid as an alternative to Circuit Playground. Surprisingly,  Hack a Day authors actually pay attention to the comments, so I’ve decided to throw my hat into the ring and offer up my review of ElectroDroid. For purposes of full disclosure, I have to add that I paid the $2.59 donation for a copy of ElectroDroid without ads, and have had no contact with the developers.

[Read more…]