Going from idea to schematic to printed PCB

Building a circuit on a bread board makes life much easier, but eventually you’re going to want a PCB for one of your circuits. Luckily, [Will] from Revolt Lab put up a trio of posts that will take you idea and turn it into a schematic and PCB.

First up is an awesome tutorial on the circuit design program Fritzing. While you won’t find Fritzing on the computer of anyone making a living doing circuit design work – those people usually go for Eagle or KiCad – Fritzing is very easy to use but still has a ton of features. Using Fritzing isn’t very hard, either. [Will]’s tutorial goes over copying your breadboarded circuit into Fritzing, creating a schematic from the bread board layout, and finally converting that to PCB artwork.

Once you have board artwork for your circuit, you’re probably going to want a real-life PCB. [Will]’s board etching tutorial goes over the toner transfer method of PCB creation. Basically, print your circuit onto glossy photo paper with a laser printer, put it face down on a copper board, then take a clothes iron to it. If you’re lucky, the laser printer toner will have transferred to the copper making a nice etch resist. To get rid of all that superfluous copper, [Will] used ferric chloride but a Hydrochloric Acid/Hydrogen Peroxide mix will work just as well.

Before you etch your boards, you might want to thing about building an etch tank that keeps all your slightly dangerous chemicals in one container. [Will]’s etch tank uses a large water container and a few pieces of LEGO to suspend the board in the etch solution. It etches boards a lot faster than laying them face down in a tray, allowing you to go from idea to finished piece a lot quicker.

Etching your own boards really, really fast

Sometimes the planets align and the Hackaday tip line gets two posts that are begging to be used together. Here’s two hacks to etch your own boards at home in just a few minutes.

Toner transfer PCBs on the quick

One way of putting an etch mask on a PCB is with the toner transfer method: print your circuit on a piece of inkjet photo paper using a laser printer, lay that circuit face down on a sheet of copper, and go at it with a clothes iron. This takes a heck of a lot of time and effort, but [Dustin] found another way. He used parchment paper instead of inkjet photo paper. Once the paper was on the board, he rolled it through a laminator. The results are awesome. It’s a very fast process as well – you don’t need to soak your board in water to get the photo paper off.

Etching that’s like wiping the copper away

[Royce] wrote in from the Milwaukee Makerspace to tell us about [Tom]’s etching process that is like wiping the copper off the board.  He used Muratic (Hydrochloric) acid and Hydrogen Peroxide with a sponge to wipe that copper away. The trick in this, we think, comes from the 30% H202 [Tom] picked up at a chemical supply company, but we’re pretty sure similar strengths can be purchased from beauty supply stores. Check out the video after the break to see [Tom] etch a 1 oz. board in just a few seconds.

[Read more…]

Putting QR codes in copper

Former Hackaday contributor [mikeysklar] has been trying to etch a QR code into a sheet of copper. Although his phone can’t read the CuR codes he’s made so far, he’s still made an impressive piece of milled copper.

The biggest problem [mikey] ran into is getting Inkscape to generate proper cnc tool paths instead of just tracing a bitmap image. He’s got the CNC part of his build under control, but he still can’t find a QR code reader that will register his work.

We’re no stranger to QR codes here at Hack a Day, and it’s very possible the only thing that could be stopping [mikey]’s QR code from being read by a phone is the contrast of the image. We’re thinking a little bit of printer’s ink forced into the non-copper part of the PCB would make the QR code register. Since [mikey] already has a very nice negative etching of his QR code, he could easily use his new board as a printing plate, making infinite paper copies of his copper-based QR code.

If you’ve got any ideas on how [mikey] can get his QR code working, post them in the comments.

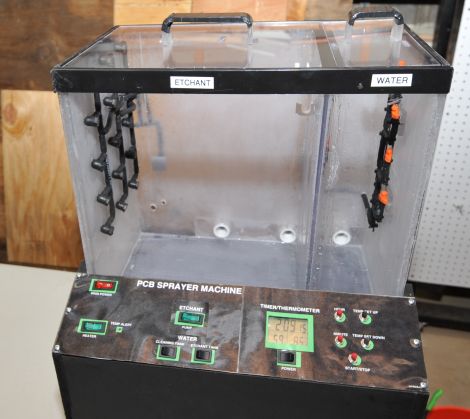
Create PCBs in just minutes with this awesome spray etching machine

pcb-sprayer

If you have ever produced your own PCBs at home, you know that it can be somewhat of a time consuming process. Spending 20 or so minutes manually agitating a board is a drag, and while aquarium bubbler setups improve the process, they are far from ideal. [Christian Reed] knew that if he really wanted to streamline his PCB production he had to emulate the big boys and build a PCB sprayer of his own.

His spray etcher is contained in a custom acrylic case built mostly of scraps from previous projects. It contains two compartments – one for spraying etchant on the PCBs, and another for rinsing the finished work. The system is impressive to say the least, featuring a maze of tubes and piping which allow him to etch boards and manage his chemicals with ease.

[Christian] says that although the parts list might seem daunting at first, it really is pretty easy to assemble the device. Seeing as he can etch and wash a board in about two minutes flat, we think that any amount of effort would be worth the results.

[Christian] points out that he was unable to find a guide for building this type of PCB sprayer anywhere online, so he documented the process in painstaking detail in order to make it as easy as possible to replicate his work. Be sure to check out the video below to see his etch tank in action – we’re pretty sure it will have you itching to build one this weekend.

[Read more…]