Arduino can program PIC too!

This is a wiring diagram that [Soranne] put together when developing a method of programming PIC microcontrollers using an Arduino board. You can see that he takes care of the 12V issue by connecting the Master Clear (MCLR) pin to an external source. This comes with one warning that the Arduino should always be reset just before making that connection.

He’s tested this with a 16F628 and is happy to report that he can successfully flash the program memory, but hasn’t implemented a way to write to the EEPROM as of yet. This should work for any of the 16F family of chips, but we’d bet this will be extended if some knowledgeable folks decide to lend a hand.

On the PC side of things [Soraane] has been working on a program to push code to the Arduino via the USB connection. He’s developing it in C# and even has a GUI worked up for the project. You can get your hands on the software in the second post of the thread linked above but you’ll have to be logged into the Arduino forum to see the download link.

We think the 12V issue is why we don’t see more roll-your-own programmers for PIC. But there are a few solutions out there like this ATmega8 version.

LED matrix shield starts with a very loud snap

We see a lot of LED matrix projects. They’re fun, and you can learn a lot of basic lessons during the build. But this one is out of the ordinary. [Rtty21] built an oddly sized, and sound controlled matrix shield for his Arduino. That’s it right there, the shield is the large chunk of protoboard but you can just see the Arduino peeking up over the top of it.

Now we say oddly sized because a 9×9 matrix doesn’t make much sense with an 8-bit micro controller. There’s no schematic but in the clip after the break he mentions that the columns and rows are driven by a decade counter and shift register and that’s what makes it possible to drive nine bits easily. Also of note on the board is that washer above and to the right of the matrix. It’s a touch-sensitive reset button. But the main control mechanism is a Clapper clone circuit. Just snap your fingers and it turns the project on or off. [Rtty21] based the design on this step-by-step sound input build.

[Read more…]

Arduino BASIC interpreter using LCD, keyboard, and SD

This Arduino BASIC interpreter will make a really fun one-day project if you’ve already got the parts on hand. [Usmar A. Padow] put together an Arduino Uno, SD card, four line character LCD, and PS/2 keyboard. but he’s also included alternative options to go without an LCD screen by using a computer terminal, or without the SD card by using only the Uno’s RAM. As you can see in his demo after the break, this simple input/output is all you need to experiment with some ancient computing.

It’s hard for us to watch this and not think back to an orange or green monochrome display. Just like decades past, this implementation of BASIC has you start each line of code with a line number, and doesn’t allow for character editing once the line has been input. The example programs that [Usmar] shows off are simple to understand but cover enough to get you started if you’ve never worked with BASIC before.

Last August we saw another hack which ported Tiny BASIC to the Arduino. You may want to take a gander at that one as well.

[Read more…]

Interactive table is slightly different than most.

[DanNixon] has put together this unique interactive table concept. Usually, when we see the term interactive table, we think of an LED grid. That just happens to be what we see the most of. While this table does, in fact, have an LED grid in the table top, it also has several other features and some very nice construction.

Instead of going the usual boring rectangular route, [DanNixon] decided to build a more visually appealing structure. The build log on that part alone is worth a peek. After that, he has a small LCD screen for displaying headlines and song titles as well as a compact LED matrix for some visualizations.

Great Job [DanNixon]

[Read more…]

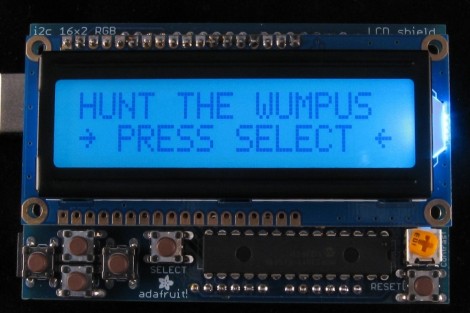
Text adventures for Arduino starting with Hunt the Wumpus

Let’s be honest, you’re going to have trouble getting kids to play text-based adventure games these days. But this is one way to get them interested. This weekend you should get together with niece, nephew, son, or daughter and help them build their own hardware and program it with an adventure game. One last project before school’s out and the weather’s nice.

This is [Dan’s] shiny example of Hunt the Wumpus. He used Adafruit’s RGB LCD shield for Arduino. It’s got a character LCD and five buttons. But you can easily breadboard this yourself using a few tactiles plus a screen and uC of your own choosing. One nice touch with this one is the RGB backlight which is used to add an element of danger to the story line. He also mentions a few bugs in the Arduino language which he found while setting up the game.

We’ve been meaning to make our version of Zork using an Arduino, GLCD, and PS/2 keyboard ever since we read “Ready Player One”. This is just a bit more encouragement to get moving on that project.

[Thanks PT]

Sip-and-Puff Ipod dock highlights assistive technology

Check it out, a Sip-and-Puff Arduino shield. This is an assistive technology that allows the physically challenged to control things using a plastic air tube. Different combinations of sucking (Sip) or blowing (Puff) differentiate between control commands.

In this case the device is used to control an iPod dock, but [Bob Johnson’s] Kickstarter project seeks to put the Sip-and-Puff functionality out there so that it can bridge the control gap no matter what the need. One example that he mentions in the video after the break is a Morse Code keyboard.

This shield uses a pressure sensor to receive input from the plastic tubing. But we’ve also seen it done using mechanical pressure switches. That technique is what was used in the Sip-and-Puff Kayak build.

[Read more…]