Whistle controls for you home electronics

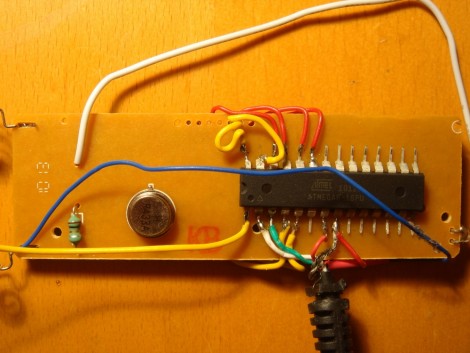
You know how to whistle don’t you? You just put your lips together and blow. But do you know how to make the electronics around you react to your whistled commands? Well [Befi] figured out a system that allows him to assign a whistled command to various home electronics.

He’s using a set of RF remote control outlets to switch power to various devices like a desk lap, or a turn table. The board you see in the image above is the remote control that came with the system, but that chip is an ATmega8 which he added to give round-about USB connectivity using a serial-to-USB converter. The technique is simple enough that we’d bet you can get this to work with an ATtiny2313 and the V-USB project but that’s another story.

The additional piece is the use of embedded Linux to detect and process whistled commands. In the video after the break [Befi] explains that he’s using a Dockstar along with a microphone to capture audio input. It uses a Fast Fourier transform algorithm to process the clip and pushes commands to the remote control after processing is complete. [Read more…]

Build an elevator controller, gain a friend for life

diy-elevator-controller

[Michael Ruppe] was working one day when a man named [Kevin] approached him for a bit of help with a project. It just so happened that [Kevin] was in the middle of constructing a DIY residential elevator and he needed assistance putting a control board together.

[Kevin] had no problem casting a forklift ram into his basement slab, nor installing a submersible pump in a custom-made hydraulic pit, but wiring up the controls for the device was just not something he was comfortable with. [Michael] was more than happy to lend a hand, and over the next couple of months the pair got things running nicely.

Instead of relying on a microcontroller, [Michael] built a control board that uses little more than a handful of relays and microswitches to get the job done – It’s certainly not hard to appreciate the controller’s simplicity.

It’s stories like these that remind us just how much the hacker community is willing to help out complete strangers with any task, big or small – you guys rock!

Stick around to see a short demo video [Michael] shot, showing the elevator in action.

[Read more…]

Rain barrel irrigation system keeps your plants fed when you're too busy

sprinkler-controler

[Kyle Gabriel] moved into a house with a nice tract of land behind it, but due to his busy schedule he had yet to plant the garden he so desperately wanted. He worried that his hectic life and busy hours would lead to accidentally neglecting his garden, so he built a water collection and automated irrigation system to ensure that his plants never went without fresh water.

The system is fed by two large 55 gallon barrels that collect rain from his gutters. A 1/2 HP well pump is used to pressurize the collected water, which is then dispensed throughout his garden by a sprinkler. [Kyle’s] system is run from a small control box where an Arduino is used to control the pump’s schedule. At a predefined time, the Arduino turns the pump on, while monitoring the system for potential problems.

If the system starts running low on water, the Arduino triggers the valve on his spigot to open, keeping the water level above the pump inlet pipe. He also keeps an eye on pump’s outlet pressure, indefinitely disabling it before a blockage causes the pump to cycle repeatedly.

He says that the sprinkler system works quite well, and with his modular design, he can add all sorts of additional functionality in the future.

Collecting Radon data in the name of science and safety

radon-data-collector

When [Chris Nafis] built an addition onto his historical home he found that a Radon problem, previously mitigated with plenty of concrete, seemed to rear its ugly head yet again. He eventually resigned himself to installing a Radon fan and detector – the latter of which offered no way to store measurement data. He wanted to get a better feel for the short and long-term Radon measurements in his house, in hopes of finding some correlation between temperature, moisture levels, and the total amount of Radon emitted from the ground.

To do this, he disassembled a pair of Radon detectors located in different parts of his house, each of which he wired up to an Arduino. Using his oscilloscope to determine which PCB leads controlled the different LED segments on the displays, he quickly had the Arduinos scraping measurement data from the sensors. [Chris] figured the best way to keep track of his data was to do it online, so he interfaced the microcontrollers with Pachube, where he can easily analyze his historical readings.

An additional goal he set for himself is to trigger the Radon fan only when levels start rising in order to save a little on his electric bill. With his data logging operation in full swing, we think it should be a easy task to accomplish.

Aquarium water exchanger built from Keurig parts

We keep seeing commercials for those Keurig coffee makers that use a plastic pod of grounds to brew just one cup of coffee. We’re pretty sure this is a fad, and absolutely sure that the extra packaging created by brewing with this method is a waste. But to each his own. [Danman1453] has two of the devices. One he bought, the other is a warranty replacement. He decided to scrap the malfunctioning unit and see if he could put it to good use. What he ended up with is the aquarium pumping system you see above.

It is conceived as tidier way to swap out the water in the fish tank. He had been using tubing to siphon the water, but found he almost always made a mess. This system uses an air pump to prime the water pump by pressurizing the tank which forces water into the lines. Once the water pump is primed he switches over to that for the rest of the work. He used an old metal tool box as an enclosure, using the cover to mount the push-buttons which route power to various components when pressed. Many of the parts were transplants from the coffee maker, but even if you sourced all of the components new this wouldn’t cost too much to put together.

Tearing down a failed LED bulb

todd-harrison-led-bulb

[Todd Harrison] was thinking of replacing some incandescent light bulbs in his house with LED models, so and his wife picked up a single candelabra bulb to test before they spent the cash to swap them all out. The bulb died in about a week’s time, so [Todd] got out his trusty electronic disassembly device (his hammer), sharing his post-mortem examination with us.

After taking a cursory look at it, [Todd] found that the circuit powering the bulb was not overly complicated. A small bridge rectifier along with a few caps and resistors are all that was used to power the device, making it’s failure a bit puzzling. When [Todd] wired it up to his power supply, the bulb lit up, much to his surprise. His best guess as to why it died is that the shrink wrap around the PCB managed to cause a short, though he also noticed that one of the bridge rectifier’s legs was not soldered down.

He started tooling with the light to find out more about it, but he managed to blow out a handful of LEDs in the process. All in all the LED lighting swap was a disappointment, but at least he had some fun along the way!

Continue reading if you’re interested in seeing [Todd’s] diagnosis in its entirety.

[Read more…]