Building your own portable 3D camera

diy-3d-camera

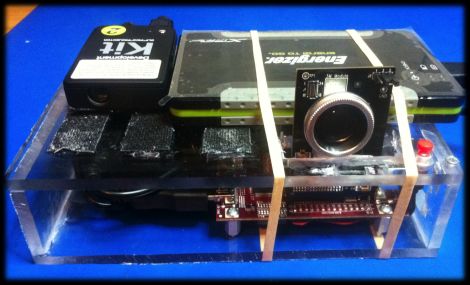
[Steven] needed to come up with a project for the Computer Vision course he was taking, so he decided to try building a portable 3D camera. His goal was to build a Kinect-like 3D scanner, though his solution is better suited for very detailed still scenes, while the Kinect performs shallow, less detailed scans of dynamic scenes.

The device uses a TI DLP Pico projector for displaying the structured light patterns, while a cheap VGA camera is tasked with taking snapshots of the scene he is capturing. The data is fed into a Beagleboard, where OpenCV is used to create point clouds of the objects he is scanning. That data is then handed off to Meshlab, where the point clouds can be combined and tweaked to create the final 3D image.

As [Steven] points out, the resultant images are pretty impressive considering his rig is completely portable and that it only uses an HVGA projector with a VGA camera. He says that someone using higher resolution equipment would certainly be able to generate fantastically detailed 3D images with ease.

Be sure to check out his page for more details on the project, as well as links to the code he uses to put these images together.

Monitoring and controlling your garage door from afar with an IP camera

remote-control-garage-door

Last year, [Mark Simonelli’s] wife asked him if he could design something that would allow her to remotely check if their garage door had been left open. [Mark] jumped at the chance to tinker with electronics and designed a system around an old TrendNet IP camera. When remotely connected to the camera using IP Cam Viewer Pro for his Android phone, [Mark] could watch the video stream and also trigger the garage door opener via a small relay circuit he built.

His remote opener worked well, but his camera unfortunately lacked any sort of IR vision/low light capabilities. Since his camera wasn’t very useful in the dark, he decided that he needed to add some way to trigger a light when remotely monitoring his garage. He figured the best way to do this would be to control a power strip-connected light using a circuit similar to the one he built to open the garage door itself.

He stopped by the hardware store and picked up a cheap power strip, disassembling it and removing the power toggle once he got home. He fitted it with a small 5v relay, which he connected to the camera’s terminal block. While he admits that it might not be the absolute safest solution, he can easily control both the light and the garage door with a simple swipe of his phone’s screen.

Continue reading to see his remote controlled power strip in action, and be sure to swing by his site to see more details about his camera-controlled garage door opener.

[Read more…]

A zoom lens for your webcam

We need to find the kind of friends that [Dino] has. They seem to drop off all of their older, yet totally awesome, electronics with him once they’re through with the devices. One example of this is the Sony Handycam that came into his possession. He decided to crack it open and repurpose the 20x optical zoom lens for use with a webcam.

We always like [Dino’s] style. You can tell that he has no idea if he’s going to be able to pull off his goal, but at the same time he has an intuitive sense that he’ll make it happen. In the video after the break he starts off investigating what components are in the camera. At first the lens is passing no light at all, but he just strips down parts until he can see through it.

There are a couple of servo motors which control zoom and focus. He removes those before attaching the CCD from a Logitech webcam. At the end of his video he shows a demo of the functionality, which is pretty finicky when focusing by hand. But we think this hack would make a fantastic camera for soldering projects, it just needs a custom controller so the motors can be once again used to adjust focus.

[Read more…]

Shoulder mount for any camera

Whatever your reasons may be, if you’re going to be holding a camera for long periods of time this shoulder mount will both steady the image, and help save you some aches and pains. [Kyle Jason] built the rig seen above for just $20 by following this guide.

[Knoptop] published the guide about a year ago. It doesn’t make use of any special PVC connectors, so you’ll have no problem finding everything you need at the hardware store. Connectors used include 45 and 90 degree angles, straight pieces, and a PVC conduit box to serve as the mounting bracket. After cutting, dry fitting, and welding everything together the rig really benefits from a couple of coats of paint. Don’t forget the grip covers to make the thing easy to hold onto.

Don’t want to read the build guide? After the break you’ll find [Knoptop’s] build video which is actually quite a fun eight minutes to watch.

[Read more…]

Make any photo 3D using The Gimp

Put your face close to the screen and cross your eyes until the two images above become one. You may need to adjust the tilt of your chin to make it happen, but when they come together you’ll see [John Lennon] pop out in 3D. This was made using a 3D rendering script for The Gimp.

The process is not entirely automatic, but it won’t take too long to mask off the outlines for different depth layers. The script makes three different layers from the image. One of them is a color-coded depth map that uses a custom color palatte to choose distance for each item. If you paint the background dark blue it will be processed at the furthest distance from the viewer’s cross-eyed perspective, yellow is the nearest.

[Don] mentions a parallel output and a cross-eyed output in his write up. We understand the cross-eyed version, but are just guessing that the parallel version would be used in a stereoscopic viewer that puts a partition between the two images so that each eye sees a different frame. You know, like a View-Master.

DIY intervalometer uses a great looking enclosure

That finished look for your project is all about the enclosure you find to host it. We think [Punge] really did a great job with the case for this DIY intervalometer. The build section of the project page links to the company that makes the enclosures. They’re meant to host round PCBs with several options for button configuration. Combine this with enough space for a coin cell and you’ve got a great looking custom device.

The intervalometer itself is much like others we’ve seen. It uses an audio-jack connector to control the camera. You have the option of using a three or four contact version depending on what your camera supports. The PIC 12F683 uses an optocoupler with a built-in transistor to do the switching. A single button seen at nine o’clock on the board above is all it takes to start the device off. Press and hold once to wake it up, then wait for your desired interval and press the button again to start the timed shots.

You’ll notice that there is no programming head in this design. A separate board was etched to attach the PicKit, with the surface mount chip just held in place during programming.