Designing a self-replicating milling machine

For his senior design project at Swarthmore College, [Julian] decided to build a metalworking equivalent to the RepRap. [Julian]’s final project is a self-replicating milling machine, and hopefully giving some serious metalworking power to all the makers with CNC routers and RepRaps out there.

At first glance, [Julian]’s mill doesn’t look like something you would find in a machine shop. The machine is built around a tetrahedral machine tool frame, giving the machine an amazing amount of stiffness with the added bonus of a degree of self-alignment. The spindle and motor are off-the-shelf units, but the entire bed assembly is made by [Julian] himself.

Right now, [Julian] still considers his project a very early prototype; there’s still a bit of chatter issues he’s working out, and the cost of the finished machine – about $1200, not including many hours of fine tuning – means it isn’t as competitive as other options. Still, [Julian] made a mill from scratch, and that’s nothing to scoff at.
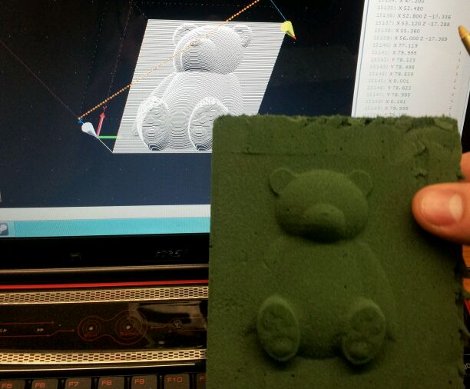
Pleasing results from a CNC mill project

[Roy] is getting to the end of his second CNC mill project and finally seeing some results. Here you can see a bear he milled in some floural foam.

The project started out as an Arduino-based pen plotter. It move the pen along one axis, and the drawing surface along another, with the third axis allowing the pen to be lifted and repositioned. With that in his back pocket he went all out and began what he calls the Mark II. He used T-slot aluminum for the frame, which really helped when it came to aligning the linear rod supports for each axis. After a lot of drilling, and tapping he managed to bring each axis on line one at a time. A pre-fab CNC driver kit drives the stepper motors, making them groan as they do their work. hear it for yourself in the test video after the break were the machine is first tested as a pen plotter.

[Read more…]

CNC conversions with [Bob]

[Bob Berg] emailed in to request that we take a look at his website. We did, and we liked what we saw! [Bob] has done a couple CNC mill conversions and documented the process quite thoroughly.

The first one listed on his site is a Sieg x-3, seen above. [Bob] explains that the first thing he did when he received it was tore it apart and  cleaned it meticulously. We’re not sure if [Bob] was being insanely neat, or if he bought a used dirty unit. Either way, you can’t argue that a nice clean machine is the way to start. After a short while using it the way it was, he added a digital read out for a little more accuracy. From there, he went for a fully motorized conversion.

Keep looking around his site. There is another full build (a lather master RF45) as well as some miscellaneous other projects that are quite interesting.

A better dust skirt for your CNC mill

[Joshendy] wanted to get a better look at the cutting head on his CNC mill when it was running. The problem is that the rotating blades throw up a lot of junk which you don’t want flying around the shop so they’re usually surrounded with a shroud connected to a shopvac. He just milled is own transparent dust skirt to solve the problem.

The original dust skirt uses black bristle brushes to contain the waste from the cut. In addition to obscuring your view of the cutter this didn’t do a very good job of containing bits and pieces. The solution seen on the right uses clear, flexible PVC as the skirt. The video after the break details the build process. [Joshendy] cut out a replacement plate which is then fitted with magnets to connect to the cutter. The skirt is affixed to that plate with a series of screws, making it easy to replace if it ever wears out.

[Read more…]

Carabiner helps you hone your milling skills

[Christian] is learning to use the metal milling tools at what we assume is his local Hackerspace. We love this about the communal spaces, they provide so many opportunities to delve into new fields. He embarked on a voyage that included visits to most of the machinery in the shop as he build his own carabiner with a magnetic gate. He’s not going to be hanging off the side of a mountain from it. But his keys or a water bottle will find a happy home thanks to the device.

It all started with some sketches to establish the shape of the overall design. From there he spent some time modelling the frame of the carabiner in CAD. He’s lucky enough to have access to a water jet which took the SolidWorks files and cut out the aluminum frame for him. That left a part with very sharp edges, so he used a wood router with a carbide bit to round them over.

The next part is adding the gate. He used an end-mill to add a mounting area on the frame. The locking ring for the gate was textured using a knurling tool, and the rest is milled with a simple cutting tool. This gate uses a magnet to center itself, with the knurled ring as the only mechanical latching mechanism. [Christian] does a good job of demonstrating the completed carabiner in the clip after the break.

[Read more…]