A flashlight for any occasion

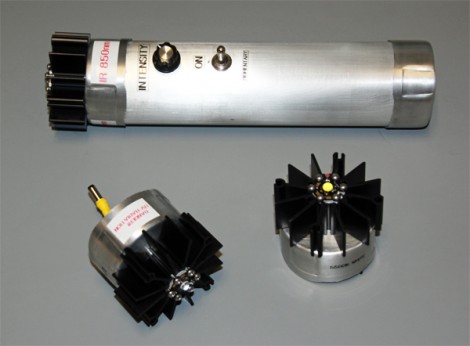
Whether you’re trying to light your path, build your own night vision, or do some tanning at home, this flashlight has you covered. [David Prutchi] designed the high power flashlight with three swappable heads.

He built the base unit out of aluminum pipe. It’s got plenty of room for the four 9V batteries that act as the power source. The driver circuit is just a bit smaller than one of those batteries, and to bring the whole thing together [David] and his helper added a potentiometer, toggle switch, and quick connector which makes head swaps a breeze. The heads themselves are all LED based, with one for visible light, another for infrared, and the final module outputs ultraviolet. We joke about tanning with it, but at 10 Watts you should be more worried about accidental damage to your vision.

The finished product is shown checking the security ink on some Canadian Currency. This would also make a nice secondary light source for your night vision monocle.

Build a stereo microscope from binoculars and a camera lens

Here’s an oldie but a goodie. [RunnerPack] stumbled upon an article from 2001 about building a stereo microscope from a pair of binoculars and a camera lens. With a ring light attached to the end of the camera lens, we couldn’t think of a better microscope for SMD work.

To mount the binoculars to the camera lens, [Giorgio Carboni] made a very nice adapter containing four prisms. These prisms are very carefully aligned and glued down with a little bit of epoxy. By using an 8×30 pair of binoculars and a 35-100 mm camera lens, [Giorgio] was able to get a magnification factor of 10-57x. With a macro lens this factor can be increased (a 28mm lens bumps it up to 71x, but a lot more light is needed).

The pedestal is just a few ground rods and ground steel rods, something that requires a bit of machining. Since 2001, though, a lot of tinkerers have 3D printers so it could be possible to build a more easily manufactured version of the focusing apparatus.

[RunnerPack] had a pair of binoculars and a camera lens handy and tried a mono version of this build. He says he was blown away, but unfortunately didn’t provide any pictures. If you decide to build this project, be sure to snap a few pics and send it in on the tip line.

Gigantic liquid crystal display is like a giant calculator

Some say he turns on his soldering iron by saying, “Flame on!.” He deadbug solders – QFP packages. All we know is he’s called [stig] and he sent in an awesome an awesome video of a new display at the Nature Research Center in Raleigh, North Carolina. It’s a 10 foot by 90 foot LCD display that uses 6 inch square glass panels containing the same liquid crystals you’d find in a calculator.

The display/installation is called Patterned by Nature and is built using 3600 pieces of LCD privacy glass. When a voltage is applied to the glass it changes from clear to opaque. While this technology has been around for decades (just look at your calculator), only in the last few years has LCD privacy glass come down in price to make a project like this economical.

The gigantic display was created in part by Sosolimited, an art studio who has made a similar project before. The display hanging in the atrium of the Raleigh Nature Research Center is amazingly efficient for its size  drawing only 75 watts.

If you’d like to try your hand at a similar build, we wish you luck; this LCD glass is still somewhat expensive but perhaps in a few years the price will come down enough that we can play Tetris on the side of a building.

[Read more…]

A papercraft resistor calculator from Adafruit

The Adafruit blog just posted a neat papercraft resistor calculator. If you haven’t yet learned the horribly offensive mnemonic for resistor color codes, now’s your chance to have a cheap and portable resistor value reference.

This papercraft resistor calculator is the latest in the family of Circuit Playground tools that include a fabulous electronic reference app we reviewed some months ago. Instead of an Android or iOS device, the papercraft resistor calculator runs on its own mechanical computer; a series of four printed disks and some paper fasteners.

If you’d like to print out your own resistor calculator, Adafruit put up the PDF on GitHub and posted the Illustrator file on Thingiverse for easy editing. It’s not the old-school cool of a slide rule, but we could easily see this resistor calculator being useful if you’re ever lucky enough to teach electronics to children. At least then you won’t have to share that offensive mnemonic.

Pedal powered hydrofoil looks like a lot of fun

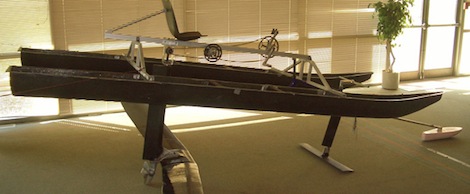
After reading a bicycle-powered hydrofoil build we posted a few days ago, [James] sent in the project that earned him an iron ring from Dalhousie University in Nova Scotia, Canada. It’s a pedal-powered hydrofoil made of carbon fiber and a Titanium drive shaft [James] and five other students in a mech eng senior design class built in 2005.

The Halifoil, as the team called it, is based on a recumbent design and uses twin carbon fiber hulls to keep the rider out of the water when not pedaling. The use of carbon fiber foils and Titanium drive shaft keep the weight down so the rider can easily accelerate to a speed where the hulls come out of the water.

Compared to the last hydrofoil we posted, [James]’ build is much heavier, but one is much better suited to sitting in the middle of a lake, then pedaling to the shore while flying above the water.

Even though the project is several years old, it’s still a very cool build. [James] was kind enough to post the videos of his build residing on the Dalhousie servers on YouTube; you can check those out after the break.

[Read more…]

Tiny N64 controller comes with hand-cramp guarantee

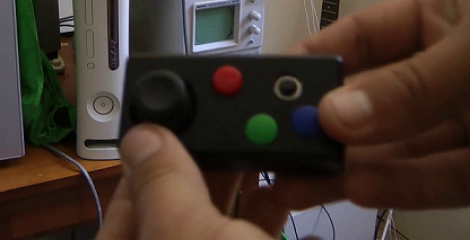
Just looking at this little thing makes our hands ache. But [Kirren] did do a great job of building an N64 controller inside a tiny project box. It’s not a mod, but a ground-up build based on a PIC 16F628 microcontroller.

It has most of the buttons found on a standard controller, and he assures us that you can play most games without missing the ones that didn’t make it into the design. You can just make out the analog stick to the left, but that silver ring on the right is actually a 4-direction tactile switch which stands in for the C buttons. He’s also included Start, A, B, R, and Z.

The link above goes to his Wiki, and there are more than enough details if you’re interested in doing this yourself or just understanding how everything works. Check out his writeup on the protocol, and  you can even get a copy of his code. There’s also a video demo after the break which shows [Kirren] playing some Bond with the controller. [Read more…]