Etching PCBs with vinegar

When we hear about etching PCBs at home we assume that either Ferric Chloride or Cupric Chloride were used to eat away unmasked copper from the boards. But [Quinn Dunki] just wrote up her PCB etching guide and she doesn’t use either of those. Instead, she combines vinegar, hydrogen peroxide, and salt. It’s easier to find vinegar than muriatic acid (Cupric Chloride is made using this, peroxide, and adding the copper) so this is something to keep in mind if you’re in a pinch (or a Macgyver situation).

The rest of the process is what we’re used to. She’s using photoresistant boards which can be masked with a sheet of transparency instead of using the toner-transfer method. Once they take a bath in the developer solution she puts them in a shallow dish of vinegar and hydrogen peroxide along with a teaspoon of salt. She wipes the surface with a foam brush every minute or so, and inspects them every ten minutes to see if they’re done.

She does discuss disposal. Seems that she throws the solution in the garbage after each use. The liquid will contain copper salts which are bad for wildlife. We’ve heard that you should neutralize the acid and make a block of concrete using the liquid, then throw it in the garbage. Does anyone have a well-researched, ethical, and environmentally friendly way of getting rid of this stuff?

Gold leaf circuit board

Ah, the glitter of gold… or fake gold, we’re not really sure. But [Mike Hogan] and [PJ Santoro] have been working with faux gold leaf as a conductor on circuit boards. The device you see above is mounted on metal-covered paper substrate and it really works.

They started by applying spray adhesive to heavy paper to make the gold-clad they needed. This was cut down into hexagons in homage to their hackerspace, Hive76 in Philadelphia. From there the shape of the microcontroller (an MSP430 G2211 in this case) to prevent shorts under the chip. The leads were flattened to interface well with the gold contacts, and a hobby knife was used to score the traces. Some careful soldering made up the final connections, and they were in business.

Oh, wait; chip on board but nothing on chip. They forgot to program it first! Since there’s no header they needed an easy way to interface with the board. The clever guys used the power of magnets to hold alligator clips in place. See how they did that in the demo video after the break.

They’re also working on some boards that use conductive ink similar to this hack but we haven’t seen a write-up from these two about those experiments… yet.

[Read more…]

Create PCBs in just minutes with this awesome spray etching machine

pcb-sprayer

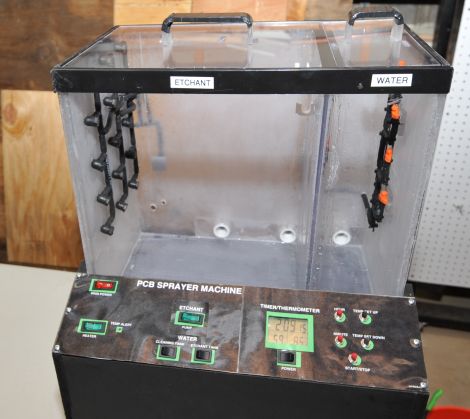
If you have ever produced your own PCBs at home, you know that it can be somewhat of a time consuming process. Spending 20 or so minutes manually agitating a board is a drag, and while aquarium bubbler setups improve the process, they are far from ideal. [Christian Reed] knew that if he really wanted to streamline his PCB production he had to emulate the big boys and build a PCB sprayer of his own.

His spray etcher is contained in a custom acrylic case built mostly of scraps from previous projects. It contains two compartments – one for spraying etchant on the PCBs, and another for rinsing the finished work. The system is impressive to say the least, featuring a maze of tubes and piping which allow him to etch boards and manage his chemicals with ease.

[Christian] says that although the parts list might seem daunting at first, it really is pretty easy to assemble the device. Seeing as he can etch and wash a board in about two minutes flat, we think that any amount of effort would be worth the results.

[Christian] points out that he was unable to find a guide for building this type of PCB sprayer anywhere online, so he documented the process in painstaking detail in order to make it as easy as possible to replicate his work. Be sure to check out the video below to see his etch tank in action – we’re pretty sure it will have you itching to build one this weekend.

[Read more…]