Program your Arduino via IR using the Arduino IDE

Here’s a way to program an Arduino wirelessly while still using the stock IDE. It uses an alternative bootloader called SuperDuplex along with an IR receiver like the ones used for TV remotes.

As you can see, this does take two parts. There is the target device which has the IR receiver, as well as the transmitting unit which connects to the computer via USB. You can see a demonstration of the programming process after the break. It might be a bit slow, but nothing outrageous.

With hobby electronics we always thing that “what does it do?/what is it for?” is the wrong question. But in this case we there’s a very apparent use for it. If you’ve built a gadget for use in a harsh environment and want to keep the number of openings in the enclosure to a minimum (like for an underwater ROV) this is perfect. Just make sure there’s a window for the IR receiver and you’ll be able to program as much as you want. Of course it still looks like you need a method to manually reset the target chip, but you’ll think of something.

[Read more…]

Six-digit VFD alarm clock

[Haris Andrianakis] just finished building this very clean-looking vacuum fluorescent display clock. It shows six digits using IV-11 tubes, and also has a half-dozen RGB LEDs to spice things up (check out the video after the break for an example). An ATmega168 drives the device, controlling the display and serving as a battery-backed real-time clock.

As with any tube-based clock there’s a fair amount of work that goes into driving the display. Each tube has a filament which requires 1.2V, and the segments themselves need 60 volts to light up. The microcontroller is not hard to protect; this is done with a series of transistor-based circuits used for switching. But the need for three voltages (to power microcontroller, filament, and segments) means a more complex PSU design. [Haris] chose to use a MAX6921 to simplify the process.

If you’re considering building something like this, we’d recommend looking for some 12-segment tubes. As we’ve seen before, they can display letters as well as numbers in case you wish to repurpose the device in the future.

[Read more…]

Sandbox topographical play gets a big resolution boost

Here’s another virtual sandbox meets real sandbox project. A team at UC Davis is behind this depth-mapped and digitally projected sandbox environment. The physical sandbox uses fine-grained sand which serves nicely as a projection surface as well as a building medium. It includes a Kinect depth camera over head, and an offset digital projector to add the virtual layer. As you dig or build elevation in parts of the box, the depth camera changes the projected view to match in real-time. As you can see after the break, this starts with topographical data, but can also include enhancements like the water feature seen above.

It’s a big step forward in resolution compared to the project from which the team took inspiration. We have already seen this concept used as an interactive game. But we wonder about the potential of using this to quickly generate natural environments for digital gameplay. Just build up your topography in sand, jump into the video game and make sure it’s got the attributes you want, then start adding in trees and structures.

Don’t miss the video demo embedded after the break.

[Read more…]

16FUSB — it's like V-USB for the PIC 16F628

If you have an idea for a fairly simple USB device but don’t want to invest in the more expensive microcontrollers, this library will be of interest to you. It’s a software implementation of the low-speed USB protocol for PIC 16F628. You can pick these up for around $2, and it just takes a few other components to complete the circuit. And hey, you don’t even need a proper PIC programmer to flash the code. This is the same chip for which we just saw an Arduino act as the programmer.

The circuit design looks exactly the same as the V-USB stack, which provides USB functionality to lower-end AVR microcontrollers. In addition to the chip you need a crystal oscillator, a couple of 3.6V zener diodes, and a handful of passive components. There are a couple of LEDs in the design, but we assume these are for feedback and are not crucial to the functionality of the circuit.

There’s no shortage of data included in the project post so you may want to bookmark this one for later reference.

Fancy telemetry control display for a quadcopter

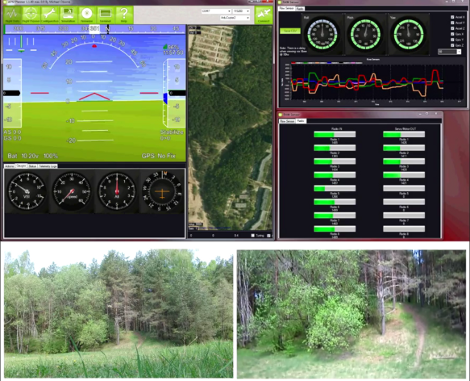
Most of the quadcopter projects that we’ve seen use a joystick-based control system. This lets you fly the thing around like any RC vehicle. But [Saulius] is augmenting his control system by pulling and displaying telemetry data. It doesn’t really change the way the vehicle is controller, but it lets the craft roam much further away because the operator can watch the computer screen and forego the need for the quadcopter to be within sight.

A Carambola board (also used in this weather station project) is used to provide connectivity. This is WiFi based, which helps us understand the range it can travel. The quadcopter carries a camera, which is shown in the lower right box of the image above. There is also an artificial horizon, and feedback dials which display the telemetry data.

It looks like there’s a satellite view in between those two dashboard widgets. We don’t see anything coming up right now, but it’s possible this is meant to overlay a virtual marker for the aircraft’s position based on GPS data. That last part is really just conjecture though. Catch the 80-second test flight after the jump.

[Read more…]

Building Main Street, USA in a coffee table

[Alex George] has been collecting miniatures of Main Street, USA in Disney Land hand crafted by artist [Robert Olszewski]. These models are incredibly accurate, but sadly static. [Alex] has some of the floats from the Main Street Electrical Parade that light up with the help of a few LEDs. One day, [Alex] found himself wishing he could watch a miniature parade circling around his diorama and did what any of us would do: make a tiny electrical parade move around his miniature town.

[Alex] began his build by designing a system of chains and sprockets underneath his miniature Main Street. When not on display, the parade floats are hidden underneath the town. At night, though, the parade ascends to the surface to put on a show.

It’s not an electrical parade if there aren’t any lights, so [Alex] grabbed a couple Blinkms to attach to the underside of each float. These are small programmable RGB LEDs that can repeat the same sequence of lights for the entire time the parade is visible. A very excellent job and a masterwork of craftsmanship for both [Alex] and [Robert Olszewski].

[Alex]’s ‘making of’ video and a full demo of the float are available after the break.

via boingboing

[Read more…]