3D Graphics on an oscilloscope

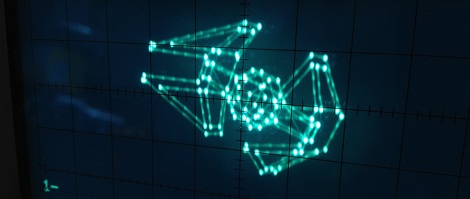
Armed with four wingtip-mounted Sienar Fleet Systems L-s9.3 laser cannons and a SFS P-s5.6 twin ion engine, the TIE Interceptor has become the scourge of the Rebel fleet, nearly capable of out-running and out-maneuvering the beloved A-wings of Nomad Squadron. Because of [Matt]’s tireless work, we can now visualize TIE Interceptors on approach with our targeting computers oscilloscopes.

[Matt]’s oscilloscope visualization of a TIE fighter is a huge improvement on previous scope displays we’ve seen, considering [Matt] used very minimal hardware to display 3D graphics. The build uses an ATMega88 along with a 10-bit DAC to draw lines on the screen. The capacious Mega88 with 8kB of flash and 1kB of SRAM was nearly filled to capacity with [Matt]’s project; to improve the rendering speed of the display, sine & cosine values are pre-computed and stored in flash along with division tables for common values.

The rotation of the TIE fighter is controlled by a serial connection to [Batt]’s desktop. It’s a very impressive piece of work that looks like it would fit into the cinematic aesthetic of The Empire Strikes Back. Check out [Matt]’s video of the TIE rotating in space after the break.
[Read more…]

Building your own portable 3D camera

diy-3d-camera

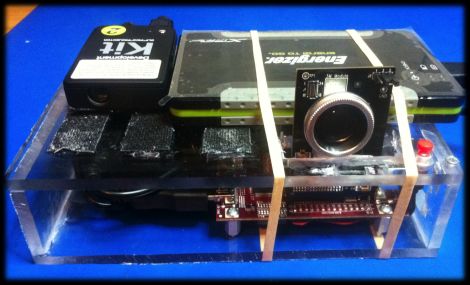
[Steven] needed to come up with a project for the Computer Vision course he was taking, so he decided to try building a portable 3D camera. His goal was to build a Kinect-like 3D scanner, though his solution is better suited for very detailed still scenes, while the Kinect performs shallow, less detailed scans of dynamic scenes.

The device uses a TI DLP Pico projector for displaying the structured light patterns, while a cheap VGA camera is tasked with taking snapshots of the scene he is capturing. The data is fed into a Beagleboard, where OpenCV is used to create point clouds of the objects he is scanning. That data is then handed off to Meshlab, where the point clouds can be combined and tweaked to create the final 3D image.

As [Steven] points out, the resultant images are pretty impressive considering his rig is completely portable and that it only uses an HVGA projector with a VGA camera. He says that someone using higher resolution equipment would certainly be able to generate fantastically detailed 3D images with ease.

Be sure to check out his page for more details on the project, as well as links to the code he uses to put these images together.

BB313 breadboard platform makes ATtiny prototyping painless

Johngineer's BB313

[John De Cristofaro aka Johngineer] uses various ATmega microcontrollers in his electronics projects, but he finds himself reaching for an ATtiny2313 or ATtiny4313 more often than not. He got tired of having to wire up pin headers, capacitors, and the like each time he started a project, so he spent some time designing an easy to use breadboard platform around the chips.

Inspired by LadyAda’s Boarduino, his BB313 board features FTDI pin headers, an ISP programming header, a reset button, along with breakout pins that plug directly into any breadboard. Aside from sharing a similar layout, [John] says that the similarities end there. His board is designed for designers who program in C or C++, so Arduino code won’t run without some substantial modification.

The board looks like a pretty handy benchtop tool, and we’re pretty sure it would be a big time saver for anyone who uses these chips with any frequency. [John] says that the board cost about $6.50 to make when he put it together, but that prices might vary slightly depending on where you have your PCBs made.

Be sure to swing by his site if the design looks like it might be helpful. He has made the schematics, a bill of materials, and all the rest available for the taking.

[via Adafruit blog]

WAV playback with an ATmega32

[Vinod Stanur] just finished another hobby project by building a WAV audio player using a microcontroller. He had started development a while back using a PIC microcontroller. But the chip he was using didn’t have enough SRAM to allocate as a playback buffer. When he got his hands on an ATmega32 his mind turned back to the project and he saw it through to the end.

He takes advantage of what he learned on several earlier builds. He’s using a TV remote as input, just like his Snake game did. Storage is provided by an MMC card, a trick he perfected with this voice recorder project. Instead of using a FAT library, he uses his own code to read the linked-list (File Allocation Table) for sector addresses, then he parses the WAV header and processes the file accordingly.

Playback uses two 512 byte buffers. One is feeding the output while the other is being populated from the memory card. When the output buffer is exhausted the two are swapped and the process continues. You’ll find [Vinod’s] demo of the project after the break.

[Read more…]

DIY intervalometer uses a great looking enclosure

That finished look for your project is all about the enclosure you find to host it. We think [Punge] really did a great job with the case for this DIY intervalometer. The build section of the project page links to the company that makes the enclosures. They’re meant to host round PCBs with several options for button configuration. Combine this with enough space for a coin cell and you’ve got a great looking custom device.

The intervalometer itself is much like others we’ve seen. It uses an audio-jack connector to control the camera. You have the option of using a three or four contact version depending on what your camera supports. The PIC 12F683 uses an optocoupler with a built-in transistor to do the switching. A single button seen at nine o’clock on the board above is all it takes to start the device off. Press and hold once to wake it up, then wait for your desired interval and press the button again to start the timed shots.

You’ll notice that there is no programming head in this design. A separate board was etched to attach the PicKit, with the surface mount chip just held in place during programming.

Investigating parking assist sensors

While his wife was out-of-town [James] jumped at the opportunity to do some snooping around with her Chevy Tahoe’s parking assist sensors. We can understand how pulling parts out of someone’s car would make them none too happy. But we find it hilarious that it’s a leased company car he’s tinkering around with. But we’re glad he did, the ten-page write-up he published about the project is a fascinating read.

You can see the control board above which is housed beneath the passenger seat. It uses a Freescale microcontroller to read from the four bumper-mounted ultrasonic sensors. But just looking at what parts are used obviously isn’t enough to satisfy a hacker’s appetite for knowledge. [James] busted out a CAN bus tool to sniff the data packets. These sensors use a custom chip designed by GM, utilizing a single wire communications system. He figures out the communication scheme and builds an mbed based test rig to read them directly.

[via Dangerous Prototypes]