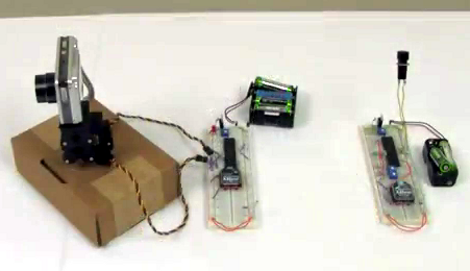
Wireless camera mount offers pan and tilt functions

[Chris] put together a bunch of common components to create this wireless pan and tilt system for a security camera or a robot.

The motorized base is simple enough, using two servos to make up a mount for the digital camera. In this case he used a parts package which is designed to mount the servos perpendicular to each other. You could also 3D print, our build your own brackets quite easily. The control circuitry consists of a pair of PIC 18LF4520 microcontrollers and a set of Xbee modules. This is where the wireless connectivity comes in.

On the transmitter side, a pair of potentiometers are read by the microcontroller’s ADC and translated into position values. The receiver takes those values and drives the servo motors accordingly. In the clip after the break [Chris] is using micro trimpots which require a screw driver to adjust. You might want to hit the parts bin and see if you can get some that have a more user-friendly shaft or knob.

Unfortunately this system doesn’t transmit video. But WiFi webcams are getting quite affordable so that might be a good option in this case. [Read more…]

ATtiny44 drop-in replacement for Ikea Dioder's stock PIC controller

The Ikea Dioder is an LED light sold at the big blue and yellow building that lets you mix your own colors using a simple button and wheel controller. [Marco Di Feo] looked at all of the other projects out there that alter the controller and figured out that the IC can be directly replaced with an ATtiny44 microcontroller. With that chip soldered onto the board he added IR control so that he can change colors using his universal remote control (translated).

[Marco] removed the potentiometer normally responsible for selecting the color. This frees up one pin on the microcontroller which he then uses to receive signals from a TSOP1736 IR receiver. The video after the break shows the device, which illuminates the back of his home entertainment center, reacting to commands from his remote control.

Of course this can be done without the chip swap as the PIC 16F684 that comes with it can be reprogrammed in place. But [Marco] didn’t have a PICkit or other programmer on hand. [Read more…]

Building a better circuit for renewable energy harvesting

[David], [Ian], and [Sajjad] finished and submitted their entry to the ChipKIT challenge just under the wire. They designed and built a maximum power tracking circuit for use with renewable sources. That is to say, this is a voltage regulator for use with solar cells and other generative sources like wind or water power. The idea is to use the best concepts of switch-mode power supply design, but replace the more wasteful parts with circuits that can harness and roll the loss back into the output.

We have to admit, following their development choices from the write-up at the top is a bit rocky. But luckily they filmed an in-depth description of the design choices, as well as a demonstration of the circuit along with various test measurements. If you’ve got twenty minutes and some patience all will become clear in the video after the break.

This will go along great with that bucket-based hydro generator you built.

[Read more…]

Building the worst Linux PC ever

Linux is generally considered the go-to OS for under powered computers. Wanting to challenge the preconceived notion that Linux requires ‘a computer made in the last 20 years,’ [Dmitry] built the worst Linux PC ever around a simple 8-bit microcontroller.

The ATMega1284p [Dmitry] used doesn’t have a lot to offer as far as RAM and storage goes; just 16 kilobytes of SRAM and a paltry 128 kilobytes of Flash storage. While this may be voluminous in the embedded world, it’s peanuts compared to the gigabytes of RAM and hard drive space on even a low-end netbook. To solve this problem, [Dmitry] threw an antique 30-pin RAM SIMM at the problem. It’s wired up directly to the microcontroller, as is the 1 Gigabyte SD card that serves as the PC’s hard drive.

Linux requires a 32-bit CPU and a memory management unit, something the puny microcontroller doesn’t have. For [Dmitry], the best course of action was emulating an ARM processor on an AVR. We’re not sure if we’re dealing with genius or madness here, but it did prove to be a valuable learning exercise in writing a modular ARM emulator.

How fast is it? [Dmitry] tells us it takes two hours to boot up to a bash prompt, and four more to load up Ubuntu and login. If you want a Megahertz rating, good luck; the effective clock speed is about 6.5 kilohertz. While the worst Linux PC ever won’t win any races, its simple construction puts it within the reach of even the klutziest of hardware builders; the entire device is just a microcontroller, RAM, SD card, a few resistors, and some wire.

If you’d like to build your own worst Linux PC, [Dmitry] has the firmware and disk image available to download. If you want to watch the time-lapse of this thing booting, check out the video after the break.

[Read more…]

Polish your understanding of capacitors by building this meter

Building a capacitance meter is a great exercise. If you’re feeling quite safe in your digital-circuit-only life, this will push just far enough out of the comfort zone for you to see there’s nothing to fear in adding analog circuits to your designs. Here, [Raj] compares a voltage divider and RC timer to calculate the value of a capacitor. The project is aimed at teaching the concepts, and will be easy to follow for anyone who has at least a bit of experience working with a programmable microcontroller.

The meter is based on an established equation that uses are starting and ending voltage, as well as the time it took to transition between the two, to calculate capacitance. The capacitor will be charged from 0 volts to 0.5 volts. Using the built-in analog comparator is the easiest way to do this. [Raj] breadboarded a voltage divider to establish a 0.5V reference on one of the comparator’s pins. The other input comes from a circuit that places a resistor in line with the capacitor being tested. When that reading rises above the 0.5 volt reference the comparator match will be tripped, stopping a timer that had been running during the charge cycle. From there it’s just a matter of using the timer value in the calculation.

Brute force a password protected PDF using the BeagleBone

The biggest benefit to using the BeagleBone is it’s 700 MHz ARM processor. If you’re just messing around with basic I/O that power is going unused, but [Nuno Alves] is taking advantage of its power. He built a PDF password cracker based on the $85 development board.

We recently saw how easy it is to perform basic I/O using the BeagleBone. Those techniques are in play here, used to drive a character LCD and sample a button input from the breadboard circuit. [Nuno] even published separate posts for each of these peripheral features.

The password protected PDF file is passed to the device on a thumb drive. Since the BeagleBone is running embedded Linux you don’t need to mess around with figuring out how to read from the device. A click of the button starts the process. Currently the code just uses a brute force attack which can test more than 6000 four-character passwords per second.  This is quite slow for any password more than four or five characters long, but [Nuno] does mention the possibility of running several ARM processors in parallel, or using a dictionary (or rainbow table) to speed things up. Either way it’s an interesting project to try on the hardware. You can see his video demo of the device after the break.

[Read more…]