Driving a T6963C based graphic LCD

[Tom Fleet] spent the dreary weekend inside learning how to drive this T6963C based graphic LCD controller. Although this is his first time venturing away from HD44780 character displays, the availability of an Arduino library helped him go from being a newbie to coding his own animated graphics.

The hardware setup is straight-forward. The screen has a 20-pin connector and operates at 5V. We don’t see it on his protoboard, but usually these displays also need a potentiometer which serves as a voltage divider for the screen contrast. The data and control pins eat up most of the available I/O on the ATmega328 chip he used, but the I2C and SPI pins are still open and he plans a future project to make this a wireless display for his PC using one of those protocols.

As for fonts and animation, [Tom] links to several tools which will come in handy. There’s a font program that will convert Windows system fonts into a C file for use on the Arduino. The animations start with a 1:1 ratio animated graphic drawn with his favorite image editing software. He then converts those to monochrome bmp files and used bmp2c to convert each frame to a C array. After the break there’s a seven second example that would work well as a boot screen for his project.

[Read more…]

Finding your keys with Bluetooth

[doragasu]’s wife is always misplacing her keys. To solve this problem, [doragasu] created a small Bluetooth-enabled key fob that is able to remotely sound an alarm when commanded to by a cell phone.

The case and LiPo battery of [doragasu]’s project comes from a small photo frame key fob. The LCD display and PCB of the photo frame were tossed aside for a future project, and the design of the circuit started. The Bluetooth buzzer key fob is based around an MSP430 microcontroller because of their extremely low power requirements.

On the software side of things, [doragasu] built a J2ME app to connect to the key fob and turn the buzzer on. His app is portable to any Android phone, and versions can be ported to Windows, OS X and iOS devices.

How does it work? Well, [doragasu]’s wife sometimes forgets to charge her key fob, rendering the whole project useless. There are ideas for  updating the device to a Bluetooth 4.0 Low Energy device, but no actionable plans. Still, very good work. You can check out [doragasu]’s walkthrough and demo video after the break.

[Read more…]

Using a touch sensor as a telegraph key

[Sebastian] is learning Morse code and CW radio, and of course he needed a telegraph key. Instead of using the terribly unergonomic paddle style key, he built a capacitive touch iambic key over the course of a few evenings.

An iambic key usually has two switches. When one switch is closed, it will transmit a ‘dit’. When the other switch is closed, it will transmit a ‘dah’. Instead of using mechanical paddles, [Sebastian] brought his iambic key into the 21st century by using a touch sensor. An ATtiny45 measures the time it takes for a single metal plate to fully charge. It’s the same idea behind the wonderful Arduino CapSense library.

This isn’t the first capacitive-touch iambic key we’ve seen; this little guy is just a pair of metal contacts and resistors that plug right into an Arduino. With an ATtiny45, [Sebastian]’s build is a full-blown iambic telegraph key that plugs right into his CW rig. You can check out the walk through of the project along with [Sebastian] trying out his iambic key after the break.

[Read more…]

Simple proximity sensor

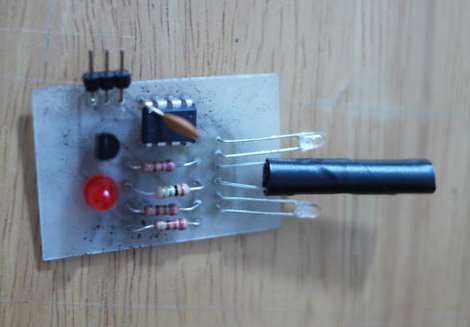
[Dustin Andrews] built this add-on board which works as a proximity sensor. He wanted a standalone sensor for his Arduino projects which would use a single pin as a trigger. This lets him alert the Arduino when an object approaches the sensor without the need for polling or extra code on the Arduino side of things.

As you can see, a single chip on the board takes care of all the work. That’s an ATtiny13, they’re inexpensive and sometimes you can even salvage them from consumer electronics like this color changing light bulb. The microcontroller monitors the phototransistor which is wrapped in electrical tape to isolate it from the IR LED emitters on either side. This setup creates a reflective sensor. When an object nears the board, the infrared light from the emitters reflects off of it and onto the phototransistor. And since the Arduino works as an AVR programmer you don’t need special hardware to program the device.

Aquarium automation keeps the fish fed and the lights on

fish-tank-automator

Anyone who owns a fish tank knows that a good amount of care is required to keep fish happy, healthy, and most of all – alive. [Vicente Jiménez] usually has no problem keeping up on the day to day maintenance such as feeding and switching the tank light, but he wanted to automate these processes for times when he can’t be home to take care of the fish (Translation).

His aquarium automation project is meant to cover three separate parts of the operation: light control, feeding, and pump regulation during feeding times. [Vincente] picked up an STM8L Discovery board to control his system, which enabled him to easily control the automation of all three.

He constructed the feeding mechanism using an old cassette player motor, which turns his food drum (an old film canister), twice a day at specified feeding times. Before the drum is turned to dispense food, the STM8L turns off the aquarium’s pump via a relay to ensure it doesn’t get clogged in the process. During the day he keeps the tank illuminated, but once night falls, the microcontroller shuts the lights off so the fish can get their rest.

There’s no video of the system in action, but [Vincente] has detailed its construction pretty thoroughly in his blog, so be sure to check it out if you are in need of something similar.

Conway's Game of Life in HD

We’re going to have to take [Mike’s] word for it that he built Conway’s Game of Life with high-definition video output. That’s because this screenshot is his only proof and it looks a bit fuzzy to us. But we are interested in the project which used an FPGA to generate a 1080p VGA output of the classic programming challenge.

One of the biggest benefits of using an FPGA for this application is the hardware’s parallel processing ability. For every frame of the game, the area around each living cell must be analyzed to produce the next evolutionary step. Most of the time this means processing all of the pixels in the playing area, which is the case here. [Mike] is using VHDL to program a Papilio Plus which has a Spartan 6 chip on it. He separated his code into the different components when writing about it. This makes it easy to find the chunks relating to the game if that’s what you’re interested in. If you just want to see how he implemented the VGA interface that’s well documented as well.

If you’re not familiar, Conway’s Game of Life has simple rules regarding when a cell will live, die, or be reborn. As [Mike] points out, every programmer should give it a shot at some point. We’ve seen many iterations from the very large to the very small.