Building Main Street, USA in a coffee table

[Alex George] has been collecting miniatures of Main Street, USA in Disney Land hand crafted by artist [Robert Olszewski]. These models are incredibly accurate, but sadly static. [Alex] has some of the floats from the Main Street Electrical Parade that light up with the help of a few LEDs. One day, [Alex] found himself wishing he could watch a miniature parade circling around his diorama and did what any of us would do: make a tiny electrical parade move around his miniature town.

[Alex] began his build by designing a system of chains and sprockets underneath his miniature Main Street. When not on display, the parade floats are hidden underneath the town. At night, though, the parade ascends to the surface to put on a show.

It’s not an electrical parade if there aren’t any lights, so [Alex] grabbed a couple Blinkms to attach to the underside of each float. These are small programmable RGB LEDs that can repeat the same sequence of lights for the entire time the parade is visible. A very excellent job and a masterwork of craftsmanship for both [Alex] and [Robert Olszewski].

[Alex]’s ‘making of’ video and a full demo of the float are available after the break.

via boingboing

[Read more…]

Huge water and light VU meter plus more

This is the senior design project for a group at the University of Vermont. It’s a wet, bubbly, blinky, interactive thing. Each column is a clear tube filled with water, with a string of fully addressable RGB LEDs suspended in the center. In idle mode, the lights scroll through a series of interesting patterns while the water is filled with bubbles to add some depth to the presentation. There is also a VU meter function, as seen here and during the Portal theme song that ends the video demo after the break.

A Teensy++ board is used to address the display. It’s set up to receive serial commands from a Processing script which is responsible for generating the animations. At the top of the frame you can see there’s a Kinect sensor. By standing in the standard post (we think it should be called the Kinect mug shot) the installation will automatically switch over to body control. We could see this thing making its way into a long airplane terminal hallway, following the travelers along their trek from one terminal to the next.

[Read more…]

Build a rig to make orbs in your light paintings

We’ve covered plenty of light painting projects here. People are always finding new ways to create interesting things in this fairly new medium. This project covers a method of creating orbs or spheres in your light paintings. The author points out that many people do this currently by putting the light source at the end of a string, swinging it in front of them like a propeller, and turning slowly in a circle. He wanted to automate the process a bit, so he combined his motorized telescope tripod, a power drill, a strip of RGB LEDs, and a few scraps of wood. He now has an automated system to make perfect orbs. Some of the examples he shows are quite stunning.

A novel binary clock from Hackaday's own

Hackaday’s very own [Mike Szczys] just shared an awesome binary clock he’s been working on. Unlike a normal binary clock that is only readable by self-admitted geeks and nerds, [Mike]’s clock is nearly comprehensible by the general population.

There are 12 lines of three LEDs around the face of [Mike]’s clock. These LEDs represent the time in minutes in binary – the inner LED is 1, the middle LED is 2, and the outer LED is 4. Adding up each of the LEDs around the clock face gives the number of minutes passed since the top of the hour.

To display the hour, [Mike] used a red/blue bi-color LED in the center of each line of LEDs. For example, at 1:03 the one ‘o clock hand will have a blue LED in the first position and a purple LED in the second position. A minute later at 1:04, this changes to blue, red, blue.

If that is a little confusing, there’s a wonderful video demonstrating the pattern of LEDs throughout the hour.

For such an interesting clock, the build is fairly simple – just an ATtiny44 with an STP16CP05 LED driver. Time is kept with a battery-backed MCP7940 real-time clock, and power is provided by a simple USB port.

[Mike] had enough boards manufactured for several dozen clocks, but only had enough parts (and patience) to solder up four clocks. You can check out the time-lapse of him going to town with a soldering iron on one of these boards after the break. As with all good builds, the code and schematics are provided on GitHub if you’d like to make your own.

[Read more…]

A flashlight for any occasion

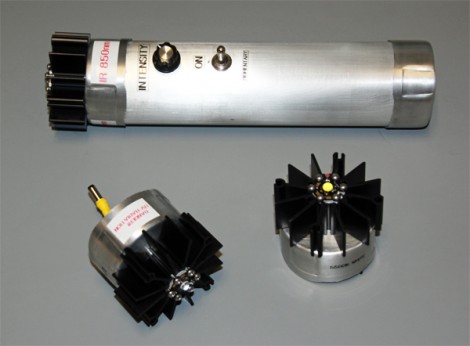
Whether you’re trying to light your path, build your own night vision, or do some tanning at home, this flashlight has you covered. [David Prutchi] designed the high power flashlight with three swappable heads.

He built the base unit out of aluminum pipe. It’s got plenty of room for the four 9V batteries that act as the power source. The driver circuit is just a bit smaller than one of those batteries, and to bring the whole thing together [David] and his helper added a potentiometer, toggle switch, and quick connector which makes head swaps a breeze. The heads themselves are all LED based, with one for visible light, another for infrared, and the final module outputs ultraviolet. We joke about tanning with it, but at 10 Watts you should be more worried about accidental damage to your vision.

The finished product is shown checking the security ink on some Canadian Currency. This would also make a nice secondary light source for your night vision monocle.

[David] hand soldered a Blinky ball… and you can too!

This is a blinky ball that [David] designed, built, and programmed himself. Does it look familiar? It should, he took his inspiration from the original prototype, and the Hackerspace-produced derivative. [David’s] version is not as small, or as blinky, but in our minds the development process is the real reason for building something like this. He took a great idea and figured out how he could pull it off while pushing his skill set, staying within his time and budget constraints.

The project is powered by an Arduino nano which resides in the core of the ball. [David] used protoboard sourced locally for each of the slices, soldering green LEDs along the curved edges, and added shift registers to drive them. The ball is driven by a LiPo battery which can power it for about 45 minutes. You can see the animation designs he coded in the clip after the break.

[Read more…]