Giving old appliances a second life with simple tweaks

blender-light

Cruising estate sales can be a total crapshoot – sometimes you find a goldmine, other times nothing but junk. [John Ownby] recently found a sleek-looking old blender at such a sale and decided to take it home. The chrome plated base and fluted glass immediately caught his eye, but he didn’t buy the blender so he could make mediocre frozen drinks – he wanted a lamp instead.

The conversion was fairly simple, requiring him to gut the machine of its moving parts including the motor and blades, replacing them with a small incandescent candelabra base. While his modifications themselves are not groundbreaking, taking them a step further would make for some really cool (and functional) retro house fixtures.

Indulge me for a moment, if you will, and imagine swapping out the simple incandescent bulb for some LED strips or even EL wire. Replace the blender’s cap with a small speaker, and you can use several of these together as retro-looking surround satellites.

We can definitely get behind his reuse of the blender, which would have otherwise likely ended up in a landfill. It’s great to see solid, durable appliances given a second life, even in ways which were never intended. Have you rescued anything from the trash heap like [John], or do you have other ideas for your fellow hackers who might come across similar goods? Let us know in the comments.
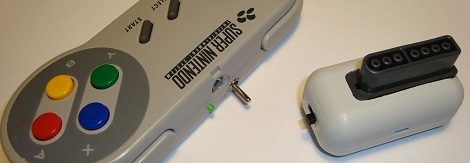
Wireless controllers for all your retro systems

Remember those old wireless controllers made for the consoles of our youth like the NES and Super Nintendo? They didn’t work well, mostly owing to the fact they were built using the same infrared technology that is found in a remote control. Now that all the modern consoles are wireless, [micro] over at the nftgames forum decided to update his classic systems for wireless control.

The transmitters and receivers are built around an nRF24L01+ radio module that operates in the 2.4 GHz band. [micro] has the process of converting his controllers down to a science. He cuts the cord and wires the controller up to an AVR running at 16 MHz. The AVR sends this to the receiver where the button presses are sent through the original controller port. Basically, [micro] recreated a WaveBird controller for his NES, SNES, Saturn and N64.

The controllers are powered by internal lithium batteries, but the charging ICs are too expensive to put in each controller. To solve this problem, [micro] crafted a small external charging circuit that plugs into a 3.5mm jack on each controller. Check out [micro]’s controller demo after the break.

[Read more…]

MIDI controlled Speak-and-Spell

We all love the Arduino, but does the Arduino love us back? There used to be a time when the Arduino couldn’t express it’s deepest emotions, but now that [Nick] hooked up a speech synthesis chip from a Speak & Spell, it can finally whisper sweet robotic nothings to us.

The original 1980s Speak & Spell contained a fabulously high-tech speech synthesizer from Texas Instruments. This innovative chip predated [Stephen Hawking]’s voice and went on to be featured in the numerous speech add-ons for 80s microcomputers like the Apple II, BBC Micro, and a number of Atari arcade games.

[Nick] has been working on his Speak & Spell project for several months now, and he’s getting around to testing the PCBs he made. By his own admission, connecting an Arduino to a Speak & Spell is a little difficult, but he’s got a few tricks up his sleeve to get around the limitations of the hardware. The final goal of [Nick]’s project is a MIDI-controllable Speak & Sound speech synth for the Arduino. This has been done before, but never from a reverse-engineered Speak & Spell.

You can check out [Nick]’s progress in interfacing the Speak & Spell speech chip after the break. There’s still work to do, but it’s still very impressive.

[Read more…]

DIY Solid State Tesla Coil

Tesla Coils are always a blast to see and are relativity simple to build. While there are plenty of sites on the subject, [Michael’s] newest instructable breaks building a solid state Tesla Coil down to 12 easy steps.

Items that should be familiar to anyone who has even looked at a Tesla Coil include PVC pipe, Aluminum ducting, and wire … lots of wire. The PVC pipe is cut to length and a flange is attached to help form a base. From there the pipe is wound with about ¾ of a pound of 30 AWG enameled wire, which takes some time by hand to make sure you don’t overlap or get space between the coils.

Aluminum ducting is then wrapped around the outside of a second flange. Some stovepipe wire is ran though the ducting and twisted to close up the 2 ends, and hot glue is used to attach the two ends together. The assembly is screwed to the top of the pipe now containing the secondary of the massive transformer. All that is left is to attach a primary, which is made out of a few turns of 16 AWG wire, and the control circuitry.

Join us after the break for a shocking video!

[Read more…]

Build your own self-driving car

If you’ve ever wanted your own self-driving car, this is your chance. [Sebastian Thrun], co-lecturer (along with the great [Peter Norvig]) of the Stanford AI class is opening up a new class that will teach everyone who enrolls how to program a self-driving car in seven weeks.

The robotic car class is being taught alongside a CS 101 “intro to programming” course. If you don’t know the difference between an interpreter and a compiler, this is the class for you. You’ll learn how to make a search engine from scratch in seven weeks. The “Building a Search Engine” class is taught by [Thrun] and [David Evans], a professor from the University of Virginia. The driverless car course is taught solely by [Thrun], who helped win the 2005 DARPA Grand Challenge with his robot car.

In case you’re wondering if this is going to be another one-time deal like the online AI class, don’t worry. [Thrun] resigned as a tenured professor at Stanford to concentrate on teaching over the Internet. He’s still staying at Stanford as an associate professor but now he’s spending his time on his online university, Udacity. It looks like he might have his hands full with his new project; so far, classes on the theory of computation, operating systems, distributed systems, and computer security are all planned for 2012.

Creating a Game for the CoCo

Retro is in the air today as [John] has tipped us off about a new game he has written for the Tandy Color Computer (CoCo), The game, inspired by the homebrew game DOWNFALL for the Atari Jaguar, features what looks like snappy game play, lots of bright colorful animation and has just entered the Alpha stages. The blog page above sheds some insight on what it takes to make a game for these old 8 bit wonders, cause no matter how easy it sounds, you do have to do some dancing to get even the simplest of things working correctly on such limited resources.

The game was part of this years Retrochallenge which is typically held in January, which we recommend checking out if you want your fill of random projects for old computers. From building an Apple I replica kit, to making a soccer game for a SGI system, getting a 5160 XT online or just noodling with a KIM, there is plenty of interesting projects to keep you occupied during the afternoon.

Join us after the break for a quick video of Fahrfall, the fun looking CoCo Game.

[Read more…]