Hackerspace intros: egMakerSpace in East Gippsland Australia

[Scott Lambshed] took some time to shoot a video tour of egMakerSpace’s new digs. This hackerspace is located in East Gippsland Australia, which is to the East from Melbourne. We know the banner image we chose isn’t all that descriptive, but just look at all of that space! They’ve got a bounty of rooms to use for everything from crafts, to machine/wood shop, to retro computing. There’s even a nice outdoor patio area which was a bit overgrown to start with but cleanup has already begun.

The group is just getting moved into what must have been an old hospital or school. Aside from some network infrastructure, a room full of couches, and a few tools, there’s not a lot in place yet. But one thing that is already looking quite good is their horde of electronics components. The latter half of the video shows boxes, bins, trays, and tackle boxes full of goodies just waiting to make it onto the next protoboard project.

[Scott] is hoping to get the word out in the area about egMakerSpace, and that’s exactly what these introductions are for. So grab you favorite video capture device and send us your own local hackerspace tour.

[Read more…]

One wire reads the keypad from the APRS radio mic

[Shane Burrell] decided to spend some time learning how the keypad on the his Kenwood TM-710A APRS radio mic works. It uses a different technique than you might think. Normally a grid of buttons is scanned as a matrix to detect keypresses, but this hardware actually counts pulses on a serial wire to take each reading.

The stock radio sends a steady digital pulse to the handset and with each pulse the mic pulls the line low. It then uses a 4017 decade counter to see what comes back. If the edge count matches it means nothing is pressed, but a change in the number of pulses returning to the base unit can be used to extrapolate which button has been pressed.

[Shane] went on to implement this control technique using an AVR chip in place of the  radio base unit. He used the data gained from measuring the pulse behavior using an oscilloscope to write the firmware for the project. He filmed a bit of a demo after the break which shows his findings.

We’re not quite sure how this would translate into your own home-brew projects, but the thought of scanning a keypad with two pins of a uC is quite desirable. Sure there is the 555-timer frequency technique, but we’re always down with new ideas.

[Read more…]

3D sphere display and controller

[Nirav] has been working on a spherical display for about a year now, and he just came up with a great way of interacting with this screen: an adjacent reality tracker that rotates the display to match the current orientation of the controller.

Earlier, [Nirav] built an 8-inch sphere display using a few 3D printed parts and a Showwx laser pico projector. The display looked great, but [Nirav] had no way to interact with it. To solve that problem, he put an inertial measurement unit inside a 3d printed model of the globe. The IMU communicates with a computer to read the rotation and orientation of [Nirav]’s controller and adjust the spherical display accordingly.

It’s a very nice build that gets very close to futuristic sci-fi displays. At least now, [Nirav] can interact with the awesome satellite tracking app and continental drift simulation he created.

There’s a bunch of videos [Nirav] put up demoing what his display can do. You can check those out after the break.

via MAKE

[Read more…]

Flying microscope build seems way too nice for a home lab

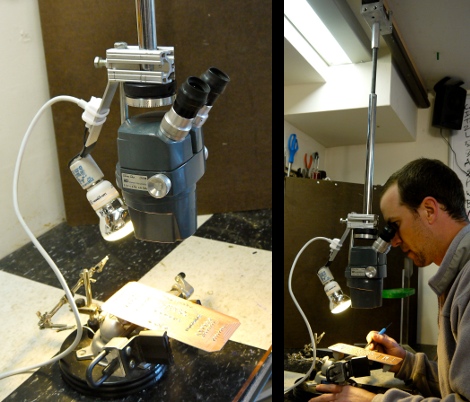
This flying microscope is a tool which [Darrell Taylor] can be very proud of. He wanted to have an inspection microscope for working with surface mount projects. He got his hands on a binocular version for a song and dance because it came without a stand. Initially he built a simple rig but if it wasn’t in the right place it was hard on the body, and the upright section was getting in the way of larger projects.

This time around he used a hanging track system instead of a stand. He had some aluminum track on hand which was originally meant for use with a sliding glass door. He fabricated a trolley to interface with the track, and added a vertical rod to support the microscope. This makes it easy to slide the unit to the side when not in use, and provides for some height adjustment as well. To add to the functionality he included a light on the opposite side of the scope. This keeps the project illuminated without shadows being cast by his hands or the scope itself.

Level conversion with plenty of options

[Andy Brown] wanted one level converter to rule them all, so he set out to build his own which included plenty of options.

The chip at the top and center is a pretty neat little device. It’s an NXP 74ALVC164245DL. In addition to having an incredibly long and seemingly meaningless part number, it contains a pair of bi-directional octal ports. It runs very fast (about 333 MHz) and supports voltages up to 5V on one side, and up to 3.3V on the other. As long as you stay below those maximums you can choose your own target voltages. To do so, he included a couple of adjustable voltage LDOs which are set using jumpers.

But wait, [Andy’s] not finished quite yet. If the jumpers don’t offer the target voltage you’re looking for he also included breakout pins so that you may inject the voltage using an external source. He even included the option to use the LDOs on their own, without the level converter. How do you keep all of these configurations straight? He build a little web form that lets you set your desired parameters and it tells you which jumper should be connected.

Directly interfacing a joystick with an Xbee

We see a pretty steady stream of projects that use Xbee modules. They’re one of the more reliable and popular ways to add a wireless aspect to your project. But we don’t often see them used to their full potential. Since there’s a microcontroller onboard, many simple tasks can be accomplished without the need for an addition microcontroller. [Stephen’s] showing how this can be done, by reading the stick and button data from a game controller using only an Xbee module.

His test setup uses an Arduino to drive servo motors on the receiving end of the hardware. You can’t do everything with Xbee, but the sender is where this concept comes into play. [Stephen] grabbed an older gamepad which is meant for use with a PC game port. The joystick uses potentiometers to measure position data, and the buttons simply complete a circuit. He altered the joystick by adding voltage dividers to the pots, and pull-up resistors to the buttons. From there he just wired it up to the Xbee and set up the module’s firmware to package and transmit the data. It’s a nice way to do more with less.

We had a little discussion here at Hackaday about Xbee modules which seem to be in short supply. Some of us think it’s due to the flooding in Thailand. If you’ve got some info on the situation, or just want to share your own conspiracy theory, let us know in the comments.