[Matt's] bubble display updated

[Matt] emailed in to show us how he has improved his bubble display since the last time we saw it. If you recall from last time, he was having issues with the air pressure dropping when multiple bubbles were released, resulting in smaller bubbles. This time around, he has added an aesthetically pleasing air reservoir to help ensure that his bubbles don’t vary too much. There really wasn’t a reason to use two containers for the reservoir, aside from the fact it is what he had on hand. He has also torn part the part of the display that houses the oil, replacing it with individual tubes for each vertical segment. This makes it easier to regulate the speed of the bubbles, as he found they travel at a constant rate if they are in contact with the edges of the tube.

One downfall of using the vinyl tubes is the fact that it comes in a giant roll. This leaves the tube wanting to curl. To get around this, he stretched it on a wooden dowel and heated it with a heat gun till it relaxed. Using clear PVC or acrylic tubing would be an alternative but would be more expensive.
[Read more…]

Analog clock display uses a Nipkow disk

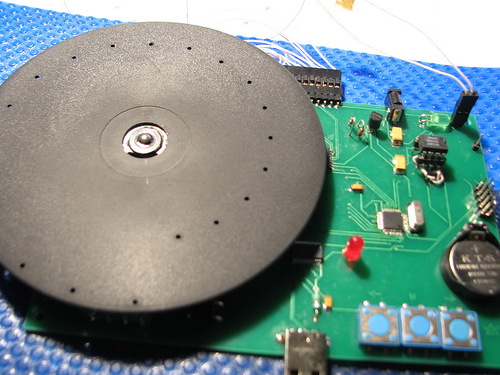
Although [Serokoy] is not thrilled with the outcome of his Nipkow disk clock (translated), but we really enjoy it. It uses the Persistence of Vision concept to create a light display from a rotating disk.

We’ve come across a lot of rotating disk clocks. Several were based off of the platters of a hard drive, using a slit, or series of slits to make up the display. This Nipkow disk uses a similar technique but in a more general way. The series of holes arranged in a spiral pattern allows a grid of concentric rings to be used as pixels when the disk is spinning. The bottom portion of the disk is used as the display area. Each pixel is illuminated at just the right time by LEDs below in order to freeze that pixel in the viewer’s eye. The demo is a bit rough, and [Serokoy] mentions that the precision of the hole layout makes all the difference. He drilled these by hand in a CD which was spray painted matte black. Even though he used a computer to lay out and print a template, it took four tries to get a suitable disk.

[Thanks Svofski]

Collimated displays wrap around that home cockpit

We don’t recall having heard the term ‘collimated display’ before, but we’ve seem them in action. These are mirrored projection display that give the viewer a true peripheral vision experience thanks to well-designed optics. Here is a project that [Rob] and [Wayne] have put a ton of time into. It’s their own version of a DIY collimated display that uses a shop vac and Arduino to form the screen shape.

The frame above is the structure that will support the screen. A sheet of mylar was later attached to the edges of that frame. That is pulled into place by the suction of the vacuum. But it needs to be stretched just the right amount or the projected image will be distorted. They’ve got something of a PID controller to manage this. A valve box was built to vary the amount of vacuum suction inside the screen’s frame. A switch positioned behind the mylar sheet gives feedback to the Arduino when the screen reaches the appropriate position and a servo closes off the suction box. If you lost us somewhere in there the description in the clip after the jump will help to clear things up.

Here’s an unrelated project that implements the same concept on a smaller scale.

[Read more…]