Dice gauntlet joins cosplay with D&D gaming

If you needed a reason to dress up for your next Dungeons & Dragons adventure this is surely it. Not only will this attractive wrist adornment go right along with your medieval theme, but the gauntlet doubles as a multi-sided digital die.

Sparkfun whipped up this tutorial which details the build. Yep, they’re hawking their own goods but we must say this is one of the few projects using sewable electronics which we thoroughly enjoy. It calls for several Lilypad modules, including an Arduino board, accelerometer, and slide switches. The switches let you select the number of sides for the die you are about to roll. The accelerometer starts the fun when you shake your wrist back and forth (that’s what she said). The project is powered by a rechargeable battery, which we always like to see, and uses a four-digit seven segment display located where the face of a wristwatch is normally found.

Of course, you could get the shaking action and use no batteries at all if you wish.

MIDI controlled Speak-and-Spell

We all love the Arduino, but does the Arduino love us back? There used to be a time when the Arduino couldn’t express it’s deepest emotions, but now that [Nick] hooked up a speech synthesis chip from a Speak & Spell, it can finally whisper sweet robotic nothings to us.

The original 1980s Speak & Spell contained a fabulously high-tech speech synthesizer from Texas Instruments. This innovative chip predated [Stephen Hawking]’s voice and went on to be featured in the numerous speech add-ons for 80s microcomputers like the Apple II, BBC Micro, and a number of Atari arcade games.

[Nick] has been working on his Speak & Spell project for several months now, and he’s getting around to testing the PCBs he made. By his own admission, connecting an Arduino to a Speak & Spell is a little difficult, but he’s got a few tricks up his sleeve to get around the limitations of the hardware. The final goal of [Nick]’s project is a MIDI-controllable Speak & Sound speech synth for the Arduino. This has been done before, but never from a reverse-engineered Speak & Spell.

You can check out [Nick]’s progress in interfacing the Speak & Spell speech chip after the break. There’s still work to do, but it’s still very impressive.

[Read more…]

WiFi experiments with ATtiny microcontrollers

[Quinn Dunki] got some free stuff from Element14 to evaluate, including this Mircrochip WiFi module. It’s been used as the centerpiece of an Arduino shield in the past, and she grabbed a copy of that library to see if it would play nicely with an ATtiny chip. What follows is a struggle to de-Arduino the code so that it’s portable for all AVR controllers.

This module is one of the least expensive ways to add WiFi to a project, coming in at around $23. But it’s not really an all-in-one solution as there’s still a huge software hurdle to cross. The hardware provides access to to radio functions needed to communicate with the network, but you need to supply the TCP/IP stack and everything that supports it. Hence the re-use of the Arduino library.

Battling adversity [Quinn] fought the good fight with this one. Switching from an ATtiny to the ATmega168, compiling more code, and troubleshooting the process. She used a single LED as feedback, and can get some connectivity with her hotspot. But to this point she hasn’t gotten everything up and running.

We’re hot for an AVR WiFi solution that is cheap and easy to use. But as we see here, the software is complex and perhaps best left up to beefier hardware like the ARM controllers. What do you think?

Play hide-and-go-seek with infrared LEDs

Although we’re sure they exist, we wouldn’t want to meet anybody that can’t look back fondly on the halcyon days of youth that included playing hide-and-go-seek. Some kids never grow up and continue the tradition with geocaching or orienteering, but that sense of limitless discovery wanes over time. [Kurt] came up with a small scavenger hunt beacon that brings back the unending wonder that accompanies the unknown.

The beacon is just a simple ATtiny13 that flashes a message with an invisible IR LED. To receive the messages, [Kurt] made a scavenger decoder shield for an Arduino. The decoder includes a phototransistor and a 20×4 LCD display. All [Kurt] needs to do is hold the decoder up to the beacon for the text in the firmware of the ATtiny to be displayed. The beacon is only one inch square and powered by a watch battery, so it can be hidden anywhere.

[Kurt] suggests that the text of one beacon should provide the clue to the next. We’re thinking this is just a great excuse for a walk in the park. You can check out [Kurt]’s IR decoder getting data from a beacon after the break.

[Read more…]

A.R.T. sorts your recyclables for you

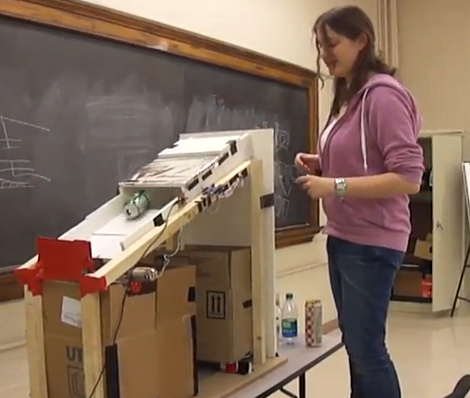
[Yuhin Wu] wrote in to let us know about the Automated Recycling Sorter that was built with a group of classmates at the University of Toronto. They entered it the school’s student design contest and we’re happy to report that it took first place.

The angled sled has been designed to separate glass, plastic, and metal containers. The first sorting happens at the intake area. A set of moment arms are used to weed out the glass bottles. Since there are several of them in a row, a larger and heavier plastic container will not be falsely sorted and the same goes for smaller glass bottles.

With the glass out of the mix the team goes on to separate metal and plastic. An Arduino was used for this purpose. It senses an electrical disturbance caused by a metal can passing through the chute and actuates a trap door to sort it. Plastic has no effect on this sensor and slides past the trap to its own sorting bin.

Don’t miss both demo videos which we’ve included after the break.

[Read more…]

Office game show buzzer keeps things fair and square

office-game-show-buzzer

The sales team in [Chuck’s] office is a pretty competitive bunch as you might expect, and they decided that they wanted a system which would allow them to challenge one another during their weekly meetings. The competition involves answering questions posed by their manager, but hand raising only works for so long – they needed a definitive way to tell who “buzzed in” to answer a question first.

Since [Chuck] only had a short bit of time and a tiny budget to work on, he opted to find the easiest solution to the problem, which was an Arduino-based game show buzzer system. The game display is built from an Arduino, some LEDs and an Altoids tin, while the buzzer pushbuttons were salvaged from an old radio broadcast console.

Now, when a question is posed, the salesman can buzz in to answer, knowing that only the quickest person’s button click will be registered. When it’s time for another question, the host simply clicks his buzzer to reset the console.

While it’s not quite as fancy as this game buzzer system we featured a while back, [Chuck] says it does the job perfectly and was cheap to boot.

Continue reading to see a short video of the office game buzzer system in action.

[Read more…]