Portal mini golf hole will incinerate your ball…you monster

portal-golf-hole

One of [Tom’s] friends is celebrating a birthday soon, and he was asked to make a mini golf hole for the event. While most people would expect to bring beer or guac to the shindig, he saw this as an opportunity to bring a little bit of Portal to life.

Near the end of the first Portal game, you are forced to pitch your companion cube into the incinerator, a scene which [Tom] thought would be the perfect mini golf hole. He started out by building an iris door mechanism, which he surrounded with chicken wire and some plaster, producing a fantastic-looking waste disposal pipe.

He added a ramp that leads up to the hole, then [Tom] got busy with the electronics portion of the fixture. Once the portal button at the end of the ramp is pressed, an Arduno triggers a pair of motors to open the waste disposal door and fire up a smoke machine. The result, as you can see in the video below, is nothing short of awesome.

[Tom] says he’s in the process of building a pair of turrets and a working golf ball portal as well, so if you’re a big Portal fan, be sure to check out his site for updates.
[Read more…]

Building your own portable 3D camera

diy-3d-camera

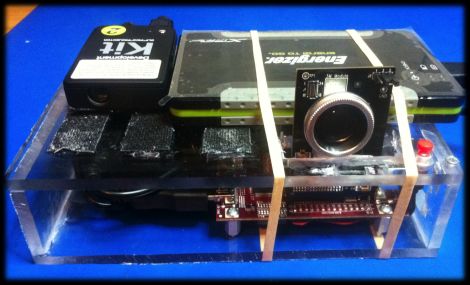
[Steven] needed to come up with a project for the Computer Vision course he was taking, so he decided to try building a portable 3D camera. His goal was to build a Kinect-like 3D scanner, though his solution is better suited for very detailed still scenes, while the Kinect performs shallow, less detailed scans of dynamic scenes.

The device uses a TI DLP Pico projector for displaying the structured light patterns, while a cheap VGA camera is tasked with taking snapshots of the scene he is capturing. The data is fed into a Beagleboard, where OpenCV is used to create point clouds of the objects he is scanning. That data is then handed off to Meshlab, where the point clouds can be combined and tweaked to create the final 3D image.

As [Steven] points out, the resultant images are pretty impressive considering his rig is completely portable and that it only uses an HVGA projector with a VGA camera. He says that someone using higher resolution equipment would certainly be able to generate fantastically detailed 3D images with ease.

Be sure to check out his page for more details on the project, as well as links to the code he uses to put these images together.

A one-bit processor

Put on that abstract thinking cap, get out the pen and paper, and spend some time figuring out how this one-bit processor works. [Strawdog] came up with the concept one day during his commute to work (don’t worry, he takes the train… much safer than [Dave Jones’] frightening drive-time podcasts). He sketched it out on paper to make sure he knew where he was going with the project, then collaborated with Legion Labs to implement it in processing as an easier way to visualize its functionality. Since it’s one-bit there’s only room for one instruction. That instruction is a copy, then branch-if instruction. It copies the current bit to one address, and if that bit was one, it branches to a second address.

Going a bit fast for you? We think the description is fairly good, but if you can’t quite put it together from the article’s description, you may want to build this 2-bit paper processor and learn how it works first. It should teach you the basic concepts you need to understand the 1-bit version. As you can see in the image above, there’s also a single-step feature in the processing example that lets you analyze the effects of each instruction during program execution.

Building a flex sensor from component packing materials

Hacks like this one don’t help us recover from extreme pack-rat behavior. Driving home the point that one should never throw anything away [Peter] built a flex sensor from component packing material. It uses the black conductive foam in which integrated circuits are sometimes embedded for shipping. Above you can see the grey rectangle which is the sensor itself. in the background of the image, each component used in the build is labelled except for the tape.

The project starts with the foam being cut to the appropriate size and thickness. He does the same with some aluminum foil, then rips tape strips to act as the enclosure. Fine wire from some cable shielding serves as the two conductors for the sensor. He attaches each wire to an upturned piece of tape, followed by the foil, and finally the foam. When the two halves are assembled in the video after the break, [Peter] hooks up his multimeter to show the change in resistance as the sensor is bent.

We think it will take a clever calibration algorithm to get this working reliably, but it’s no more troublesome than the optical flex sensors we saw in this links post. [Read more…]

Reprogramming promotional USB dongles to launch custom URLs

webkey-hacking

The teachers at [Jjshortcut’s] school were each given a Webkey by the administration as a promotional item of sorts, but most of the staff saw them as useless, so they pitched them. [Jjshortcut] got his hands on a few of them and decided to take one apart to see what made them tick.

He found that the device was pretty simple, consisting of a push button that triggers the device to open the Windows run prompt, enter a URL, and launch Internet Explorer. Since the microcontroller was locked away under a blob of epoxy, he started poking around the onboard EEPROM with his Bus Pirate to see if he could find anything interesting there. It turns out he was able to read the contents of the EEPROM, and since it was not write protected, he could replace the standard URL with that of his own web site.

While it’s safe to say that without a new microcontroller the Webkeys probably can’t be used for anything more exciting than launching a browser, [Jjshortcut] can always reprogram the lot and drop them in random locations to drive some fresh traffic to his web site!

[Thanks, Wouter]

Hacking Hack a Day with Greasemonkey

had-script

Ever since Hack a Day first emerged on the scene in 2004, the site’s design has been pretty consistent. The black background with its green and white text, while a bit dubious looking at work, is fine by me. For others however, the site’s design is a constant eyesore both figuratively and literally. [James Litton] is one of those readers, and he wrote in to share a tip that helps him read up on the latest hacks without killing his eyes.

[James] uses Firefox to browse the web, so he whipped up a small Greasemonkey script that tweaks Hack a Day’s style sheet once it reaches his browser. His script inverts the background while changing a few other items, making for a much more comfortable read. Overall we found the change to be pretty reasonable, but go ahead and judge for yourself – you can see the before and after screen shots in greater detail on his site.

[James] also points out that the script should work just fine in Chrome, for those of you who prefer that browser instead.

So if your eyes are a bit on the sensitive side, feel free to grab his script and customize away – I don’t think we’ll be changing the theme any time soon.