Putting multitasking on an AVR

[vinod] wanted to familiarize himself with AVR assembly programming, but wanted to do something a little more ambitious than simply blinking an LED. While the completed build does blink a few LEDs, we love that e decided to implement multitasking on his microcontroller.

The program [vinod] came up with uses round robin scheduling to give one of the seven programmed tasks a little bit of compute time every time a timer is triggered. Although it’s extremely simple compared to “real-life” real-time operating systems like VxWorks, it’s still an impressive achievement.

In the video after the break, [vinod] shows off his task-switching with seven LEDs. The white LED is a PWM task, while the six other LEDs are simple toggling tasks  that switch a LED on and off at set intervals independent of each other. This would be hard – if not impossible – to do without some sort of scheduling. Nice work, [vinod].

[Read more…]

Twiddling an LED using the BeagleBone's embedded Linux

If you comfortable working with 8-bit microcontrollers, the thought of moving to a hardware platform running embedded Linux may be a bit daunting. After all, there’s a lot going on between you and the chips on a board like the BeagleBone seen above. But [Matt Richardson] shows how easy it can be to get at the pins on this device. He put together a primer on hardware control from the embedded shell.

You will remember that the BeagleBone is the newest generation of the BeagleBoard. The ARM processor and other goodies make it a powerful tool, and those already familiar with Linux will be able to get up and running in no time. Just connect the board to your network and SSH into it to get started. [Matt] outlines this setup process in the clip after the break. He then hits the reference manual to find the pinout of the female headers on either side of the board. Each available I/O pin is mapped to the /sys directory and can easily be controlled by echoing your commands to the appropriate files. But [Matt] went a step further than that, writing his own Python library that implements Arduino-style syntax like the digitalWrite() function.

This example should give you enough of a shove to start porting your own libraries over for use with the device. Don’t forget to document your projects and tip us off about them. [Read more…]

Playing MP3s from an FPGA

Building an audio player is a fun project. It used to be quite a task to do so, but these days the MP3 decoder chips are full-featured which means that if you know how to talk to other chips with a microcontroller you’ve got all the skills needed to pull off the project. But that must have been too easy for [Ultra-Embedded], he decided just to build an MP3 player out of an FPGA.

It’s not quite as difficult as it first sounds. He didn’t have to figure out how to decode the audio compressions. Instead he rolled the Helix MP3 decoder library into the project. It had already been optimized to run on an ARM processor, and since he’s using a RISC soft processor the translation wasn’t tough at all. He’s using a 24-bit stereo DAC chip to bridge the gap between the audio jack and the FPGA output. Clocking that chip with the FPGA isn’t ideal and causes 44.1 kHz audio to run 3% too slow. He says it’s not noticeable, which we believe. But if you try to play along with a song the pitch shift might end up driving you crazy.

If you’d prefer to just stick to the microcontroller based players this one’s small and inexpensive.

Chipcon CC1110/CC1111 serial bootloader

[Joby Taffey] just rolled out a serial bootloader for the Chipcon CC1110/CC1111 processors. The project is called CCTL and aims to make prototyping with the Girltech IM-ME a bit less tedious. Up until now firmware for the device had to be pushed in with a GoodFET or TI proprietary programmer which was quite slow. But this bootloader makes it possible to push your code via the chip’s serial port at 115200 baud. But the pretty pink pager isn’t the only device using these chips and to prove it [Joby] send this picture of all the electronics he has on hand running this architecture.

Once the 1KB CCTL bootloader has been flashed to the chip, a serial port or USB to Serial converter can be used as a programmer. [Joby] warns that the Chipcon processors are not 5V tolerant so you need to either use a 3V serial converter or add a level converter into the mix.

CCTL provides the features you’d expect from a bootloader. It uses the chip’s watchdog timer to guard against failure due to broken code. And there is an upgrade mode available at power up. Instruction for use are included in the Github repo linked at the top.

A capacitive discharge welder/cutter for all your lightweight needs

microspot-welder

[Radu Motisan] wrote in to share a cool project he has been working on lately, a pulsed microspot welder/cutter.

The device is capable of spot welding thin metals such as foils and battery tabs by sending a pair of high current pulses between the two electrodes whenever [Radu] presses the trigger button. The cutting portion of his device uses the same general mechanism, though it requires a far greater number of pulses to get the work done.

The welding/cutting process is controlled by an ATMega16, which is also tasked with taking input from the user and displaying information on the LCD panel. The microcontroller creates quick (in the ten to several hundred microsecond range) pulses for both welding and cutting, with the latter obviously requiring a long series of pulses.

[Radu] started out using a relatively small capacitor array to power the device, but has recently upgraded to a 1.6 Farad car audio capacitor, which works (and looks) much better than before. His blog seems to update every few days with more pictures and details about his welding station, so be sure to check back often for updates.

Be sure to stick around to see a short video of [Radu] adding metal tabs to batteries and tearing down an aluminum can with his cutter.

[Read more…]

$10 camera module for your next FPGA project

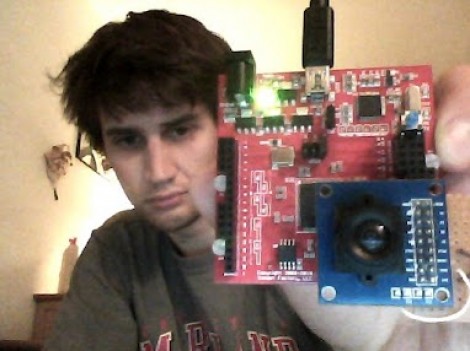
Here is [Voelker] showing off his FPGA-based camera hardware. He picked up an ov7670 camera on eBay for about $10 and set to work pulling pixels and processing the images. He’s now able to grab thirty frames per second and push them to his own Java display application. He’s using the Papilio board and if you want to give this a try yourself you might be able to snag a free breakout board (wing) for the unit.

[Voelker’s] approach is to grab each frame, and get it ready for quick serial transmission. The incoming frames are at 640×480 resolution. He scales that down to 80×60 and transmitted at 3M baud. The hardware resources used are actually quite light-weight. He wrote his own modules for transfer and photo processing using very little RAM for downscaling and one 128 byte buffer for data transmission. It sounds like he plans to use the camera to view and detect a line to create his own line-following robot.

Wondering where you’ve seen the ov7670 module before? It’s the part used on the TRAKR robot.