Testing an open source PID controller with steak

Sous vide cookers aren’t anything new, but [Phil] wanted to build the first sous vide using the osPID, an open source PID controller just released in the last month.

The build uses the osPID Open Source PID controller we saw last week that comes with inputs for a thermocouple and pair of relays capable of switching a hot plate or immersion heater. The osPID is based on the Arduino and was created by [Brett Beauregard], author of the Arduino PID library.

Getting to the meat and potatoes of the build, [Phil] connected a 300 Watt immersion heater to the osPID and put the heater in a bowl of water. A delicious looking cut of beef tenderloin was shoved into a ziplock bag and suspended in the bowl of warm water for a few hours. With the heater and thermocouple attached to the osPID, the temperature was set at 130° F and the entire device was left alone for a few hours. Looking at [Phil]’s recipe for tenderloin with lemon parsley butter whets our taste buds, so we’ll hope [Phil]’s dinner came out just fine.

3D printing from an Android device

[skullkey] over at the House4Hack hackerspace in Pretoria, South Africa wanted a way to get kids excited about technology and desktop fabrication labs. Wanting to give kids a visceral feel for the march of technology, he created Makerdroid, an android app that allows for the creation 3D objects on an Android tablet and preparing them to be printed on a Reprap or Makerbot.

What’s really interesting about this build is not only the fact that [skullkey] and his lovely beta testers are generating .STL files on an Android device, the object files are also being converted to GCode on the Android, without the need for a conventional computer. Makerdroid uses the very popular Skeinforge to generate the instructions for the printer (although a lot of people are switching over to Slic3r).

Makerdroid doesn’t need a PC to print objects out on a 3D printer, but we think the process of shuffling GCode files from a tablet to the printer with an SD card is a little archaic. It might be possible to print directly from an Android tablet over Bluetooth with the Android Bluetooth Reprap app that is currently in development. Still, we love the idea of printing objects we just created on a touch screen, as shown in the Makerdroid demo video after the break.

[Read more…]

Old radio + old phone = Android media station

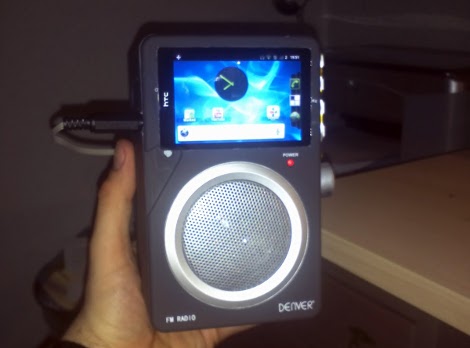
[Bjørn] combined some aging electronics he had around the house to create this Android media center. The enclosure is an FM-radio, but since he only listens to online media it wasn’t of much use to him. After sizing it up he realized it was a perfect candidate to receive his old HTC Hero Android phone.

The upper portion of the stock radio used to host controls for tuning the FM dial, adjusting volume, and switching the unit on and off. He cracked open the case, ditching the radio receiver and patching in to the amplifier. The volume knob was moved to the right side of the case, and a hole cut to receive the phone. Audio is pulled from the phone with the jack sticking out the left side. We’d love to see a future improvement using a right-angle jack (kind of like this charging hack) or patched directly into the phone’s circuit board. This way everything would fit inside the box.

Now he can listen to Internet radio, or stream some video like in the clip after the break.

[Read more…]

Monitoring and controlling your garage door from afar with an IP camera

remote-control-garage-door

Last year, [Mark Simonelli’s] wife asked him if he could design something that would allow her to remotely check if their garage door had been left open. [Mark] jumped at the chance to tinker with electronics and designed a system around an old TrendNet IP camera. When remotely connected to the camera using IP Cam Viewer Pro for his Android phone, [Mark] could watch the video stream and also trigger the garage door opener via a small relay circuit he built.

His remote opener worked well, but his camera unfortunately lacked any sort of IR vision/low light capabilities. Since his camera wasn’t very useful in the dark, he decided that he needed to add some way to trigger a light when remotely monitoring his garage. He figured the best way to do this would be to control a power strip-connected light using a circuit similar to the one he built to open the garage door itself.

He stopped by the hardware store and picked up a cheap power strip, disassembling it and removing the power toggle once he got home. He fitted it with a small 5v relay, which he connected to the camera’s terminal block. While he admits that it might not be the absolute safest solution, he can easily control both the light and the garage door with a simple swipe of his phone’s screen.

Continue reading to see his remote controlled power strip in action, and be sure to swing by his site to see more details about his camera-controlled garage door opener.

[Read more…]

Control MIDI with an Android device

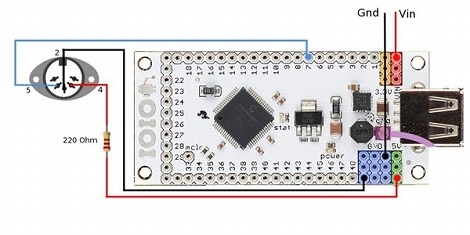
[Lewis] wanted to control MIDI devices with the huge touch screen that is his Android phone. After he couldn’t find a simple hardware implementation of MIDI out, he turned to an IOIO board to send MIDI notes to just about any imaginable musical hardware. It’s a clean build and fills a gap in the abilities of the Android platform.

Because of the woeful support of MIDI in Android, [Lewis] couldn’t find a good way to push MIDI notes from his phone to other devices. While there are a few high-overhead options like MIDI over wi-fi or a Bluetooth connection, there wasn’t much in the way of a straight-up hardware connection to other MIDI devices. [Lewis] got around this limitation by using an IOIO board and the right software to send MIDI notes though a DIN-5 connector.

Although the project works as intended, [Lewis]’ build could be made more permanent by building one of these MIDI interfaces and wiring that to the IOIO. All the Android code is up and available, along with a neat demo of [Lewis] controlling the delay time of an effects unit in his guitar rig. You can check that video out after the break.

[Read more…]

Android 3.1 devices have USB host mode. Here's how to use it.

With the coming of Android 3.1 you finally have the option of using the device as a USB host. This may be through a USB OTG (On-the-Go) adaptor, but nonetheless it’s a feature which was sorely missed until now. [Manuel] put together a guide on using Android as a USB host. As you can see, his example hardware is an Arduino board but this is applicable with just about any device.

The tutorial implements a test app for the Android device where a slider will set the brightness of the Arduino’s on-board LED. The Arduino sketch is nothing special, it just reads data received on the UART. This means that it doesn’t care if it’s connected to an Android, PC, OSX, or Linux system, it goes about its business until the RX interrupt updates the data variable.

This will greatly simplify a lot of projects we’ve seen, such as this message scrolling belt buckle. That used extra hardware to make the Arduino the host, a step that is now necessary.