Twittertape machine keeps track of your social media stock.

During the gilded age, oil magnates, entrepreneurs, and robber barons would have a ticker tape machine in their study. This machine would print stock and commodity prices and chart these men’s assets climbing higher and higher. A lot has changed in 100 years, as now [Adam] can be kept apprised of what @KimKardashian, @BarackObama and @stephenfry ate for breakfast with his Twittertape machine.

Interestingly, [Adam]’s build didn’t start off as a tarnished lump of 100-year-old brass; he built his beautiful ticker machine out of old clock movements he picked up on eBay. Even though the shiny part of the build only holds the roll of paper, it’s still a wonderful build. Right now the machine is connected to Ethernet, but he’s planning on adding WiFi and a few batteries for a completely wireless build.

Unlike the other ticker tape machine we saw this week, [Adam] did away with the loud clashing of gears and solenoids found in 100-year-old ticker machines. This ticker machine prints on cash register receipt paper and a very small thermal printer in the base. Although [Adam]’s build doesn’t sound like two robots trading blows, there’s no ink needed and no danger of the letter wheel becoming misaligned and misspelling everything.

Check out [Adam]’s build in action after the break.
[Read more…]

CRT vector graphics arcade game built from an FPGA board

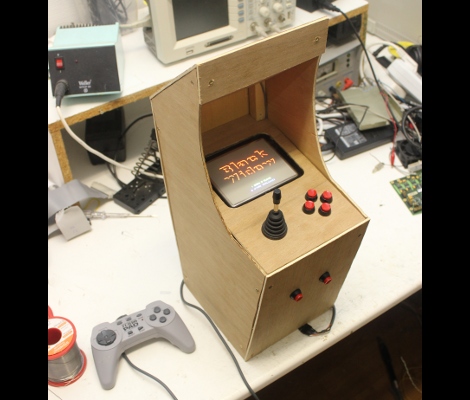
[Sprite_TM] wanted to challenge his VHDL skills, and there’s no more satisfying way of doing this than making something that will be playable when you’re done. He decided to try his hand at creating a vector-based CRT arcade. The distinction here is that vector-based games take control of the magnetic ring that guides the electron path toward the screen. This technique allows point-to-point graphic generation rather than the pixel-based scanning that CRT televisions use.

He had a small color CRT on hand and decided to grab a VHDL version of asteroids from the Internet to see if he could get it to work. But upon further inspection of the source he found that it had a chunk of code which rasterized the vectors for use with a scanning monitor. After removing that chunk, and giving it a spin he had enough confidence that he knew what he was doing to start implementing his own game. The choice of what title really came down to the hardware the original arcade cabinets used. He was not interested in implementing a soft-process for the math chips used in games like Star Wars and Tempest. In the end he got a version of Black Widow up and running, and even built a miniature cabinet for the thing. Check out some of the gameplay in the clip after the break.

[Read more…]

Bringing a 19th century stock ticker into the 21st century

[Ames]’s father has had an old stock ticker sitting on a shelf for some time. He may have become quite listless over his spring break, because he decided connect a century-old stock ticker to his laptop.

When stock tickers were in use, they were all connected to a stock ticker circuit that would broadcast stock prices as a sequence of pulses. For each of these pulses, the letter wheel would advance by one character and finally print the letter with a great ca-thunk. Because stock tickers are incredibly simple devices – just a few solenoids and a couple of gears – [Ames] knew it would be relatively easy to connect one to his laptop.

[Ames]’ tool of choice for moving electrons back and forth in a wire is an Arduino, with none handy he needed to rig up something with the tools available on hand. [Ames] took a USB FTDI serial port connected the flow control lines to his ticker. A pair of MOSFETS and a tiny Python script advances the letter wheel and prints on the paper tape, a success by any measure.

After the break, you can see [Ames]’ stock ticker going about its antique machinations for the first time in possibly a hundred years. Not bad for a something put together over spring break.

[Read more…]

Fine-pitch SMD soldering with minimal tools

We try to stick to the 0805 parts because they’re still big enough to solder by hand. But [Scott] shows us that it doesn’t take too many special tools to reflow fine-pitch components at home. In this case he’s using 0402 resistors, a footprint that we consider functionally impossible to solder using an iron.

The two parts of the equation that he spent some money on are professionally produced PCBs and a solder stencil. The stencil is laser-cut from Kapton, which is heat-resistant so it doesn’t warp during the cutting process. An acrylic frame holds the PCB in place, and he just tapes the stencil over it and uses a chunk of acrylic as a squeegee to evenly apply the solder paste. Splurging on the PCB and stencil means you’ll achieve tolerances which lead to success.

The next issue is placing the components. [Scott] shows off some vacuum tweezers he built using an aquarium pump. Watch the video after the break to see how small those 0402 parts are when he extracts one of the resistors from the tape packaging. With the board manually populated (check everything twice!) he moves the board to a completely unaltered toaster oven for reflow. We have seen a lot of projects which add controllers to these ovens, but he really makes the case that you don’t need it. Instead, he uses a thermocoupler read by a multimeter just to let him know what’s going on with the temperature. He uses a smart phone as a timer, and switches the oven on and off to match the solder’s heat profile. [Read more…]

Tuna can and some other trash turned into a Stirling engine

Next time you’re making yourself a tunafish sandwich, try to figure out how to build a Stirling engine from the leftovers (translated). If you can pull it off as well as [Killerlot] did we’d say you’ve earned your hacker badge.

The can used in this project was actually sardines in tomato sauce, but the former contents are moot. The can serves as a steam chamber for the sterling engine. A cam rod, piston, and valve are all fashioned from paperclips, along with the support structure that holds them in place. Inside the can is a damp sponge. When an alcohol lamp is placed beneath the can it heats the water air inside, which creates pressure on the piston, pushing it up until the cam opens the valve, relieving pressure just in time for the cycle to start over again. Momentum is a necessary part of the mechanism and that’s where the CD fly-wheel comes in. See it chugging along in the clip after the break.

Update: Corrected spelling thanks to [Chris Muncy] and removed references to water/steam thanks to this comment from [Khordas].

[Read more…]

Going old school with an 8051

A while back, [Matt] bought a few 8051 MCUs and tucked them away for a future project. He just found these fabulous little chips in a component drawer and decided it was time to figure these guys out. Eventually, [Matt] stumbled across this awesome resource for 8051 programming.

The 8051 featured a still reasonably respectable 4k of ROM and 128 bytes of RAM – not too dissimilar from an ATtiny of today until you realize this 30-year-old chip has 32 IO pins. This microcontroller, along with its bigger brother the 8052, served as the de facto microcontroller standard for 20 years. You’ve no doubt taken a ride in a car that used one, and was even put to use doing low-level grunt work in early PCs.

[Matt] says he couldn’t find a Hackaday project featuring this 30-year-old microcontroller (not true, here’s one of those tilty mazes and an electronic toll booth), but even we have to admit we don’t feature much outside of the usual AVRs and PICs. Even though it’s 32 years old, the 8051 family still has some tricks up its sleeve like playing audio CDs. If you’ve got an 8051 project lying around, send it in on the tip line and we’ll probably throw it up.